Lab 8 - Distributed Cloud Firewall#
1. SCENARIO#
ACE’s environment has been split up in two SmartGroups: BU1 and BU2. Under the hood, there is a flat routing domain, due to the connection policy that merged the two network domains.
Furthermore, four DCF rules have been already applied so far.

Fig. 153 Existing DCF rules#
The BU1 Frontend has raised a complaint that is not able to use the SSH protocol within BU1.
The BU1 Frontend has raised a complaint that is not able to use the ICMP protocol within BU1.
The BU1 Frontend has raised a complaint that is not able to use the ICMP protocol towards BU2.
The BU2 Mobile App has raised a complaint that is not able to use the SSH protocol towards BU1.
You have been engaged to create the following four new additional rules:
Intra-rule: allow SSH within BU1
Intra-rule: allow ICMP within BU1
Inter-rule: allow ICMP from BU1 to BU2
Inter-rule: allow SSH from BU2 to BU1
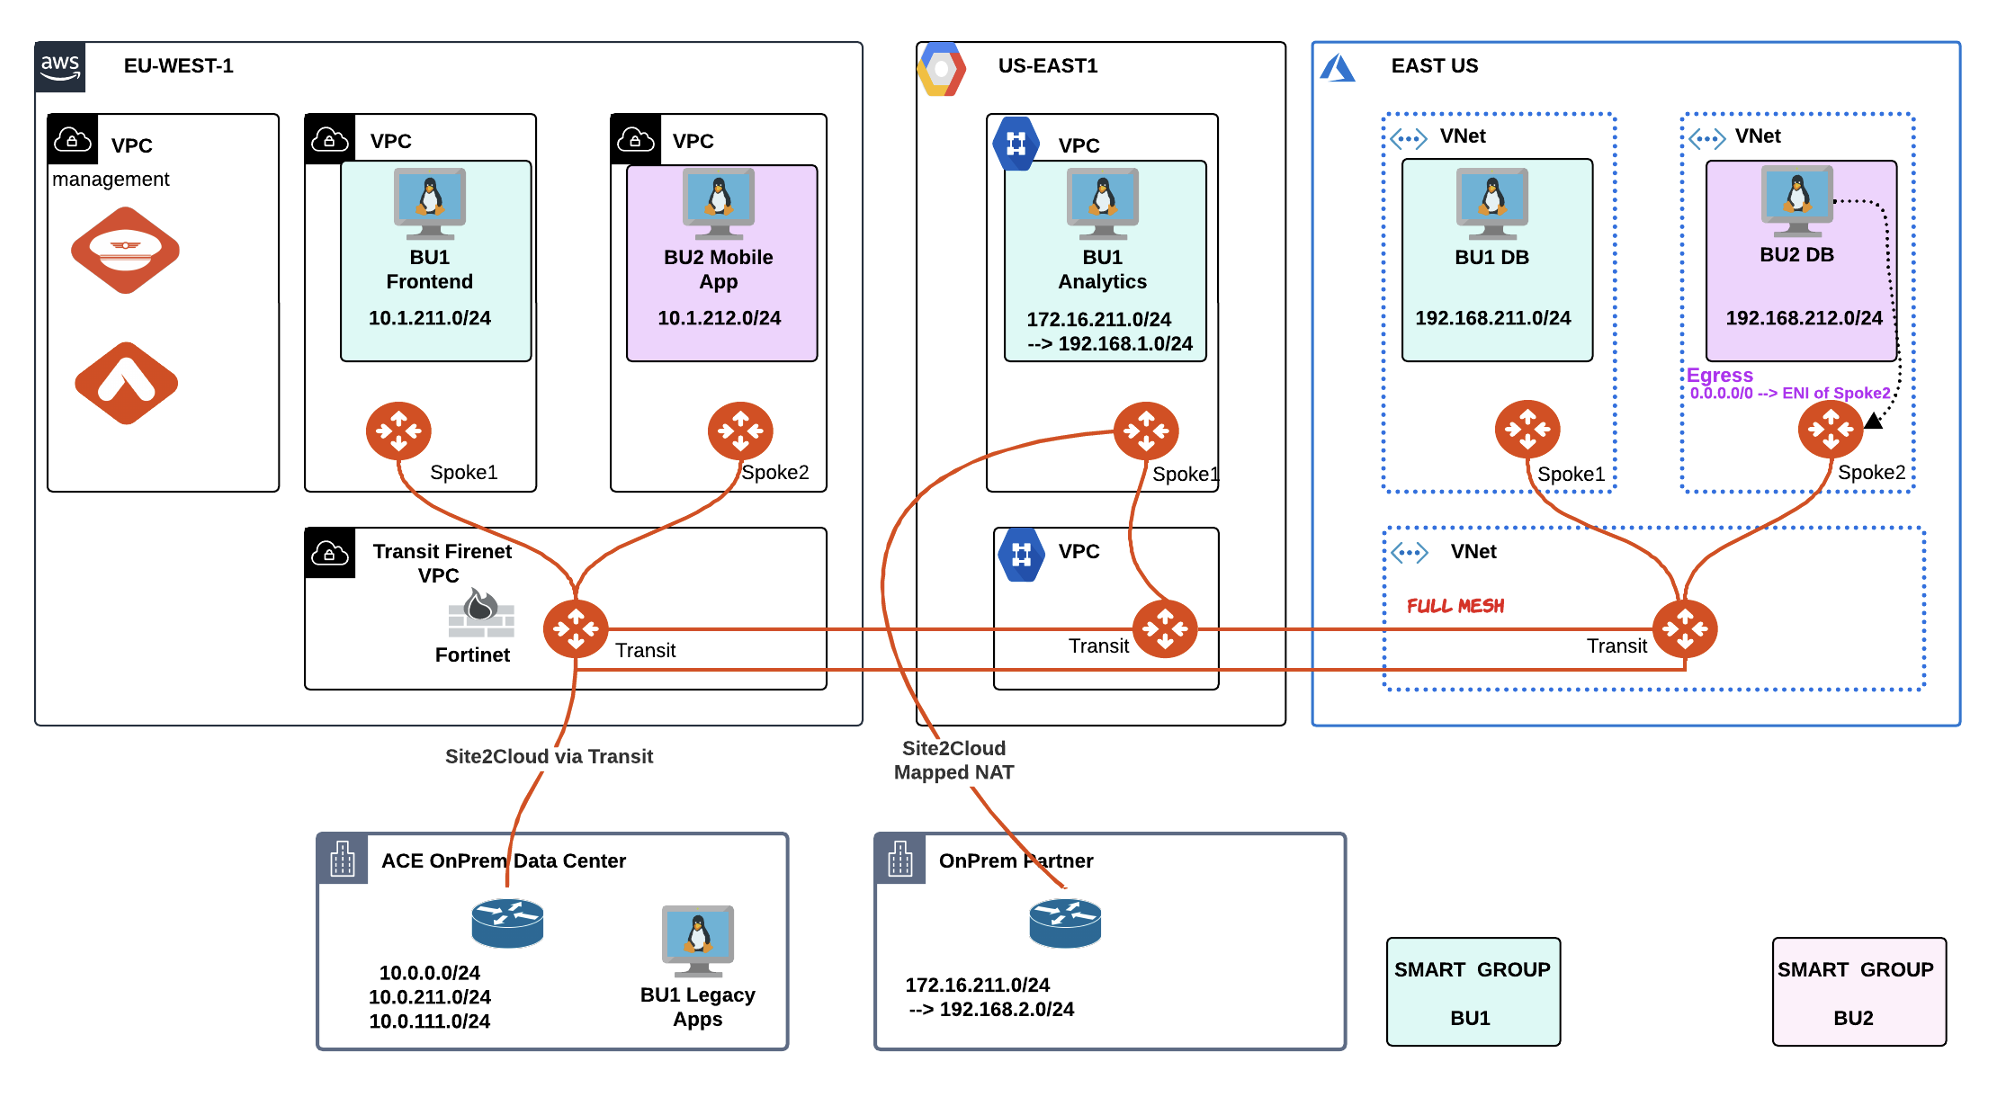
Fig. 154 Initial lab 8 Scenario Topology#
2. CHANGE REQUEST#
SSH on the BU1 Frontend and try to SSH to any other instances in BU1.
SSH fails as expected.

Fig. 155 SSH fails within BU1#
Create an intra-rule that allows SSH within BU1 and then verify that SSH is permitted among BU1’s instances. Do not forget to enable “Logging”, for auditing purposes.
Tip
Go to CoPilot > Security > Distributed Cloud Firewall and click on +Rule.
Ensure these parameters are entered in the pop-up window "Create Rule":
Name: intra-ssh-bu1
Source Smartgroups: BU1
Destination Smartgroups: BU1
Protocol: TCP
Port: 22
Logging: On
Action: Permit
Do not forget to click on Save In Drafts, and then Commit your rule.

Fig. 156 Another intra-rule#
Retry to SSH to the BU1 Analytics from the BU1 Frontend; this time the operation will be accomplished!

Fig. 157 SSH is ok within BU1#
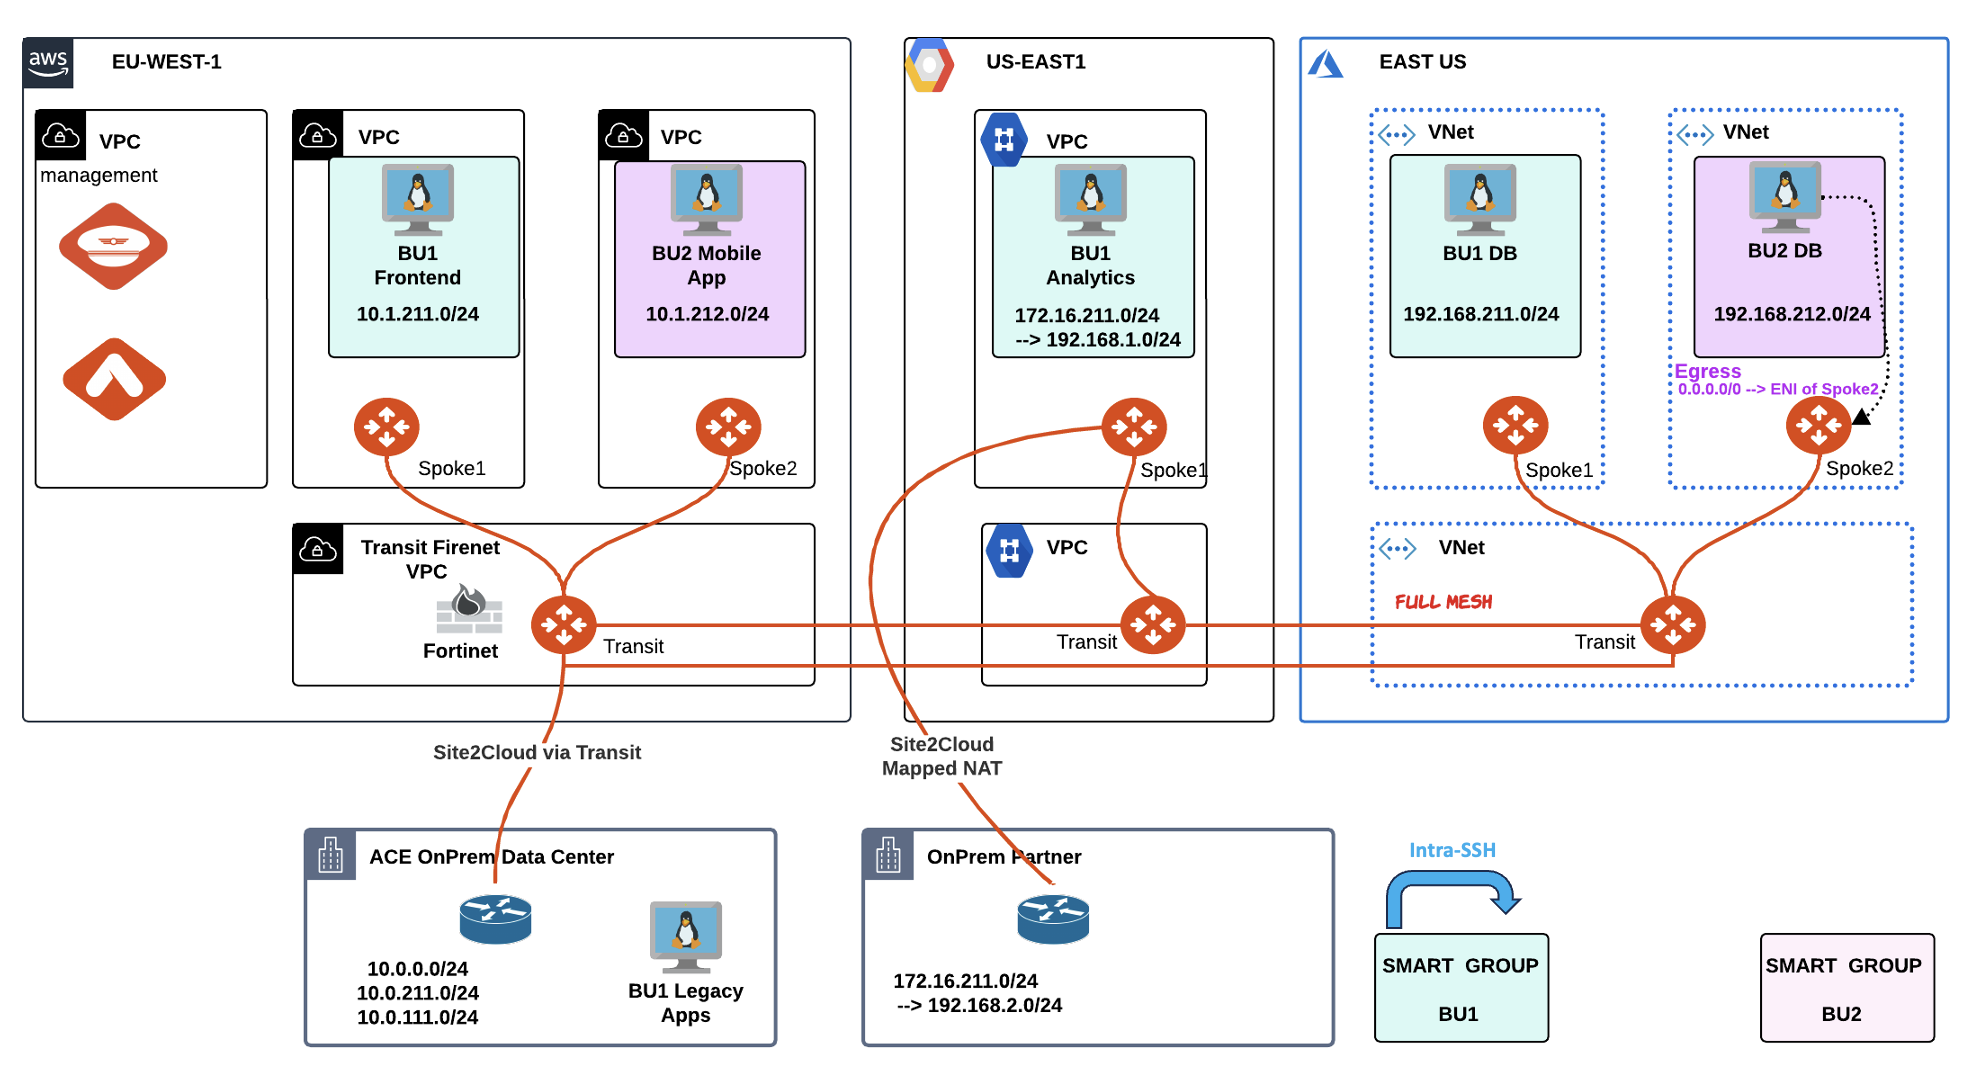
Fig. 158 Intra-SSH BU1#
Check the Logs generated after the action carried out before.
Tip
Go to CoPilot > Security > Distributed Cloud Firewall > Monitor

Fig. 159 Monitor: Logs#
Now terminate the SSH session with the BU1 Analytics, typing
"exit", and issue the ping command towards the BU1 Analytics from the BU1 Frontend. The ping will not work!

Fig. 160 Ping will fail#
Check again the Logs from the
Monitorsection. The ICMP attempt hit the Explicit-Deny-Rule, whereby the action was denied!

Fig. 161 Monitor: Denied ICMP#
Create another intra-rule that allows ICMP within BU1 and then verify that ICMP is permitted among BU1’s instances. Do not forget to enable “Logging”, for auditing purposes.
Tip
Go to CoPilot > Security > Distributed Cloud Firewall and click on +Rule.
Ensure these parameters are entered in the pop-up window "Create Rule":
Name: intra-icmp-bu1
Source Smartgroups: BU1
Destination Smartgroups: BU1
Protocol: ICMP
Logging: On
Action: Permit
Do not forget to click on Save In Drafts, and then Commit your rule.
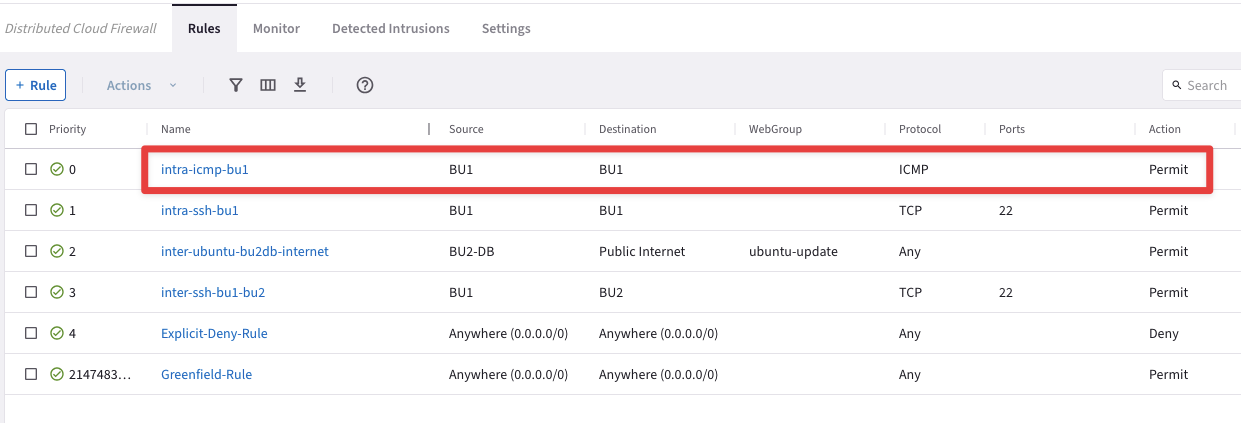
Fig. 162 New intra-rule#
The ping will work this time thanks to this new fresh intra-rule!

Fig. 163 Ping will be ok!#
Once again, inspect the Monitor section to see immediately the corresponding logs of the action carried out before.

Fig. 164 Monitor: successful logs#
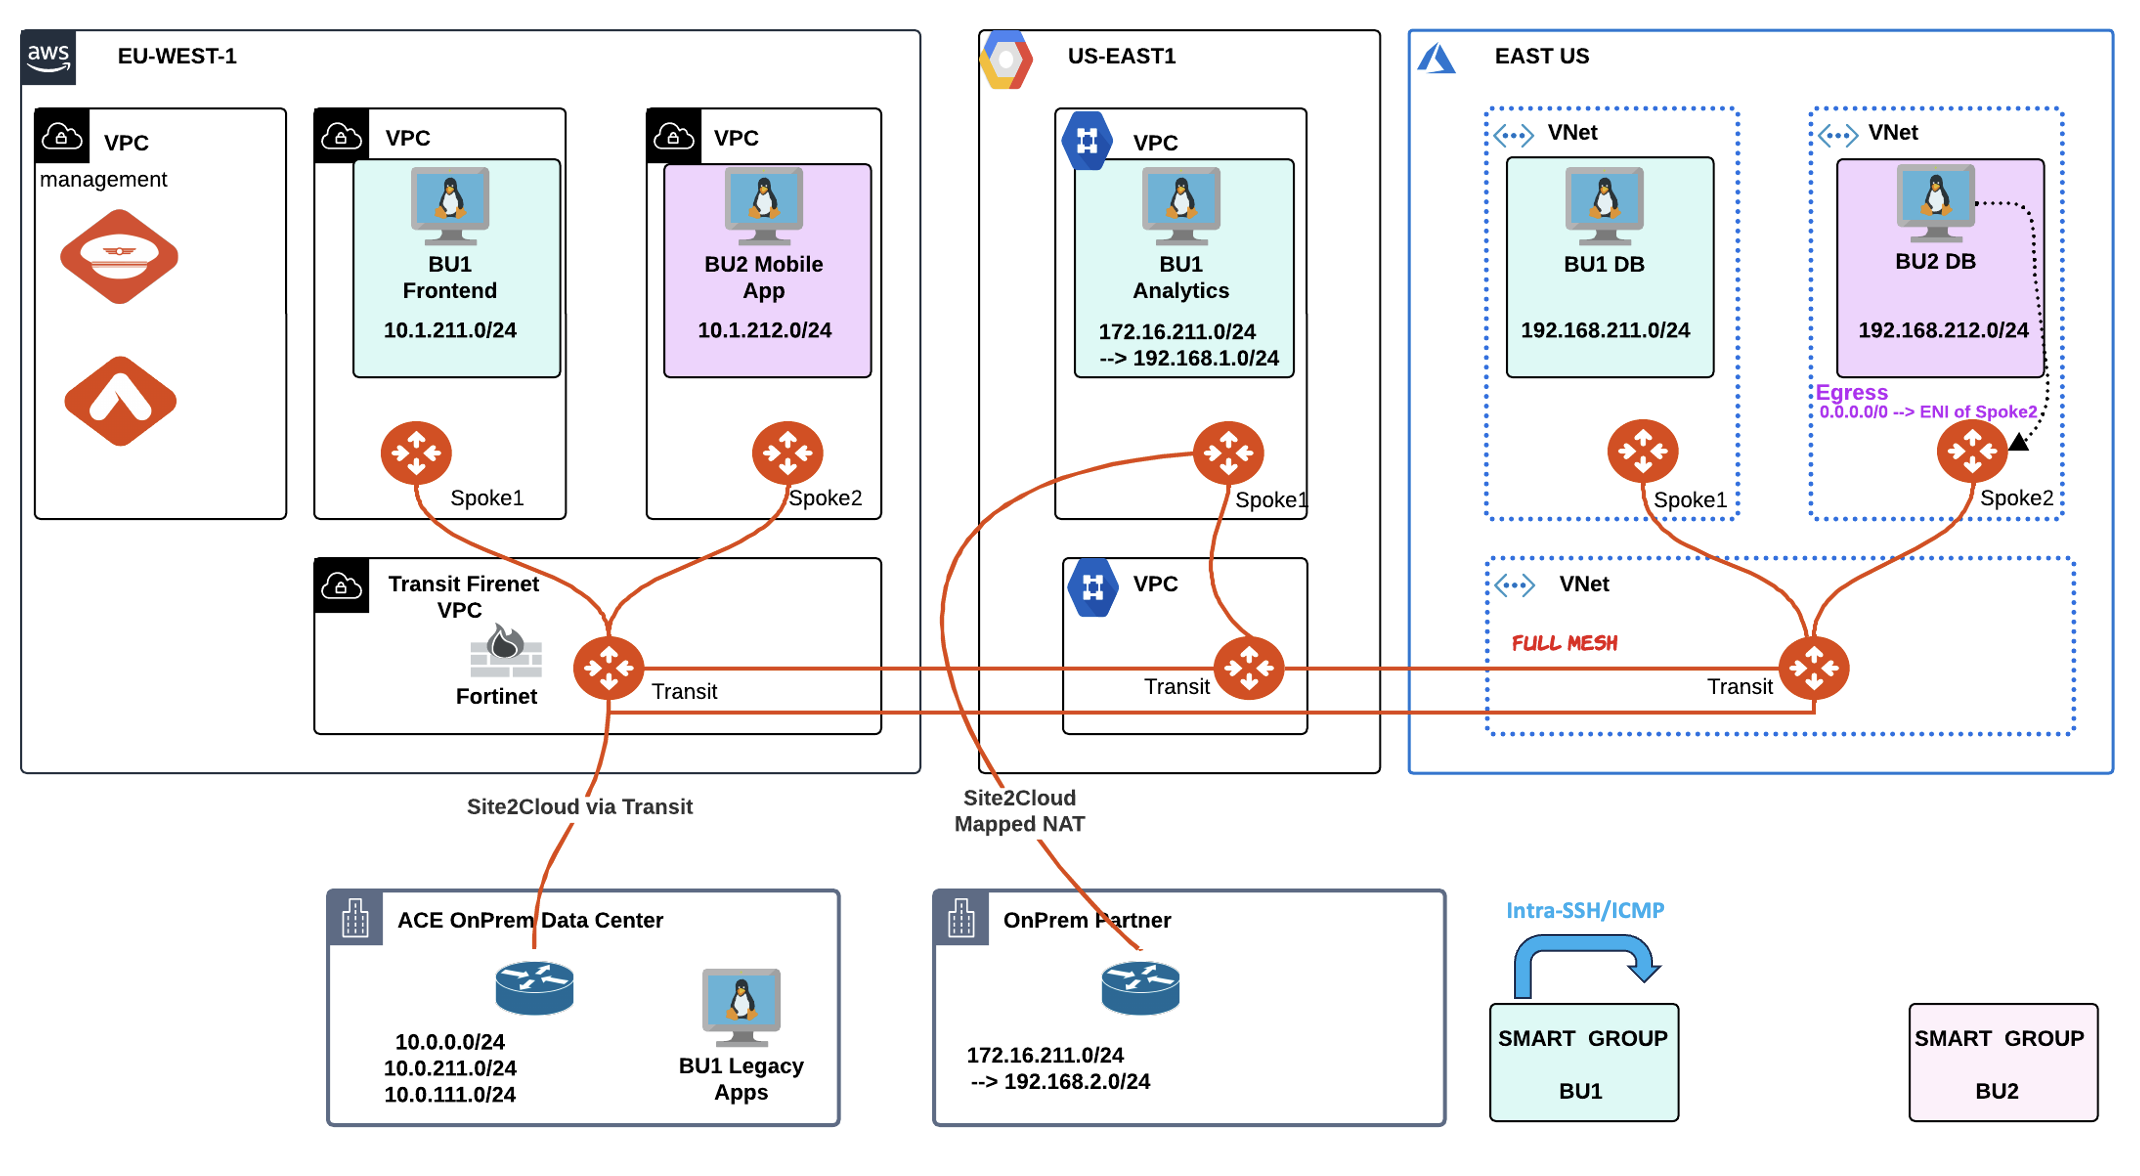
Fig. 165 Intra-SSH-ICMP BU1#
Let’s try to ping the BU2 Mobile App from the BU1 Frontend. The ping will fail due to the absence of an inter-rule.

Fig. 166 Ping will fail#
This time create an inter-rule that allows ICMP from BU1 towards BU2. Do not forget to enable “Logging”, for auditing purposes.
Tip
Go to CoPilot > Security > Distributed Cloud Firewall and click on +Rule.
Ensure these parameters are entered in the pop-up window "Create Rule":
Name: inter-icmp-bu1-bu2
Source Smartgroups: BU1
Destination Smartgroups: BU2
Protocol: ICMP
Logging: On
Action: Permit
Do not forget to click on Save In Drafts, and then Commit your rule.
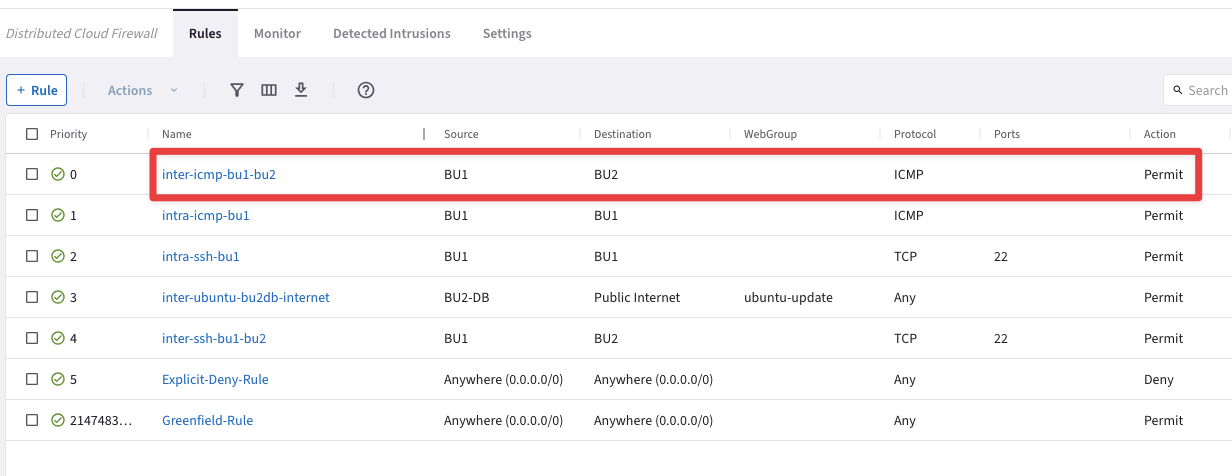
Fig. 167 DCF Rules List#
Retry to ping the BU2 Mobile App from the BU1 Frontend. The ping will be successful thanks to the inter-rule!

Fig. 168 Ping from BU1 to BU2#
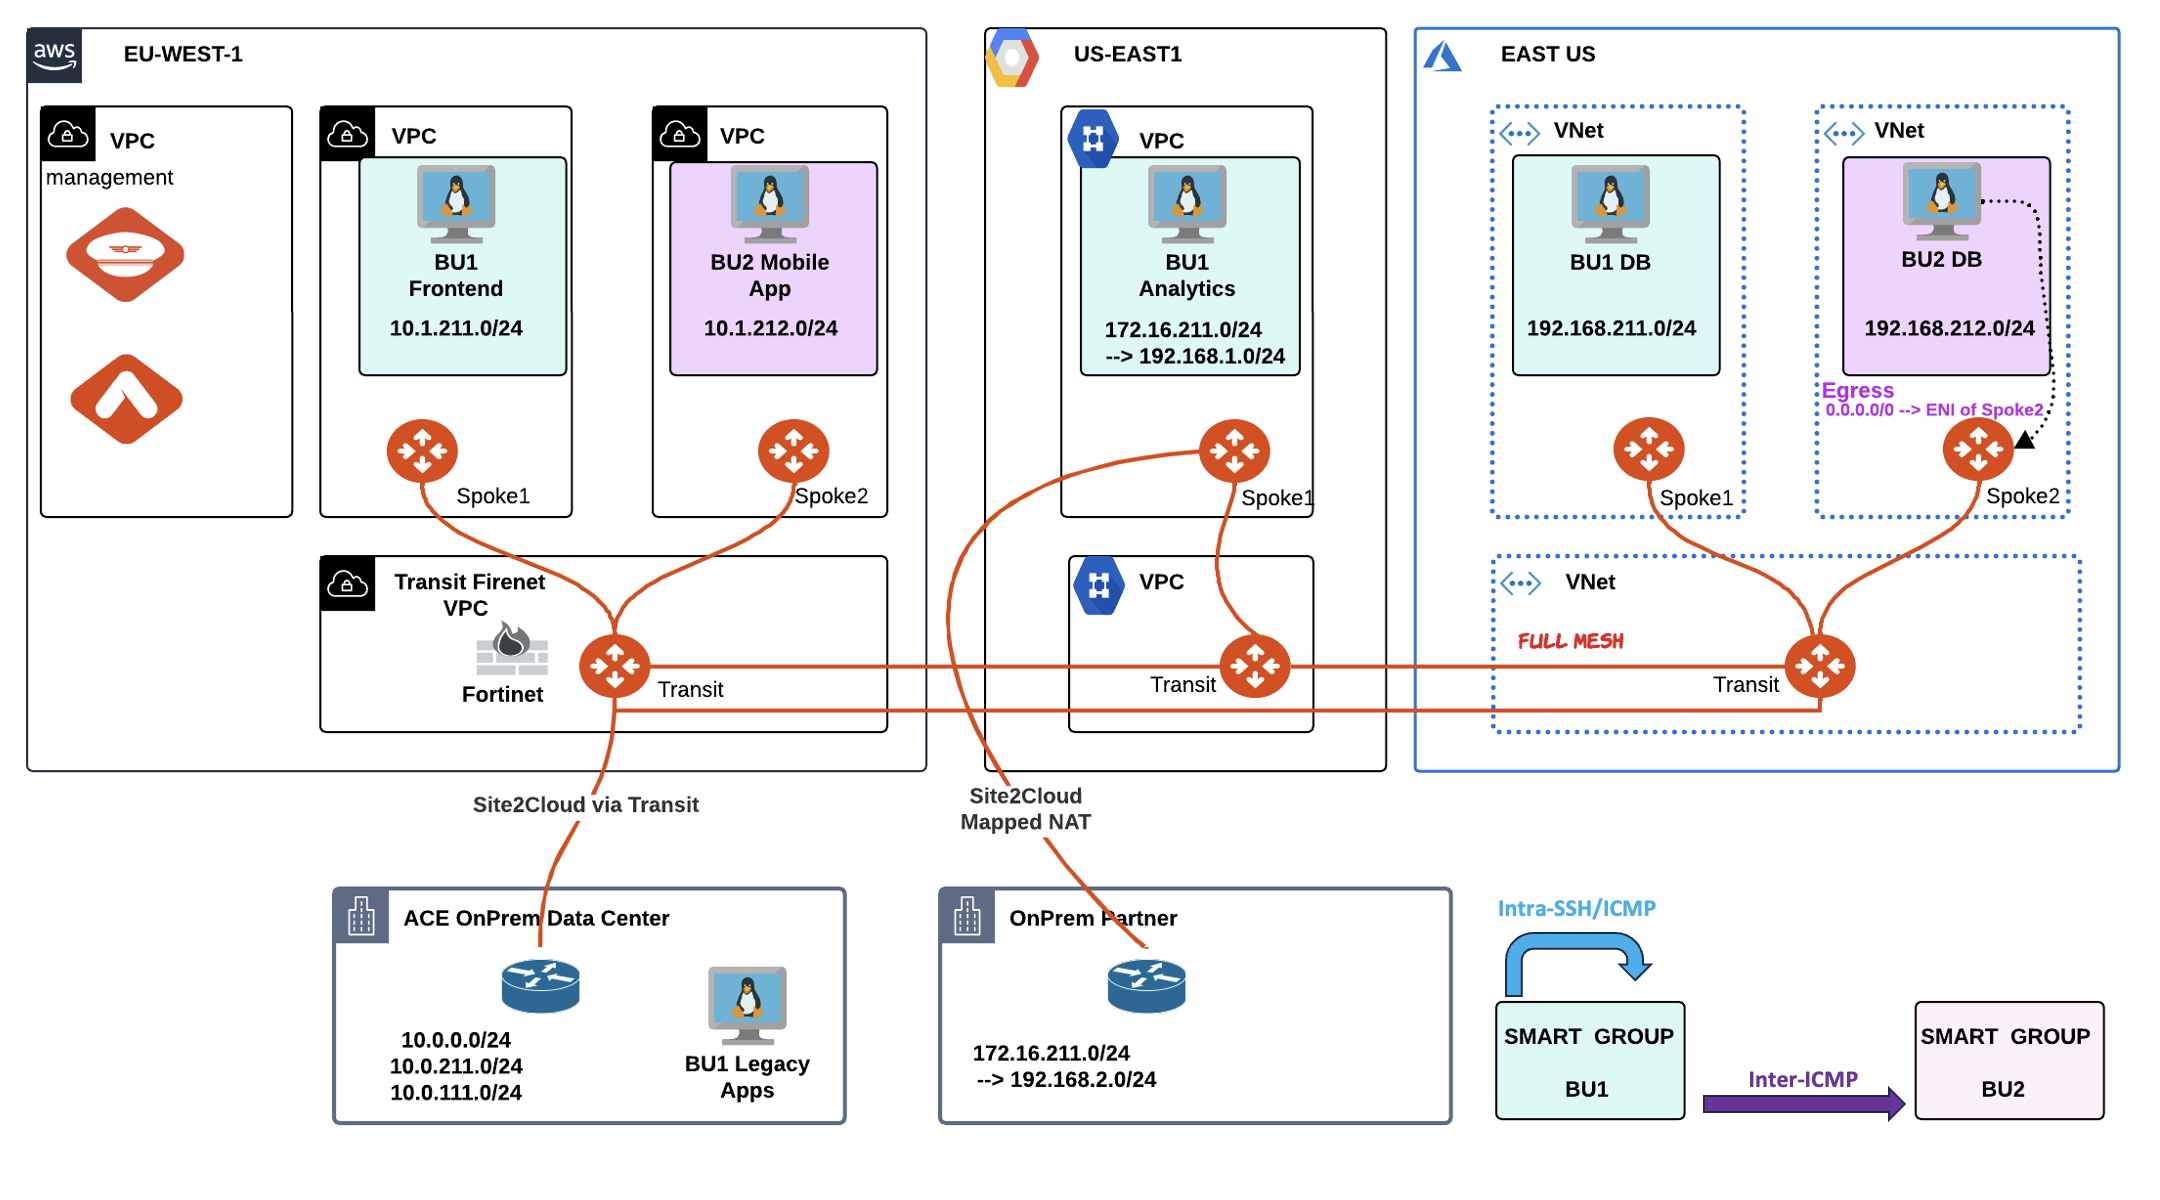
Fig. 169 Inter-ICMP BU1 to BU2#
Now, let’s SSH to the Public IP of the BU2 Mobile App and then try to SSH to the Private IP of the BU1 Frontend. Of course, SSH will fail!

Fig. 170 SSH from BU2 to BU1 will fail#
Create another inter-rule that allows SSH from BU2 towards BU1. Do not forget to enable “Logging”, for auditing purposes.
Tip
Go to CoPilot > Security > Distributed Cloud Firewall and click on +Rule.
Ensure these parameters are entered in the pop-up window "Create Rule":
Name: inter-ssh-bu2-bu1
Source Smartgroups: BU2
Destination Smartgroups: BU1
Protocol: TCP
Port: 22
Logging: On
Action: Permit
Do not forget to click on Save In Drafts, and then Commit your rule.
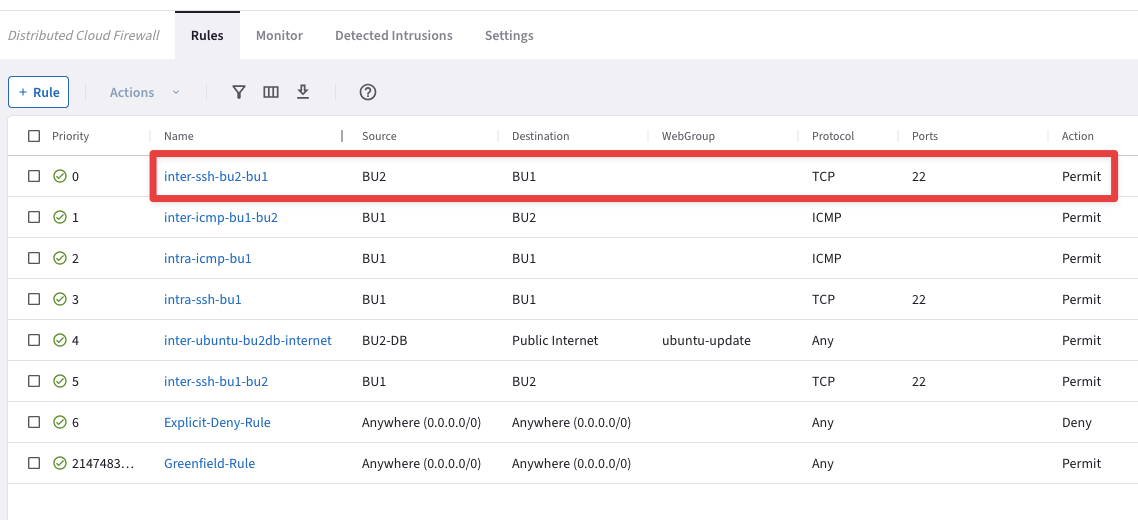
Fig. 171 “inter-ssh-bu2-bu1” Rule#
Let’s try to issue the SSH command from the BU2 Mobile App towards the BU1 Frontend. This time the SSH will work smoothly.

Fig. 172 SSH works from BU2 to BU1#
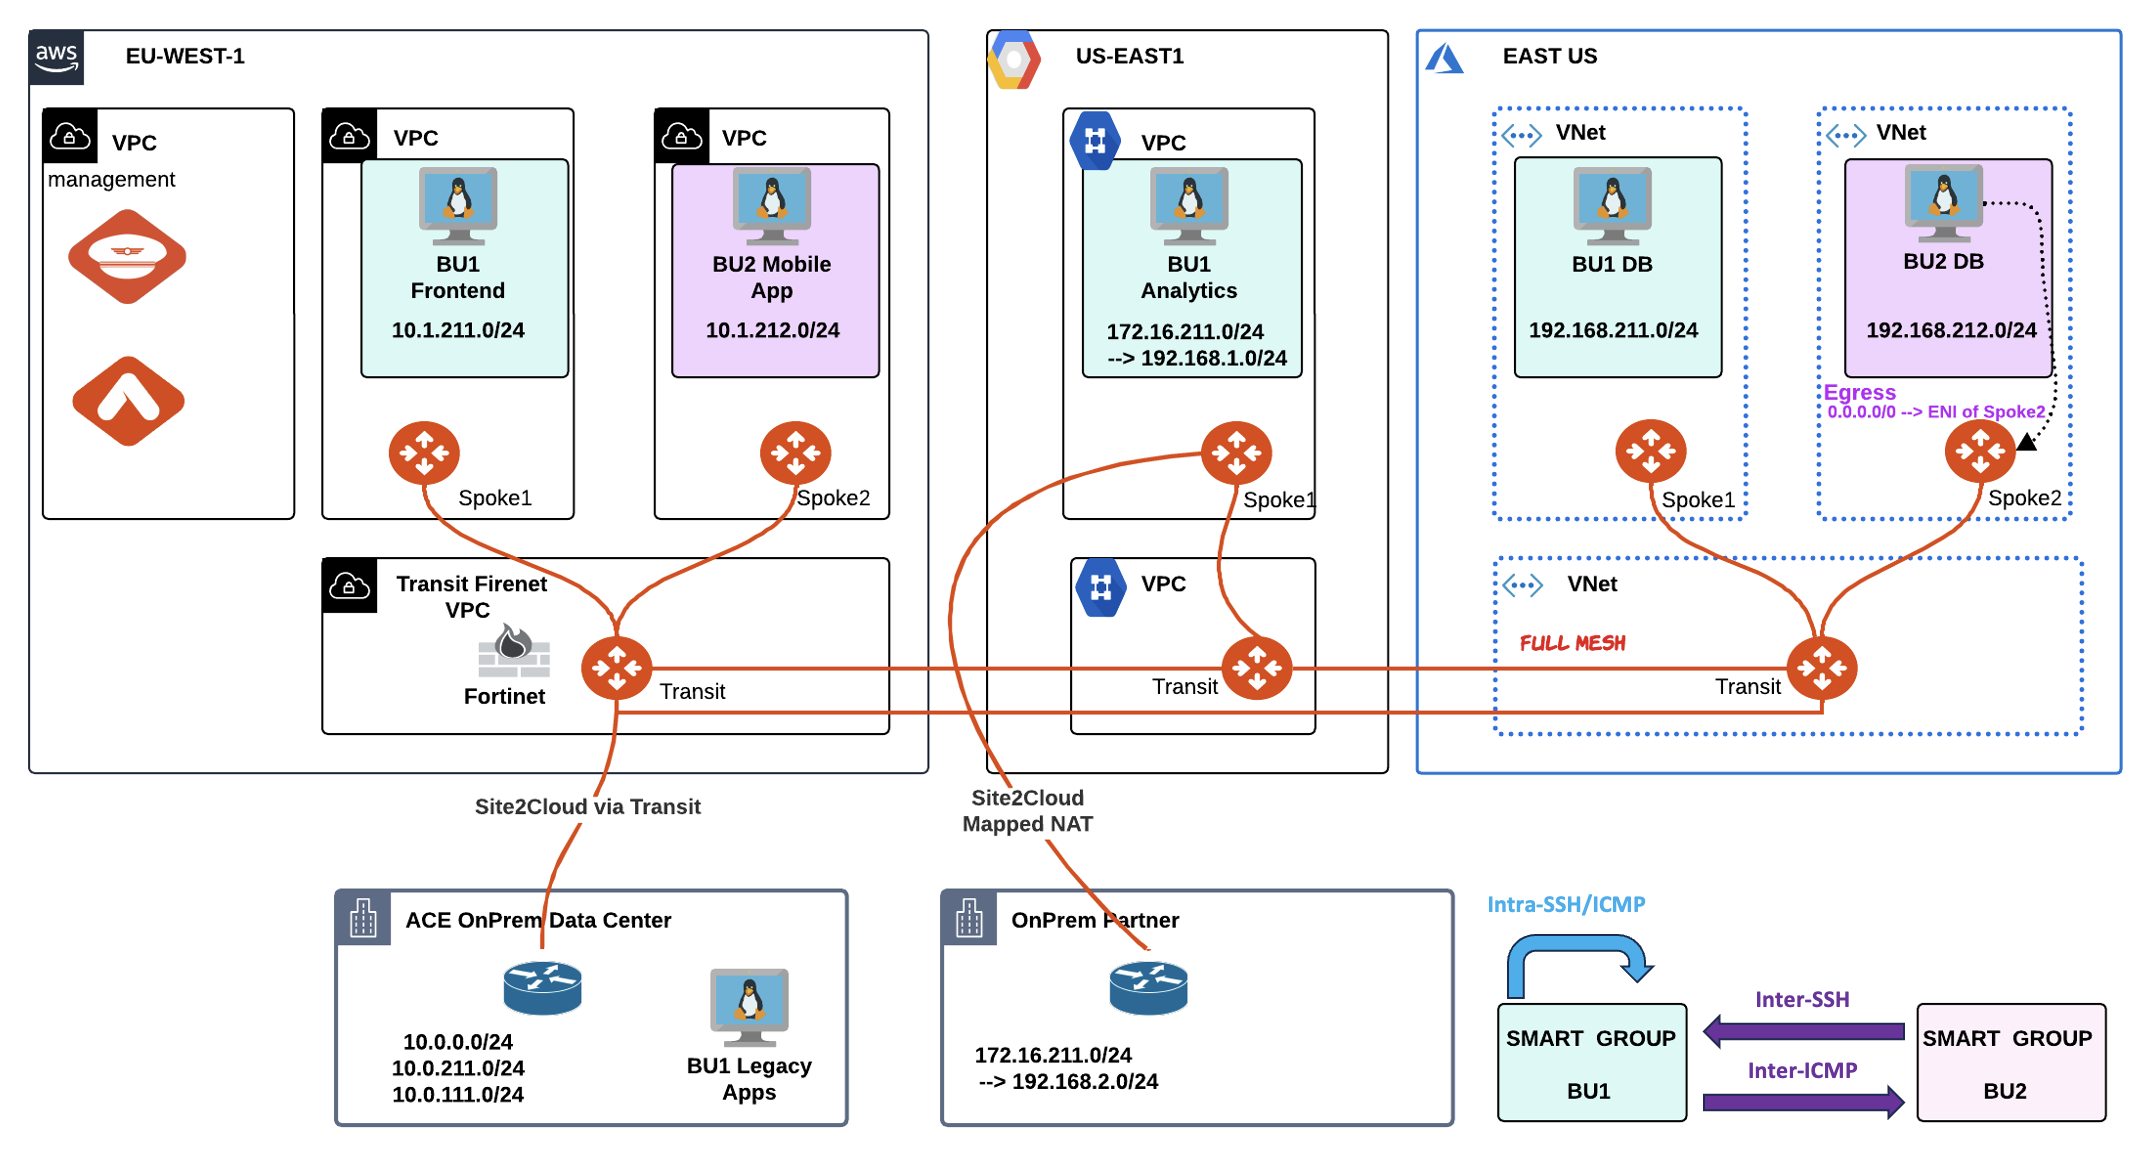
Fig. 173 Inter-SSH BU2 to BU1#
3. CHANGE REQUEST#
Now before completing the lab, remove the
Inspection Policyfrom the Transit GW in AWS. The Aviatrix Distributed Cloud Firewall has been enabled across the whole multicloud infrastructure, therefore we can get rid of the bolted Firewall in AWS.
Tip
Go to CoPilot > Security > FireNet > FireNet Gateways and click on the ace-aws-eu-west-1-transit1 GW, then click on Policy, select the two Spoke VPCs in AWS and choose the Remove action.
Traffic will be not be sent towards the FW anymore. Th DCF will perform the firewalling very close to the source!
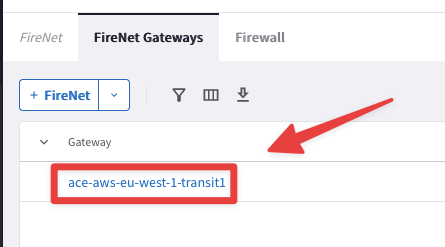
Fig. 174 FireNet cfg#
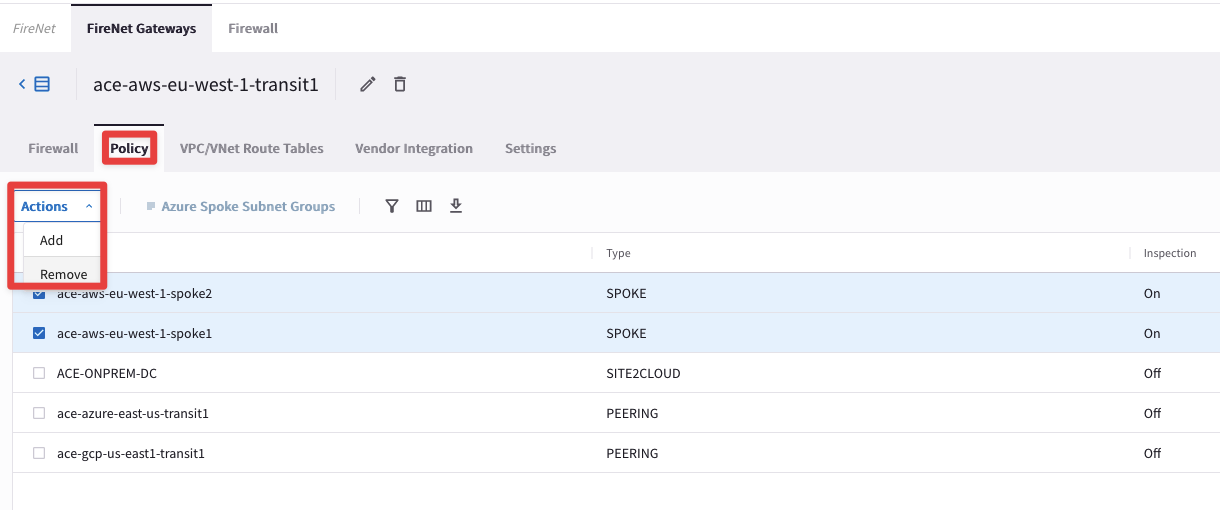
Fig. 175 Remove the inspection Policy#
Congratulations, you have completed all labs and created a nice set of DCF rules across your Multicloud infrastructure!
