Lab 7 - SITE2CLOUD#
1. General Objectives#
The objective of this lab is to resolve an IP address overlap between an on-premises partner and the cloud. You will be using the Site2Cloud Mapped NAT feature to achieve this.
2. Site2Cloud Overview#
Let’s start with the deployment of the S2C.
Site2Cloud builds an encrypted connection between two sites over the Internet in an easy-to-use and template-driven manner. Its workflow is similar to any CSP’s virtual private network workflow.
On one end of the tunnel is an Aviatrix Gateway; on the other could be an on-premises router, firewall or another public cloud VPC/VNet that Aviatrix Controller does not manage.
3. Topology#
In this lab, you will first achieve Site2Cloud connectivity to a StrongSwan Router, emulating an on-premises branch router.
In this lab, you will work with a typical overlapping IP addresses scenario depicted in the drawing below:
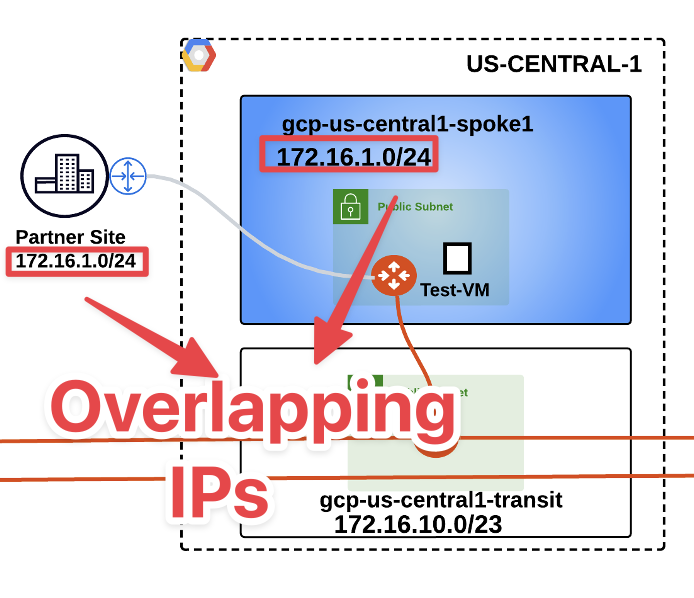
Fig. 227 Lab 8 Initial Topology#
4. Configuration#
4.1. Site2Cloud Connection (Cloud to On-Prem)#
Go to CoPilot > Networking > Connectivity > External Connection (S2C). Here you will immediately notice the presence of an existing S2C connection.
This is the connection established between an Aviatrix Edge device deployed in the remote DC in New York and a LAN Router.

Fig. 228 Existing S2C connection#
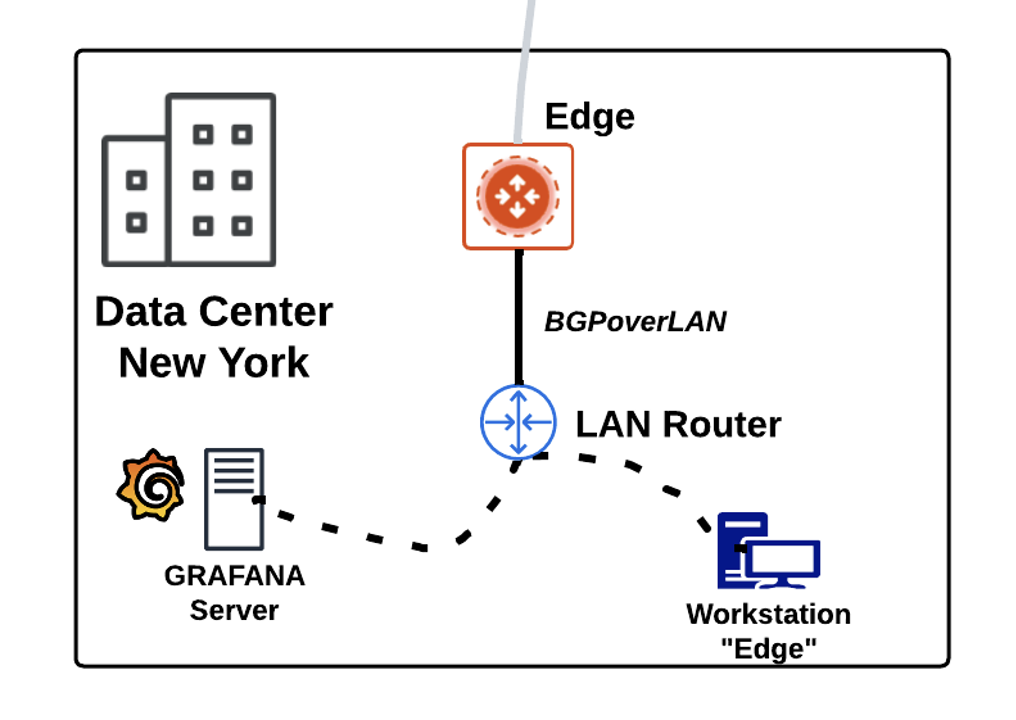
Fig. 229 BGPoverLAN#
The S2C connection with Edge will be configured on the subsequent task.
Now let’s configure the S2C connection with the Partner site!
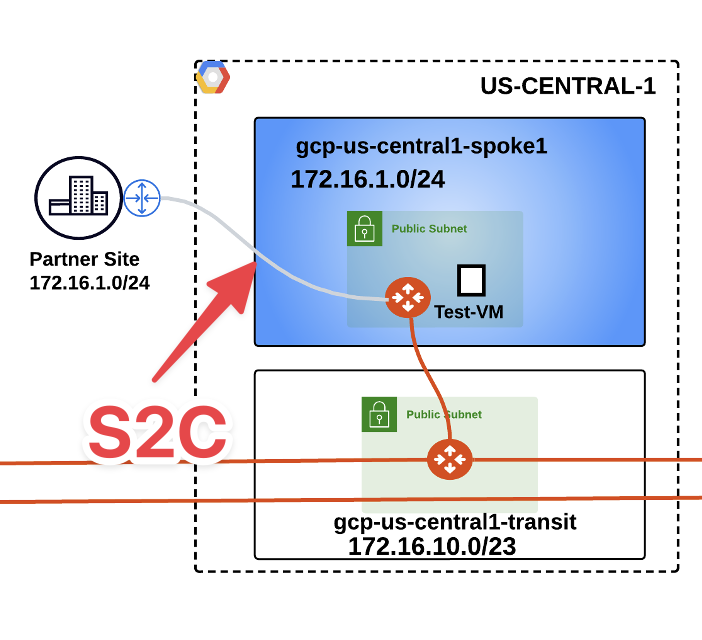
Fig. 230 S2C between Partner and GCP#
Click on the "+ External Connection" button and let’s create a new connection from scratch:
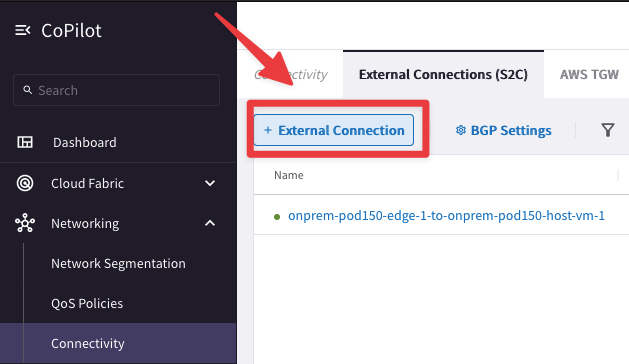
Fig. 231 S2C creation#
Create a connection from Cloud (GCP) to an on-prem Partner site, using the following settings on the "Add External Connection" window:
Name: GCP-to-OnPremPartner
External Device: Static Route-Based (Mapped)
Local Gateway: gcp-us-central1-spoke1
Real Local Subnet CIDR(s): 172.16.1.0/24
Virtual Local Subnet CIDR(s): 192.168.200.0/24
Remote Gateway Type: Generic
Real Remote Subnet CIDR(s): 172.16.1.0/24
Virtual Remote Subnet CIDR(s): 192.168.100.0/24
Authetication Method: PSK
Pre-Shared Key: [Refer to your Pod assignment for the StrongSwan PSK - Lab8 section]
IKEv2: ON
Remote Gateway IP: [Refer to your Pod assignment for the StrongSwan Public IP - Lab8 section - You will need to use the dig/host/nslookup command]
Local Gateway Instance: gcp-us-central1-spoke1
Then click on Save.

Fig. 232 DNS Name of the StrongSwan router#
Note
Use the command “host strongswan.pod#.aviatrixlab.com” from your personal laptop terminal to resolve the symbolic public name of the on-prem-partner1 StrongSwan router and retrieve the REMOTE GATEWAY PUBLIC IP address, as depicted in the example below.
Replace the # symbol with your POD number!
The example is referring to POD #100 (please issue the command based on your POD number).

Fig. 233 Dig command in action#
Tip
For Windows OS you can use the command "nslookup":
nslookup strongswan.pod#.aviatrixlab.com

Fig. 234 Nslookup#
This is how your template would look like.
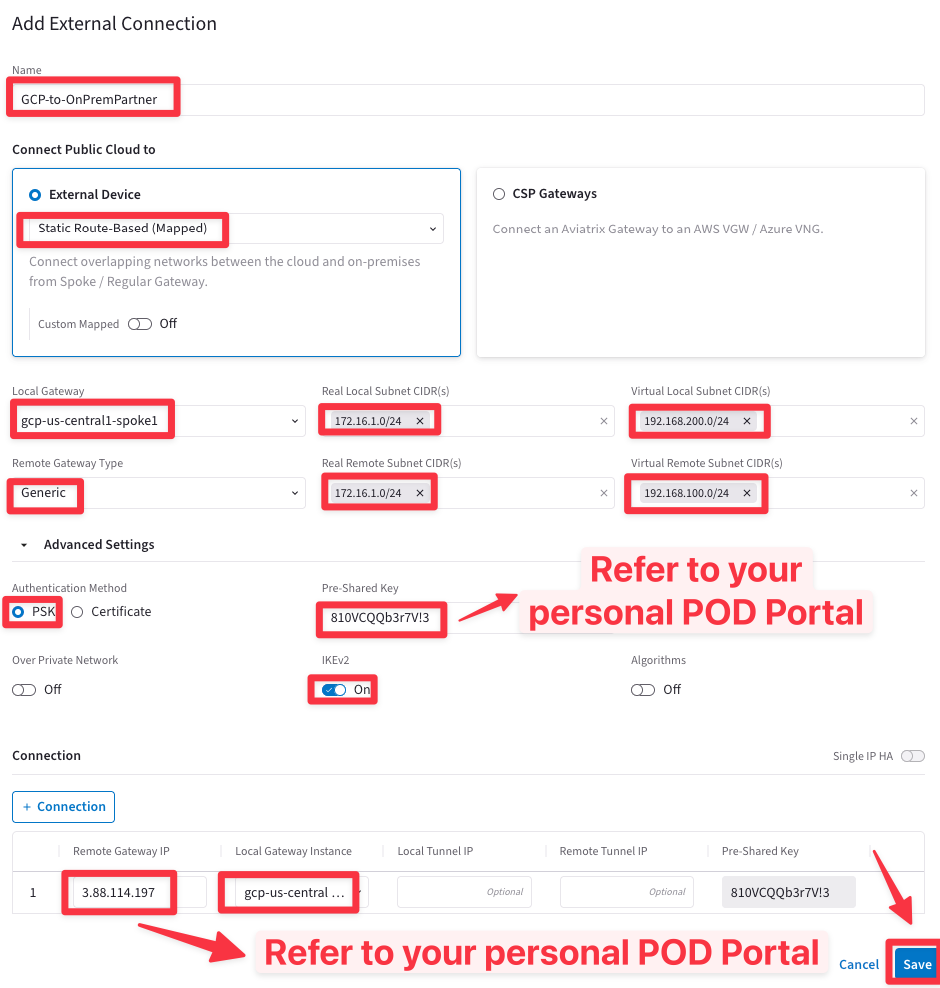
Fig. 235 S2C template#
Caution
The configuration template will grey out after clicking on Save.
Be patient and wait for the Aviatrix Controller to complete the deployment. This will create the first side of the connection, on the GCP Spoke GW.
The StrongSwan router was already preconfigured at the launch of each POD!
Since On-Prem-Partner1 uses the overlapping IP space, we will utilise the Aviatrix Mapped NAT feature and use two virtual subnets.
192.168.100.0/24 will be used for the cloud to reach on-prem resources, and 1:1 NAT will be used.
192.168.200.0/24 will be used from on-prem to reach cloud resources.
For example, gcp-us-central1-test1 (172.16.1.100) will be reached at 192.168.200.100 due to 1:1 NAT.
4.2 Site2Cloud Connection - StrongSwan’s configuration#
Now you have to complete the IPSec configuration of the StrongSwan router.
SSH to the StrongSwan router. You can either use the public IP address that you retrieved before using the dig/nslookup command or you can use its dns name available on your personal POD portal.
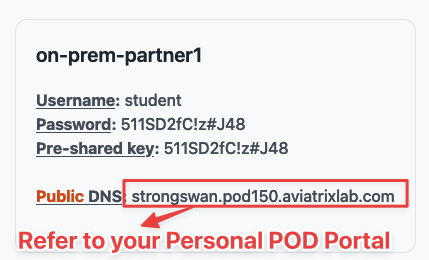
Fig. 236 StrongSwan’s DNS name#
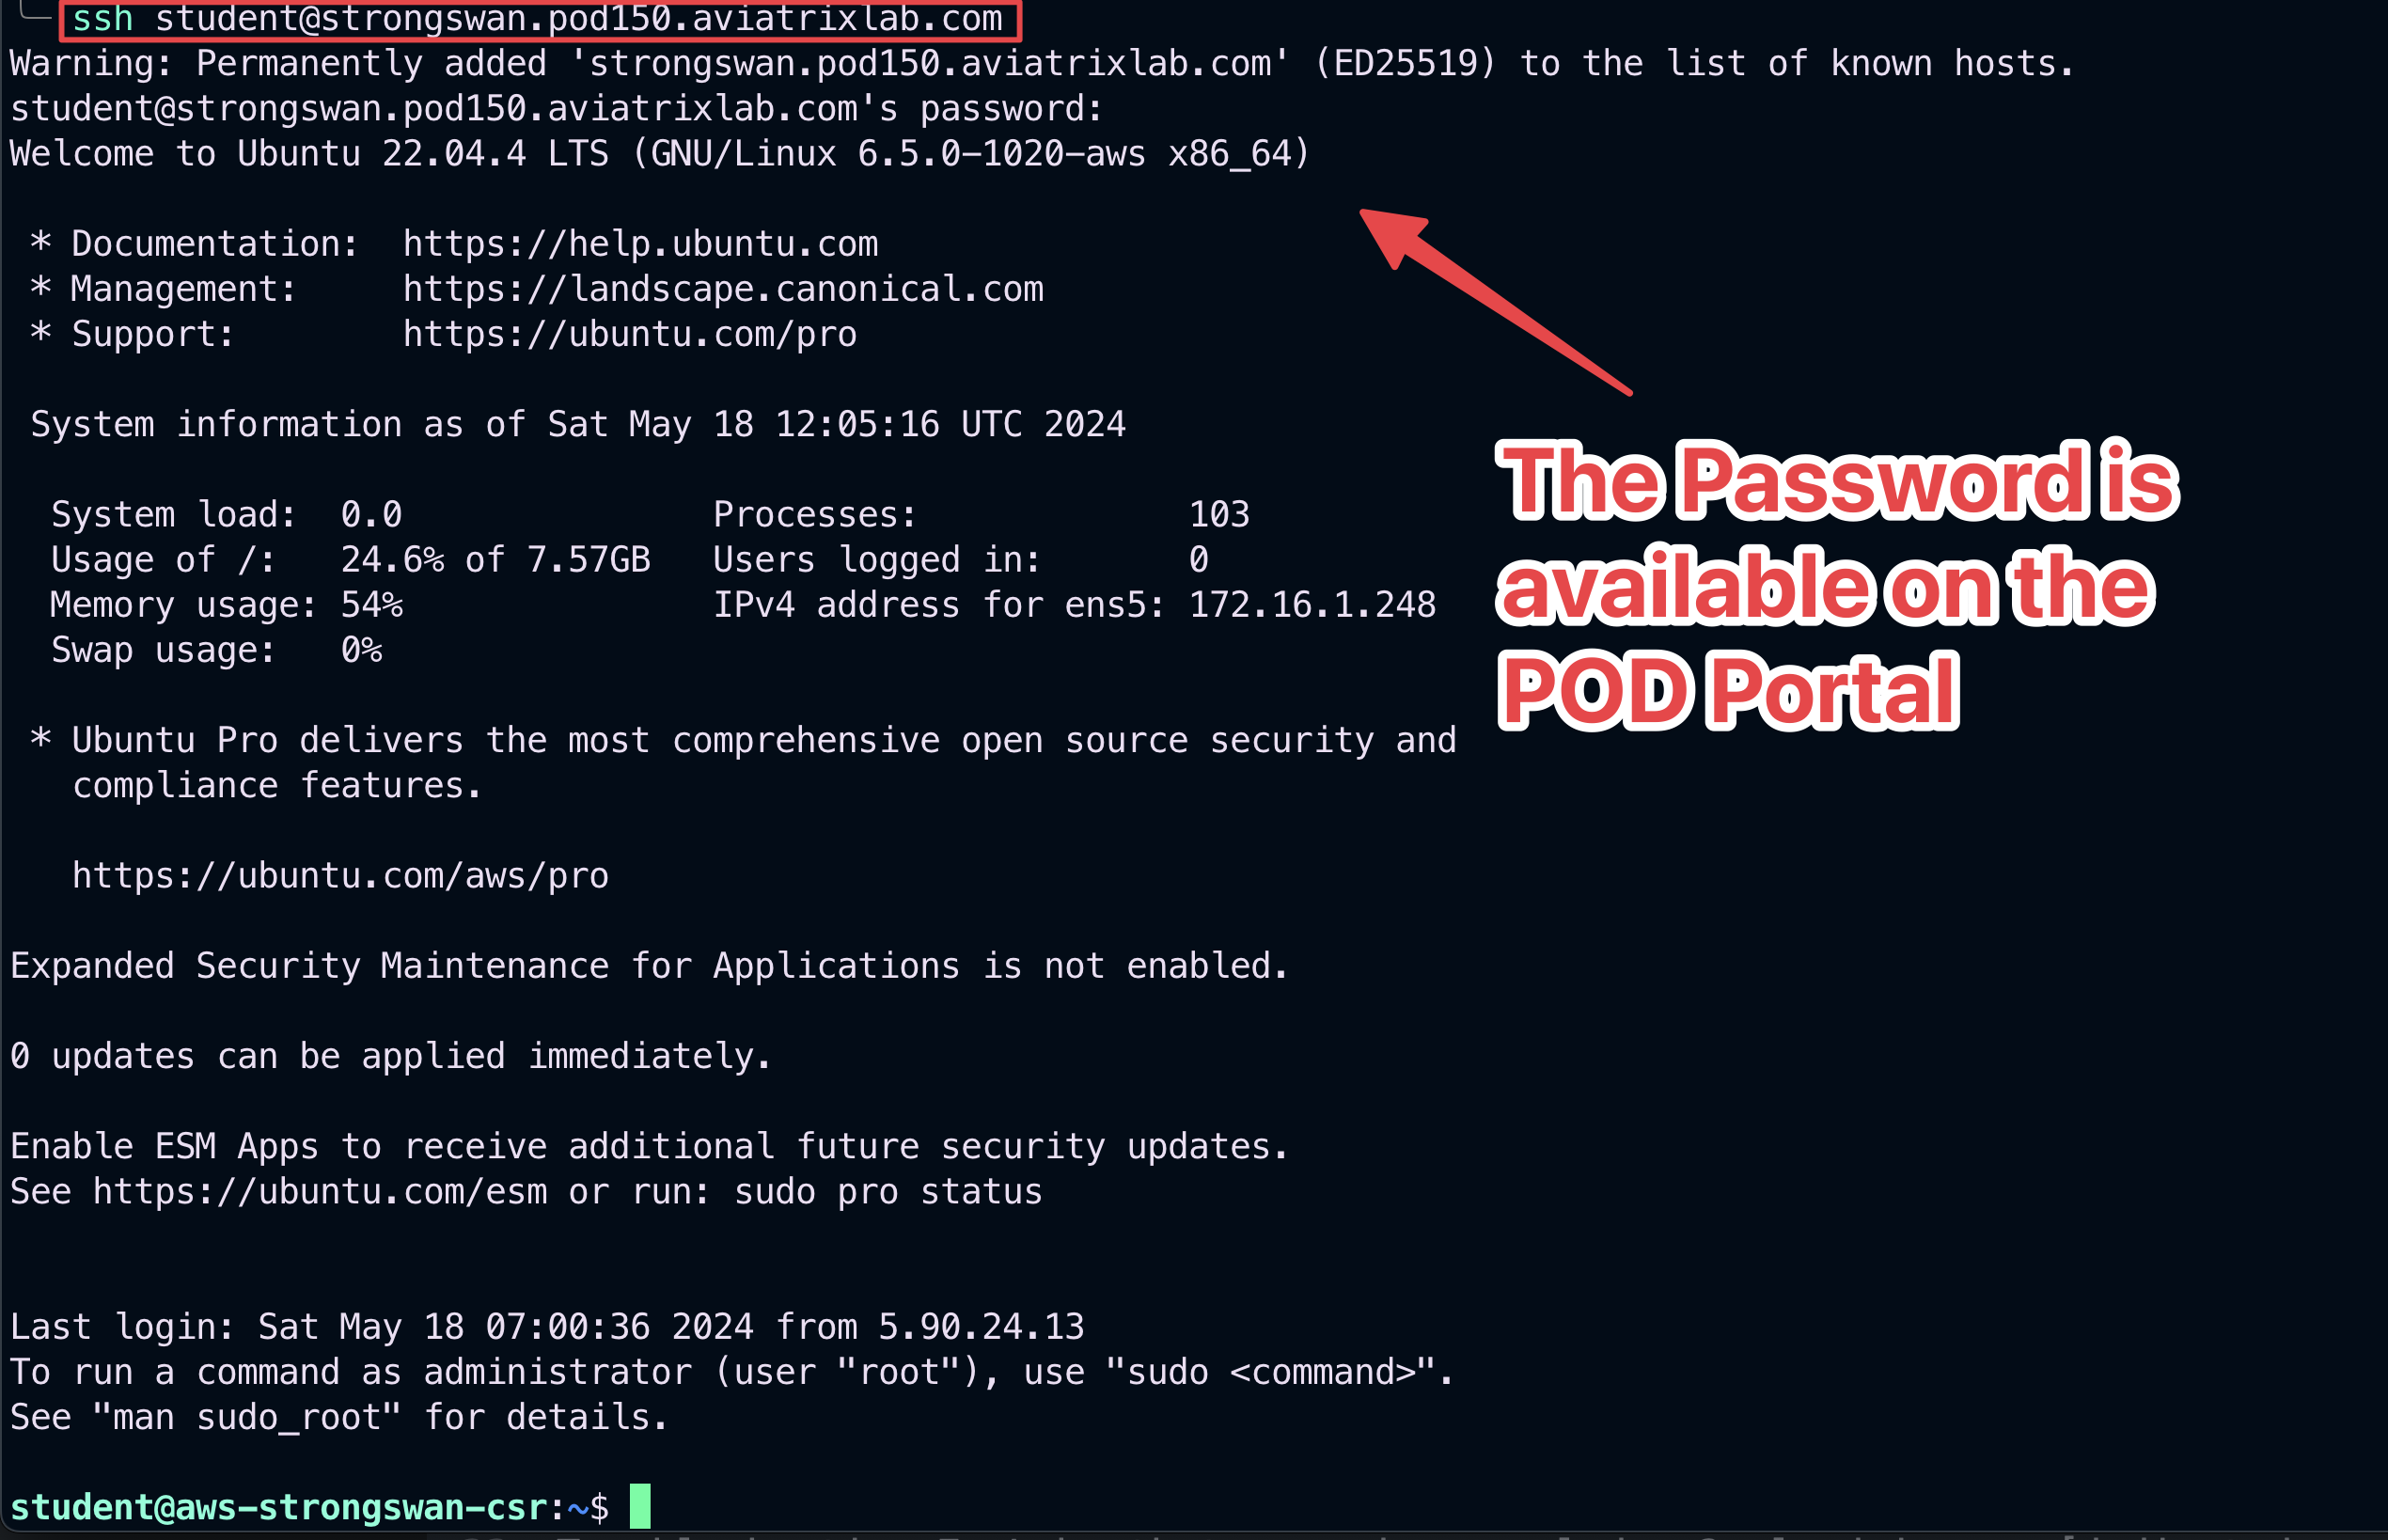
Fig. 237 SSH#
Now you need to edit the StrongSwan’s router configuration file. Check the content of the following file:
/etc/swanctl/swanctl.conf
Type the following command:
cat /etc/swanctl/swanctl.conf
You will need to replace the string REPLACE_WITH_SPOKE_GW_PUBLIC_IP with the public IP address of the GCP spoke gateway in 3 places within /etc/swanctl/swanctl.conf
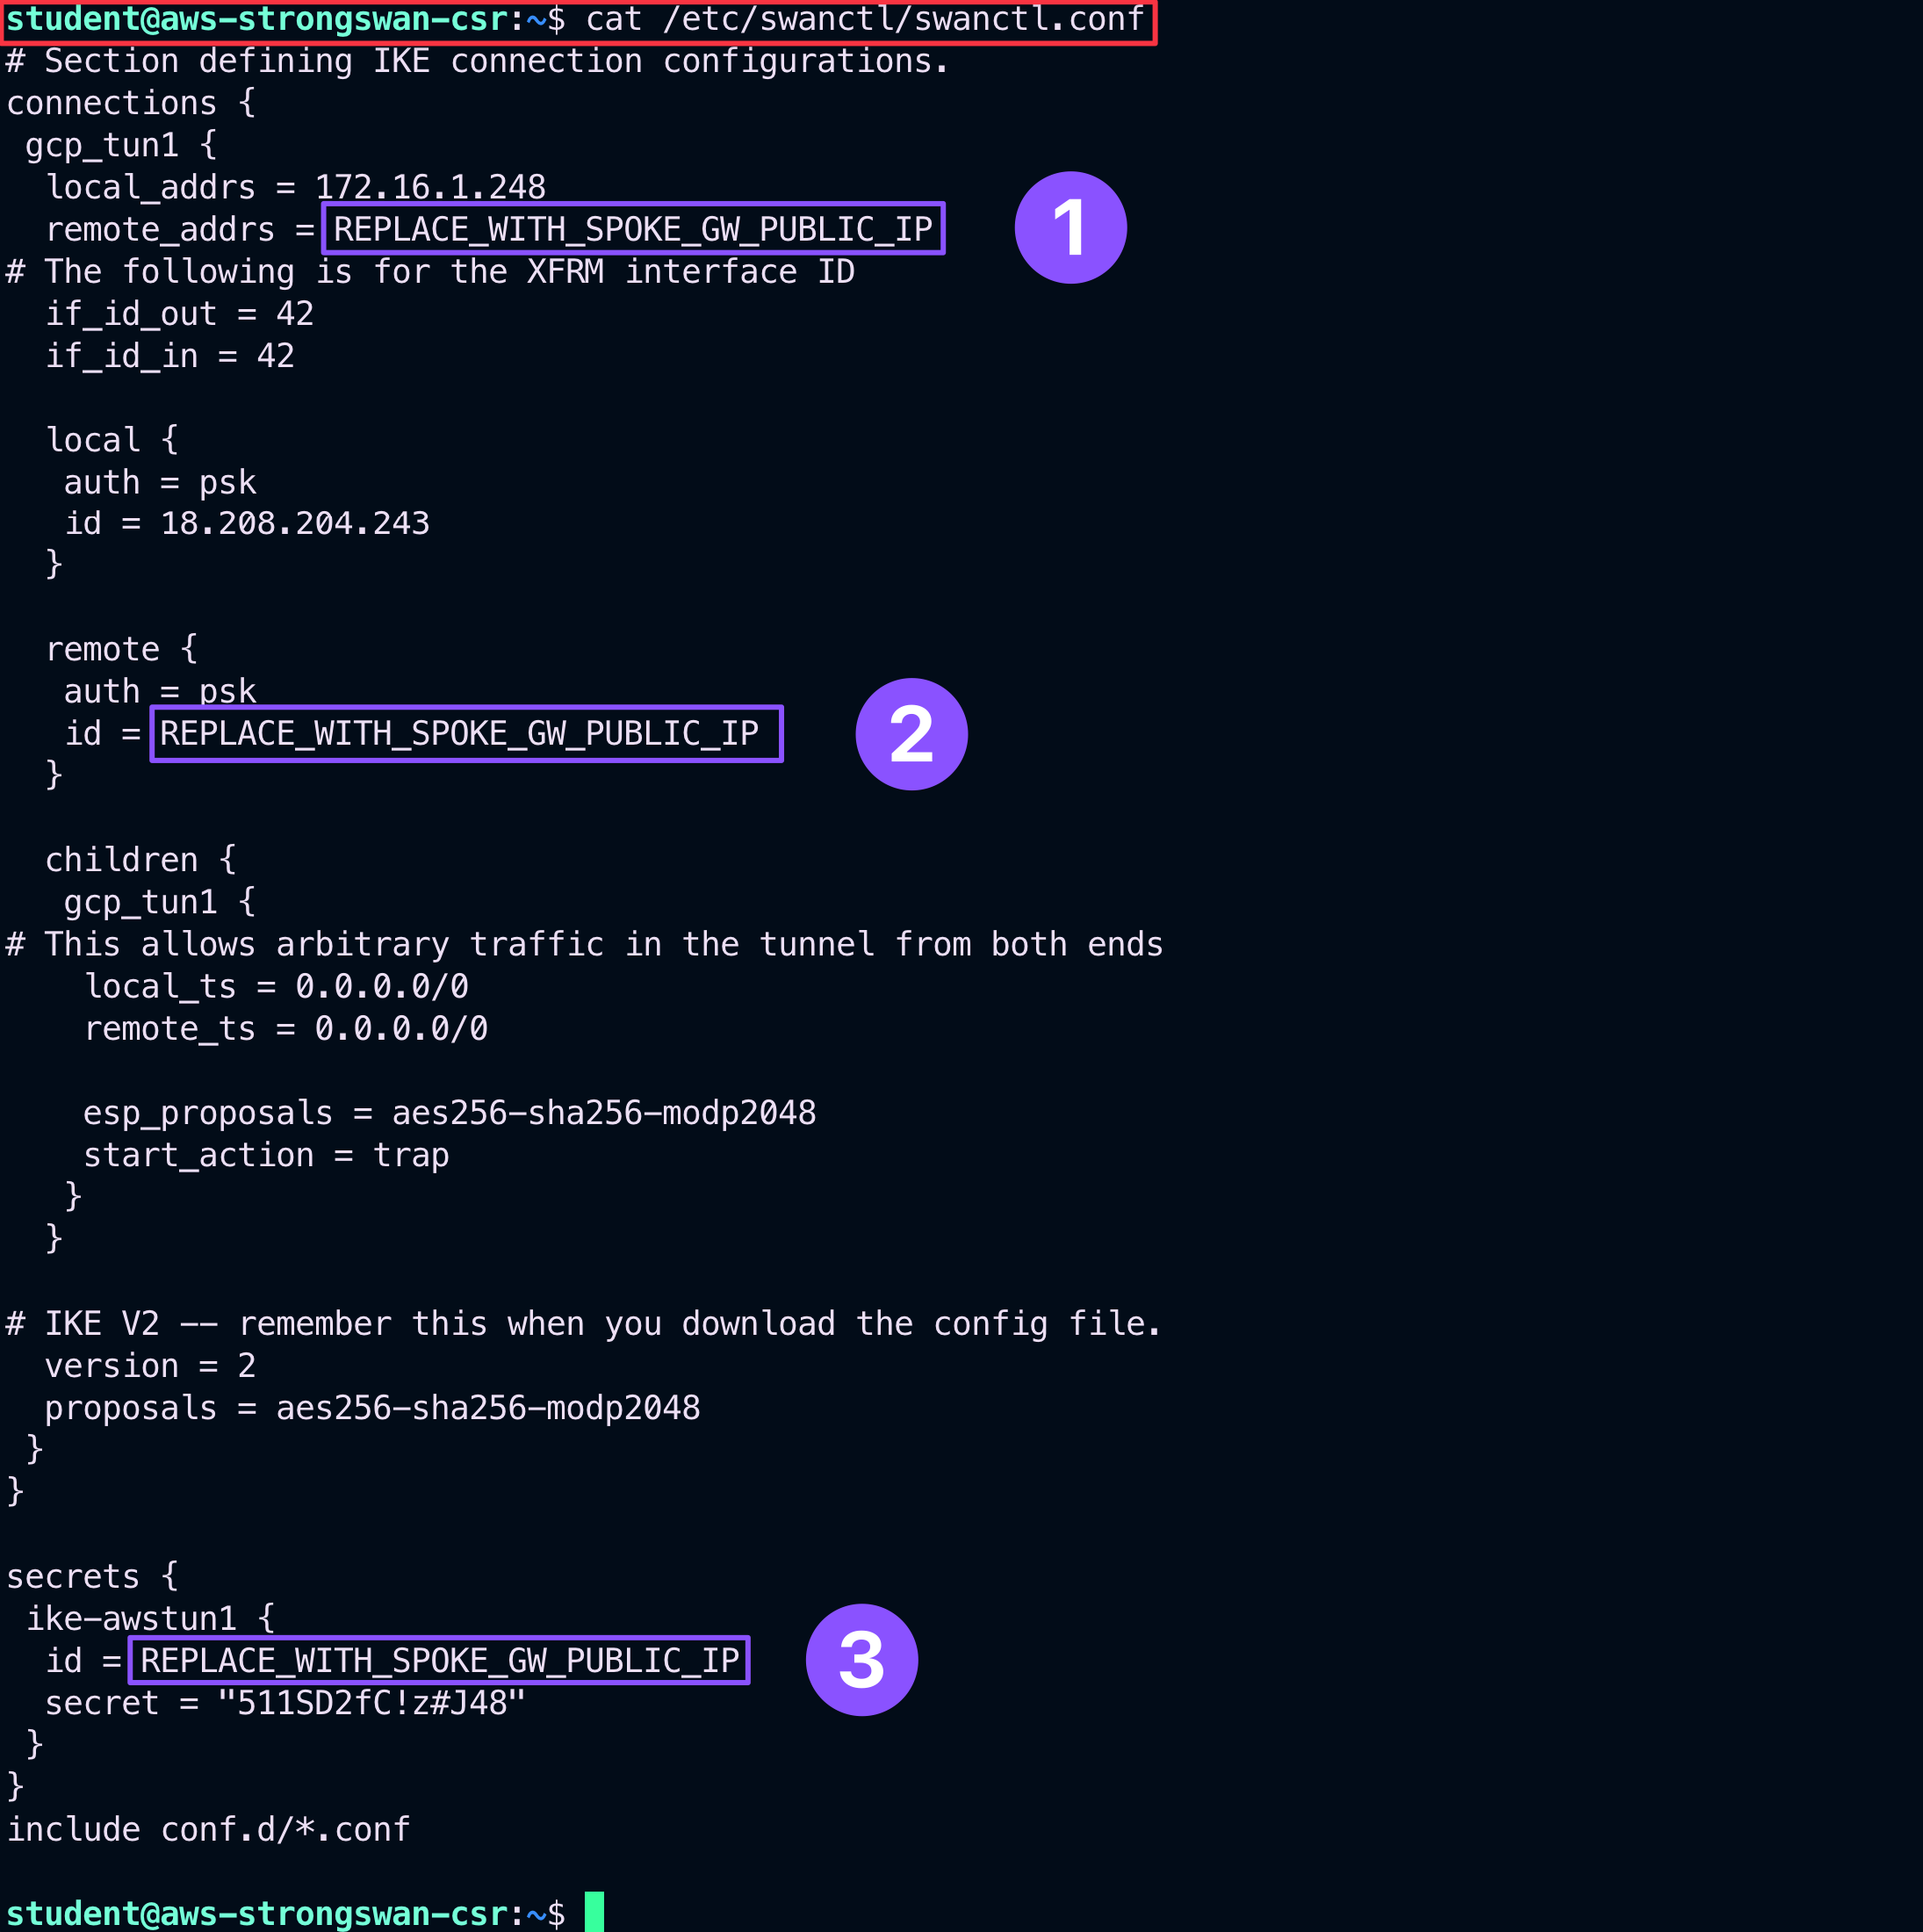
Fig. 238 cfg file#
Let’s retrieve the Public IP address assigned to the GCP Spoke Gateway.
Go to CoPilot > Cloud Fabric > Gateways > Spoke Gateways and then identify the GCP Spoke Gateway and copy its Public IP address.

Fig. 239 Public IP address#
Now go back on the SSH session established with the StrongSwan router and instead of editig the cfg file manually, you are going to use a script for automatically updating the content of the coonfiguration file!
Run the following bash script:
Tip
Below replace the string <REPLACE_WITH_SPOKE_GW_PUBLIC_IP> with GCP Spoke gateway public IP of your POD.
sudo ./update_swanctl.sh <REPLACE_WITH_SPOKE_GW_PUBLIC_IP>
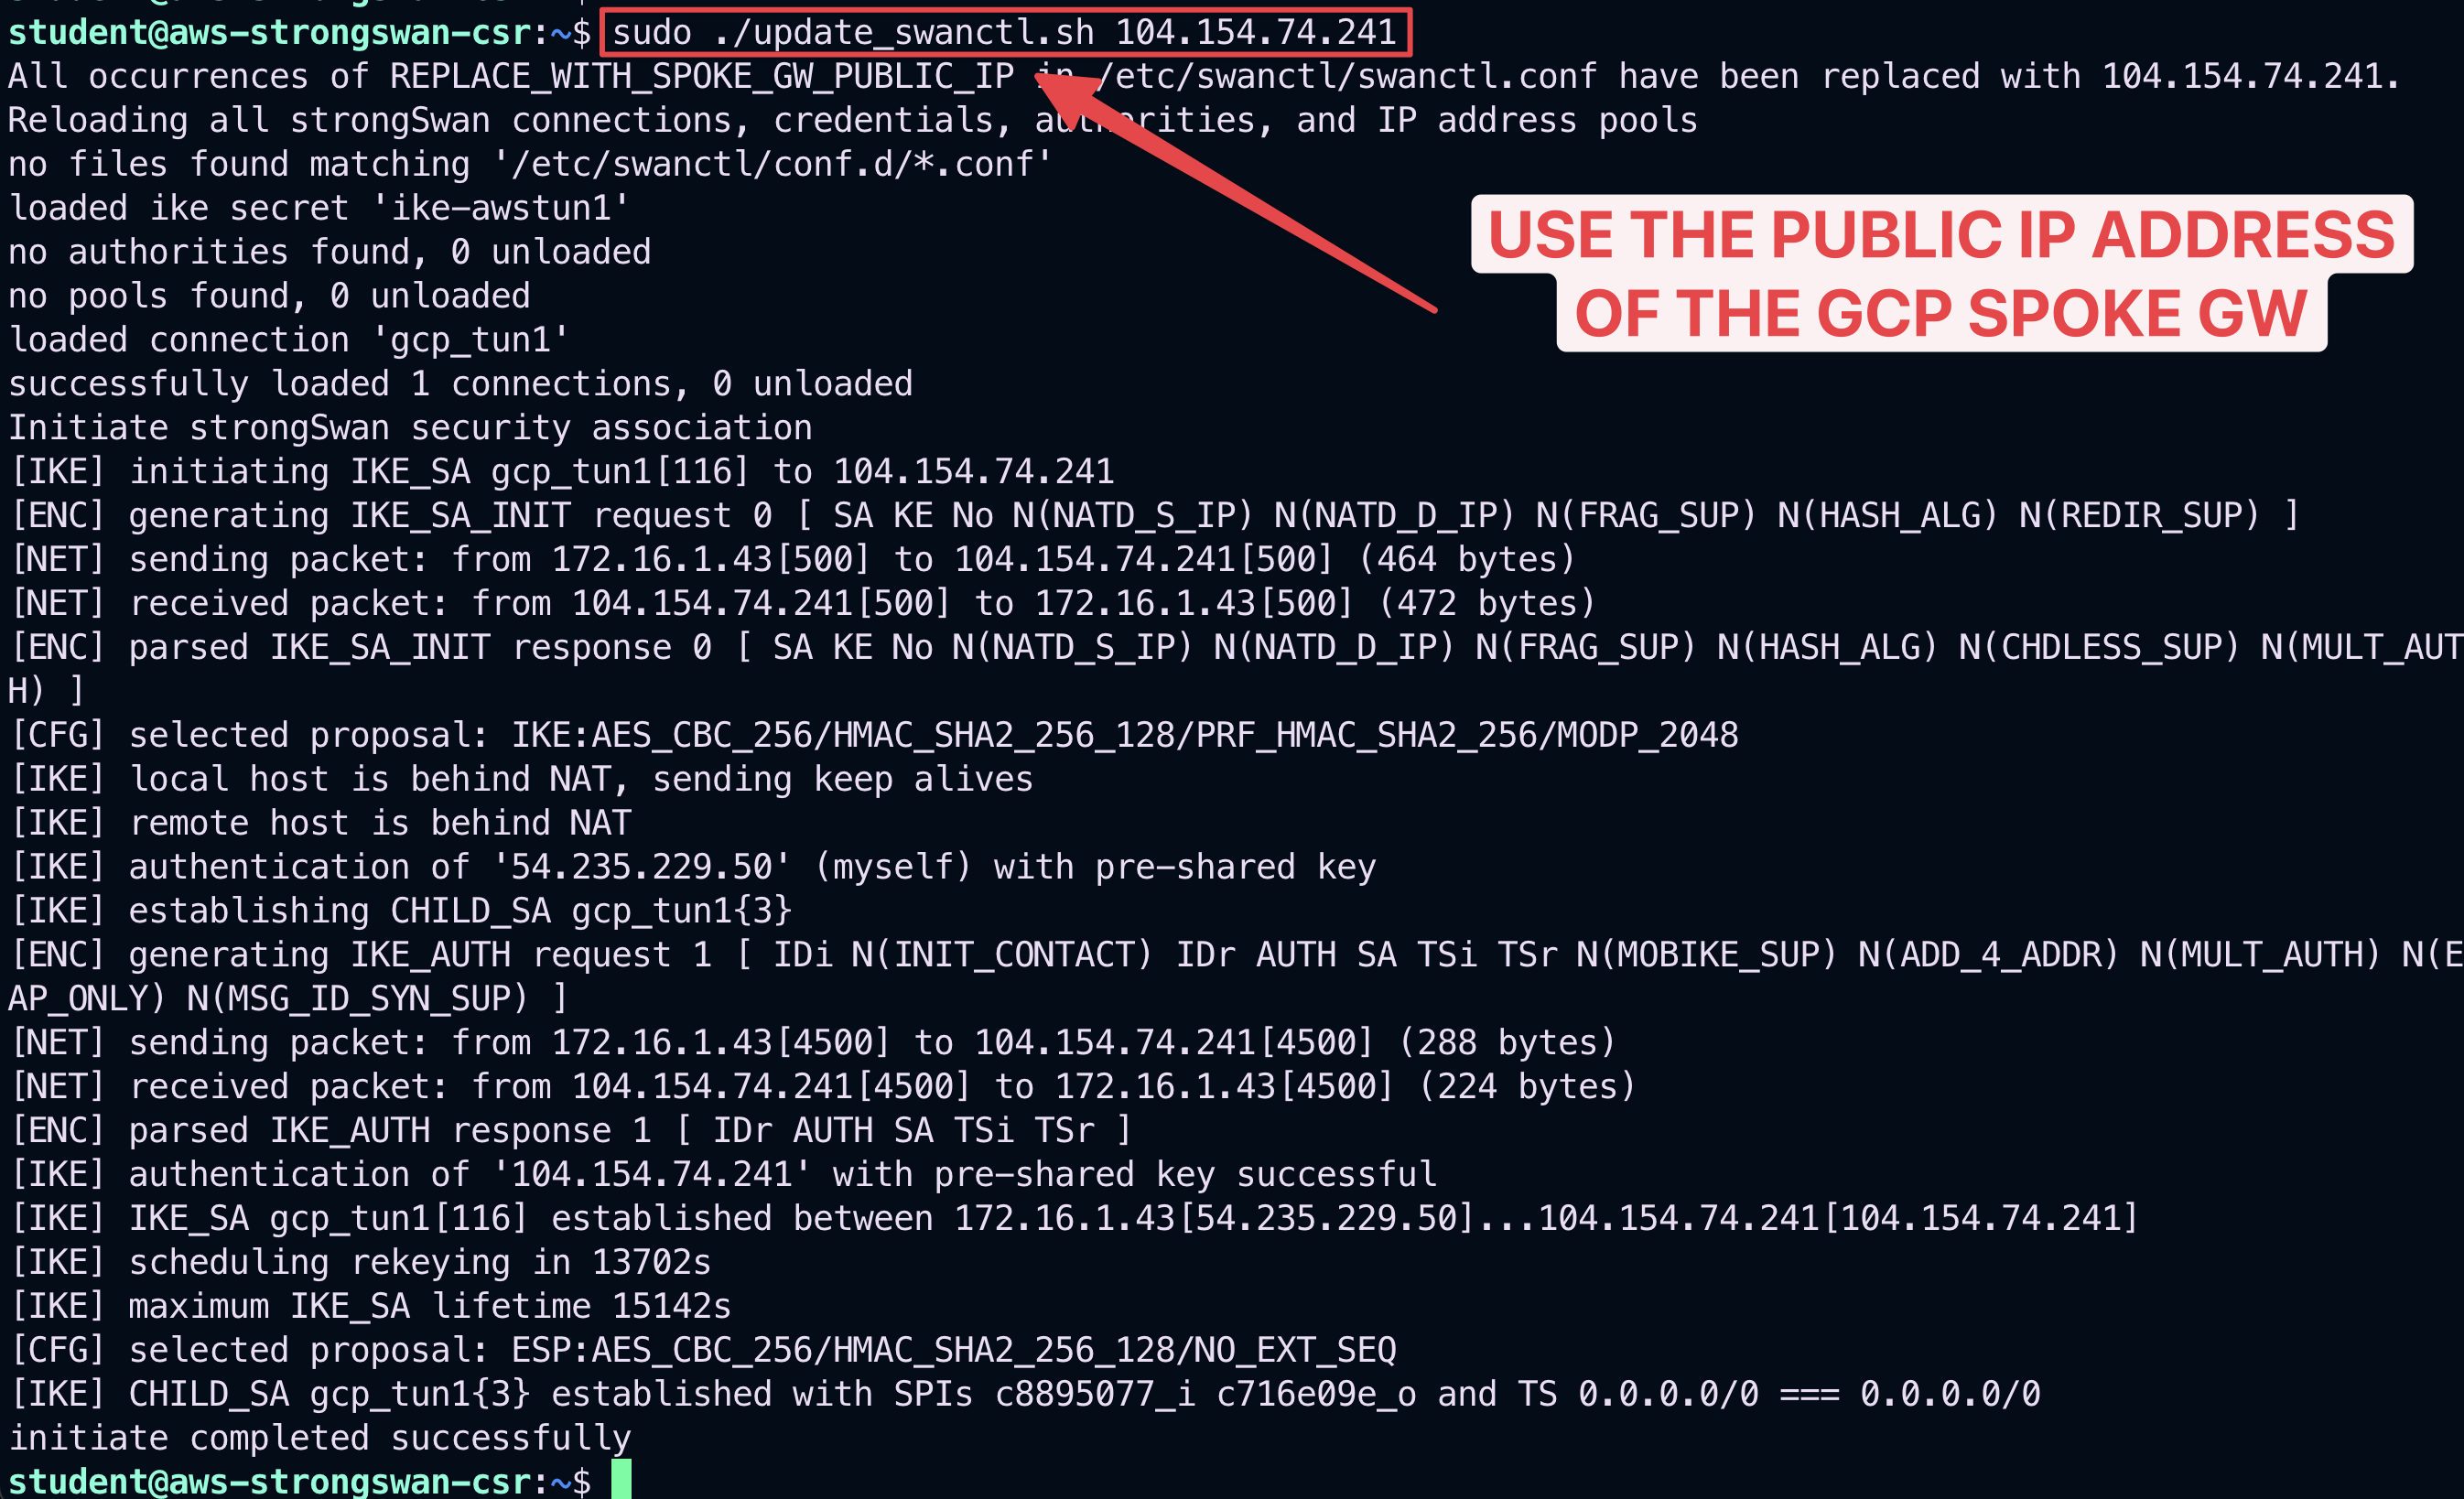
Fig. 240 sudo bash script#
5. S2C - Verification#
Go to CoPilot > Networking > Connectivity > External Connection (S2C)
Tip
Click on the refresh button to see the status icon changing from red to green.
The status will be reflected on the screen in about 1 minute.
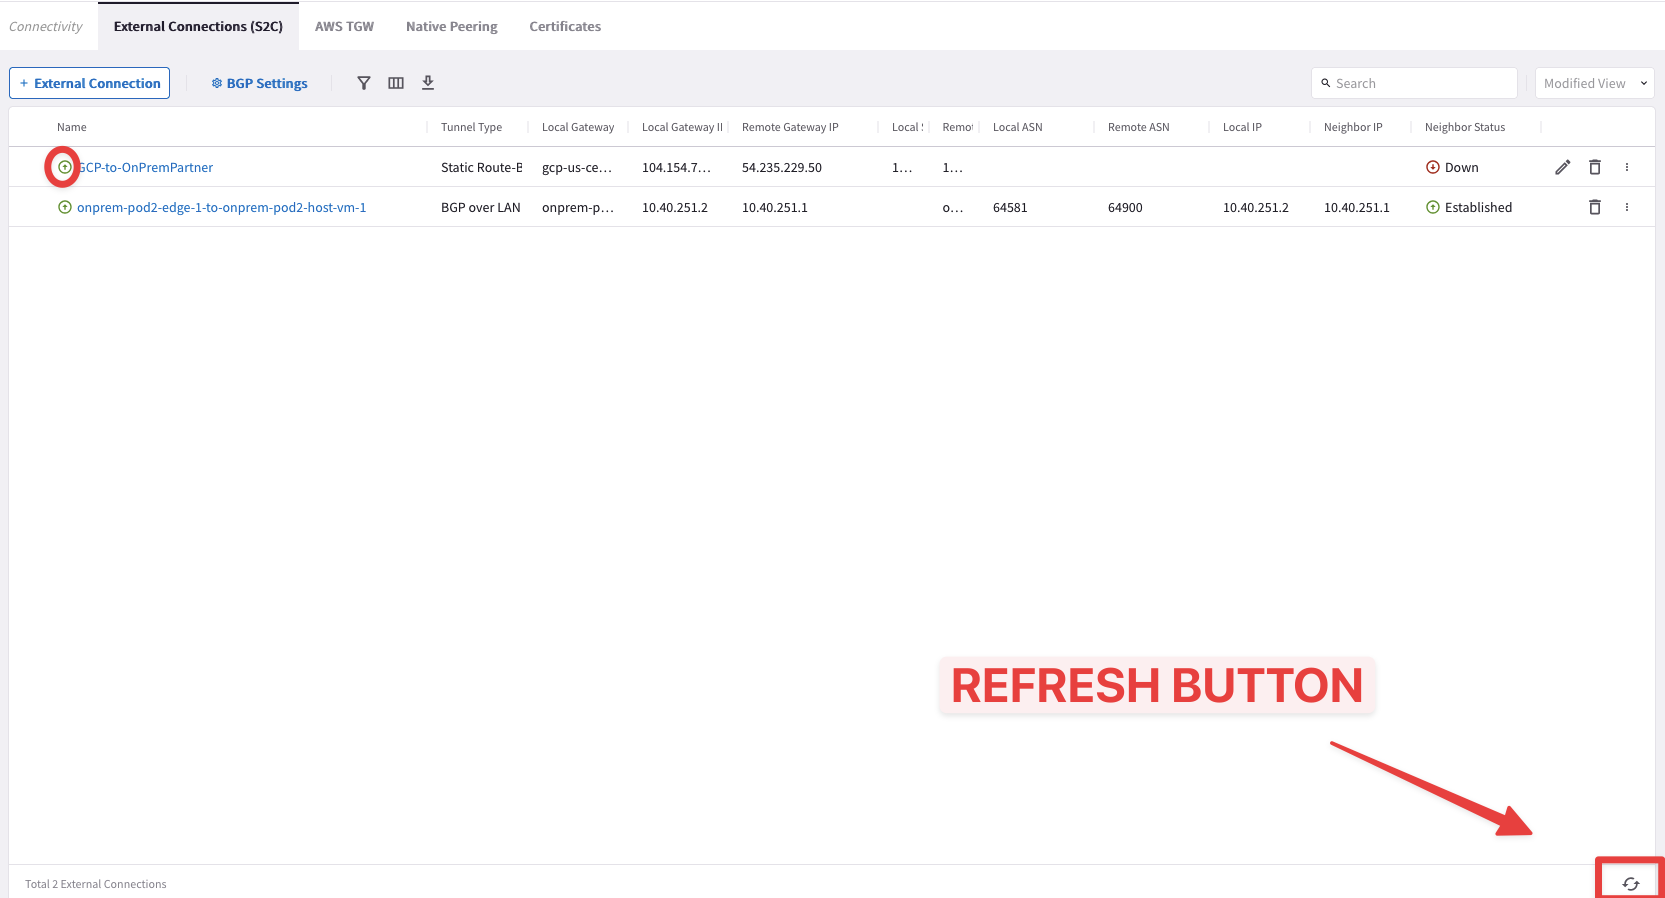
Fig. 241 Connection is up#
Go to CoPilot > Cloud Fabric > Topology > Overview (default TAB)
Filter out based on the GCP Cloud, expand all the VPCs and you will see the new S2C connection with the remote OnPrem-Partner site!
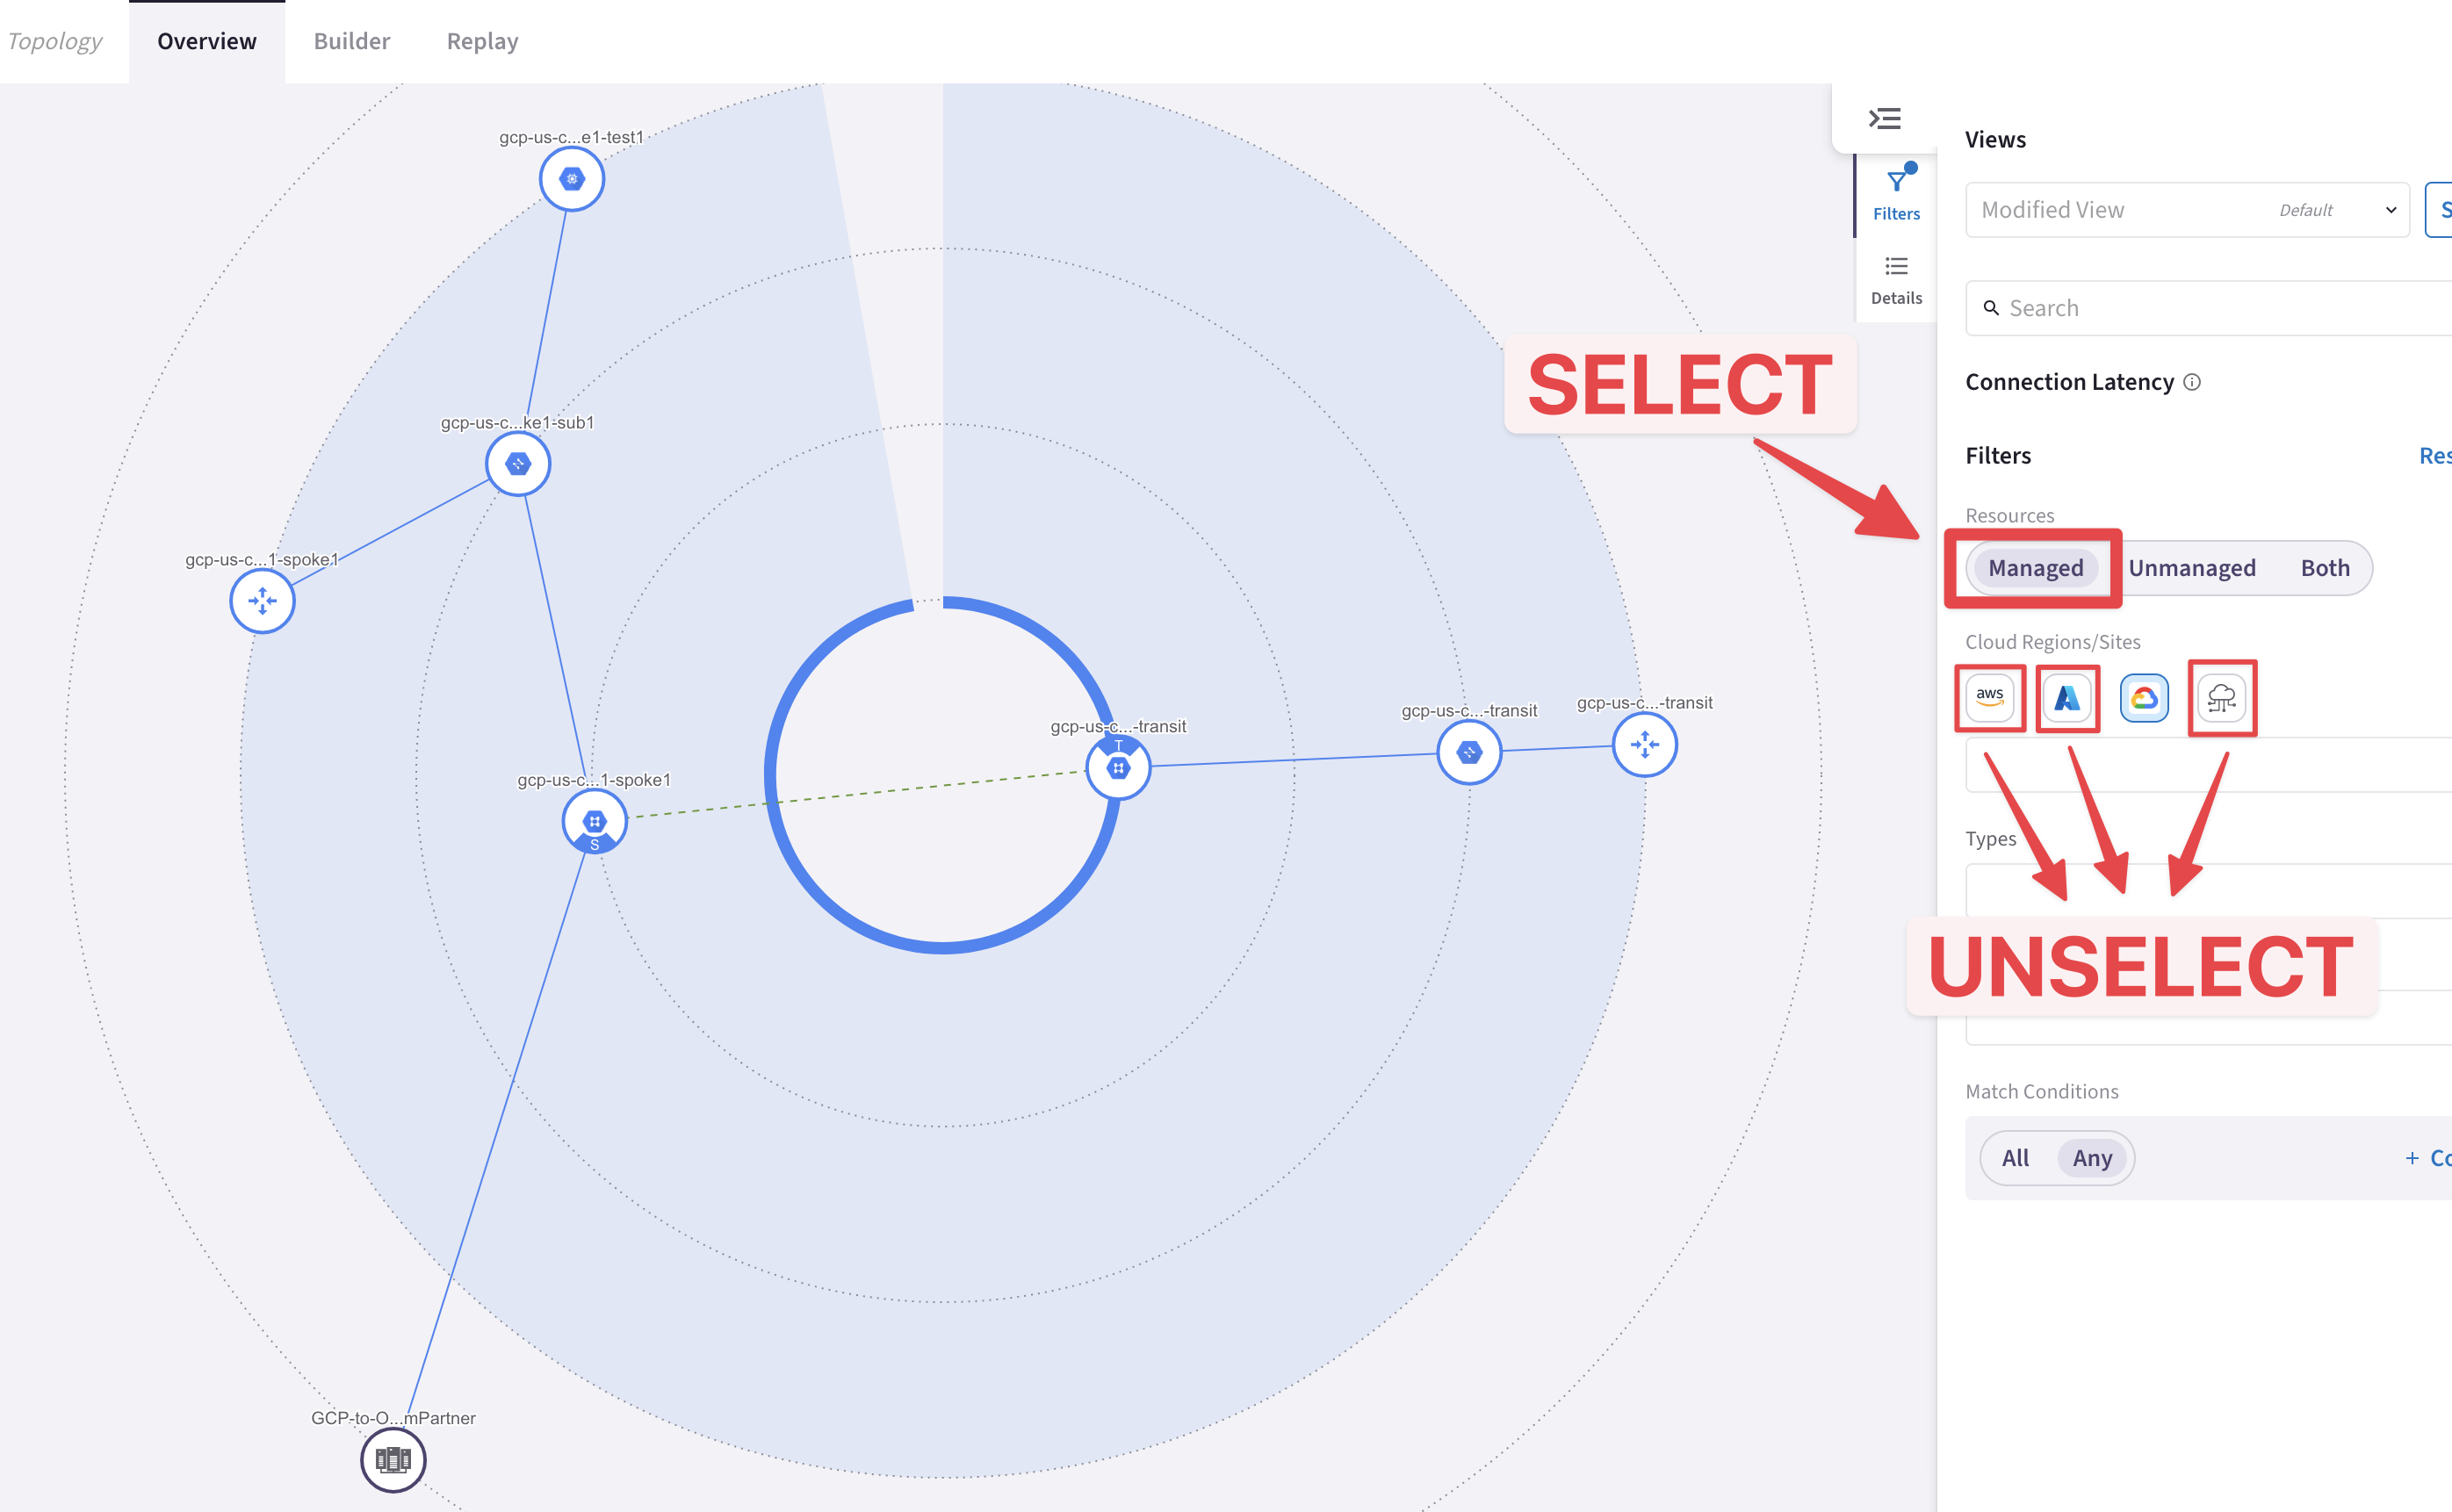
Fig. 242 OnPrem-Partner site#
Now go back to your SSH terminal, and from the on-premises router’s console (i.e. StrongSwan), issue the following command to verify the connectivity with the gcp-us-central1-spoke1-test1:
ping 192.168.200.100
Tip
Keep the ping running recursively!

Fig. 243 Ping ok#
Then go to CoPilot > Cloud Fabric > Topology > Overview (default TAB) and click on the icon of the Spoke Gateway gcp-us-central1-spoke1, click on the Tools button and then click on Gateway Diagnostics.
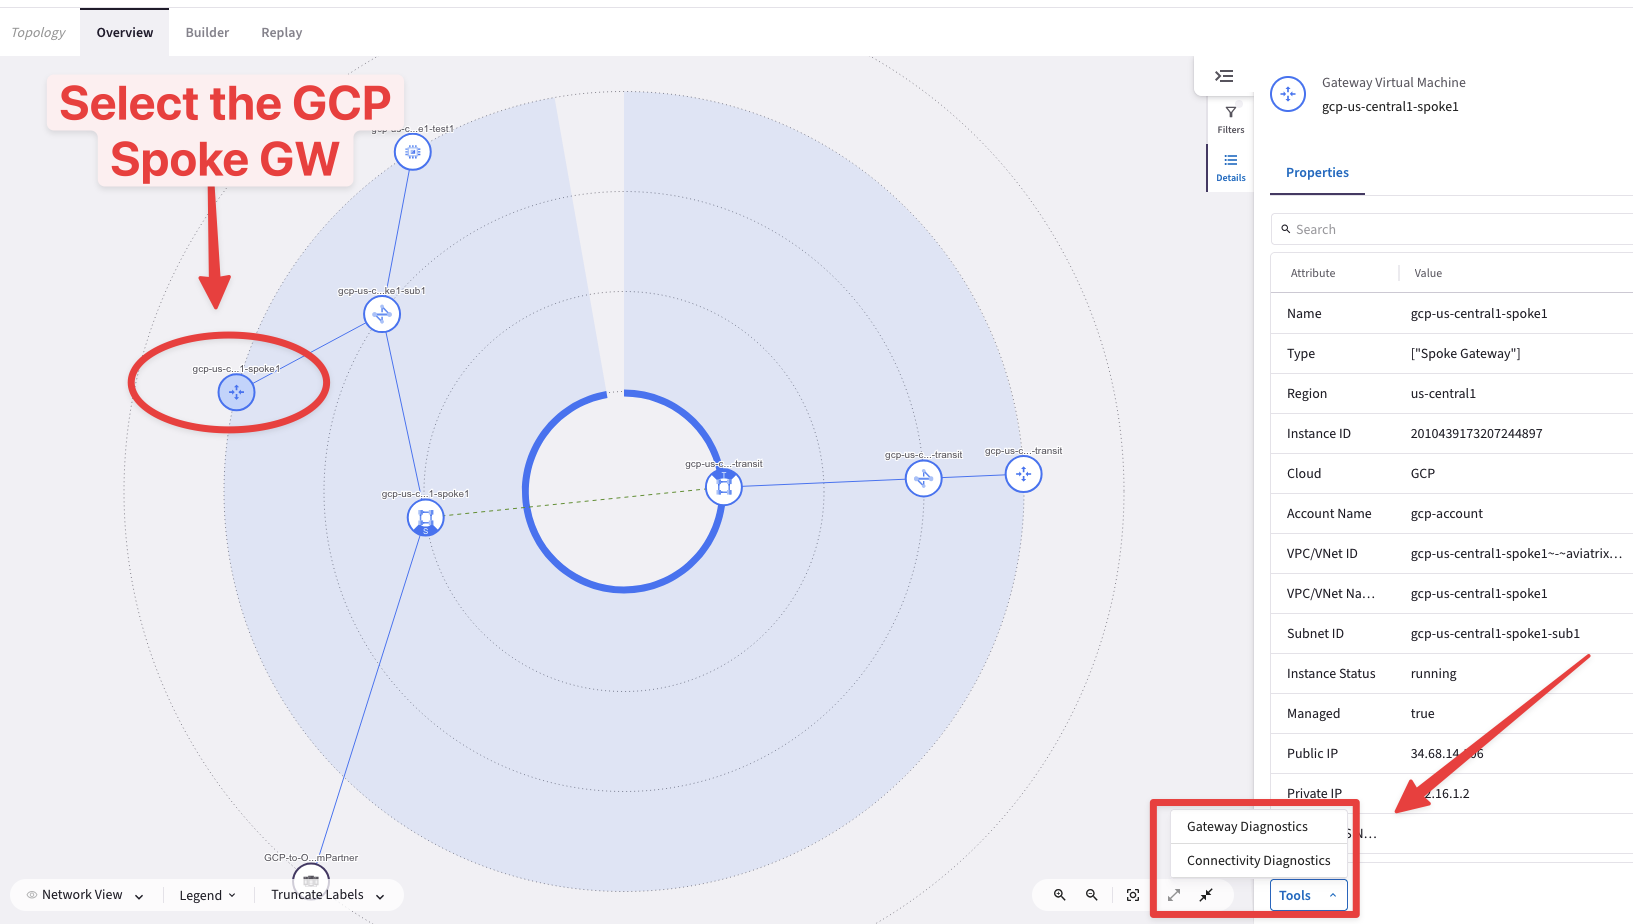
Fig. 244 Gateway Diagnostics#
Choose the “Active Sessions” option and in the Search field type “icmp” and then click on Run. You will notice the subnets involved (i.e. real and virtual subnets) in the Mapped NAT.
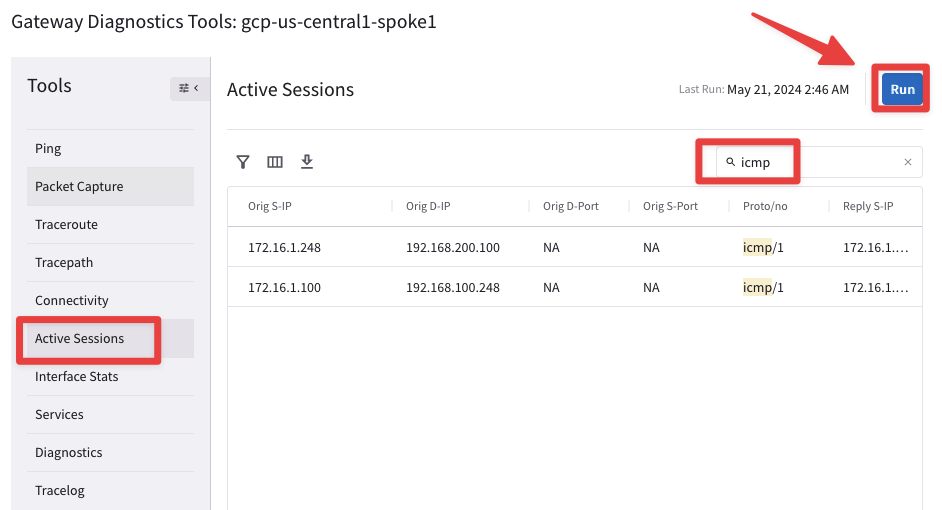
Fig. 245 Active Sessions#
After completing the S2C connection, this is what the overall lab topology would look like:
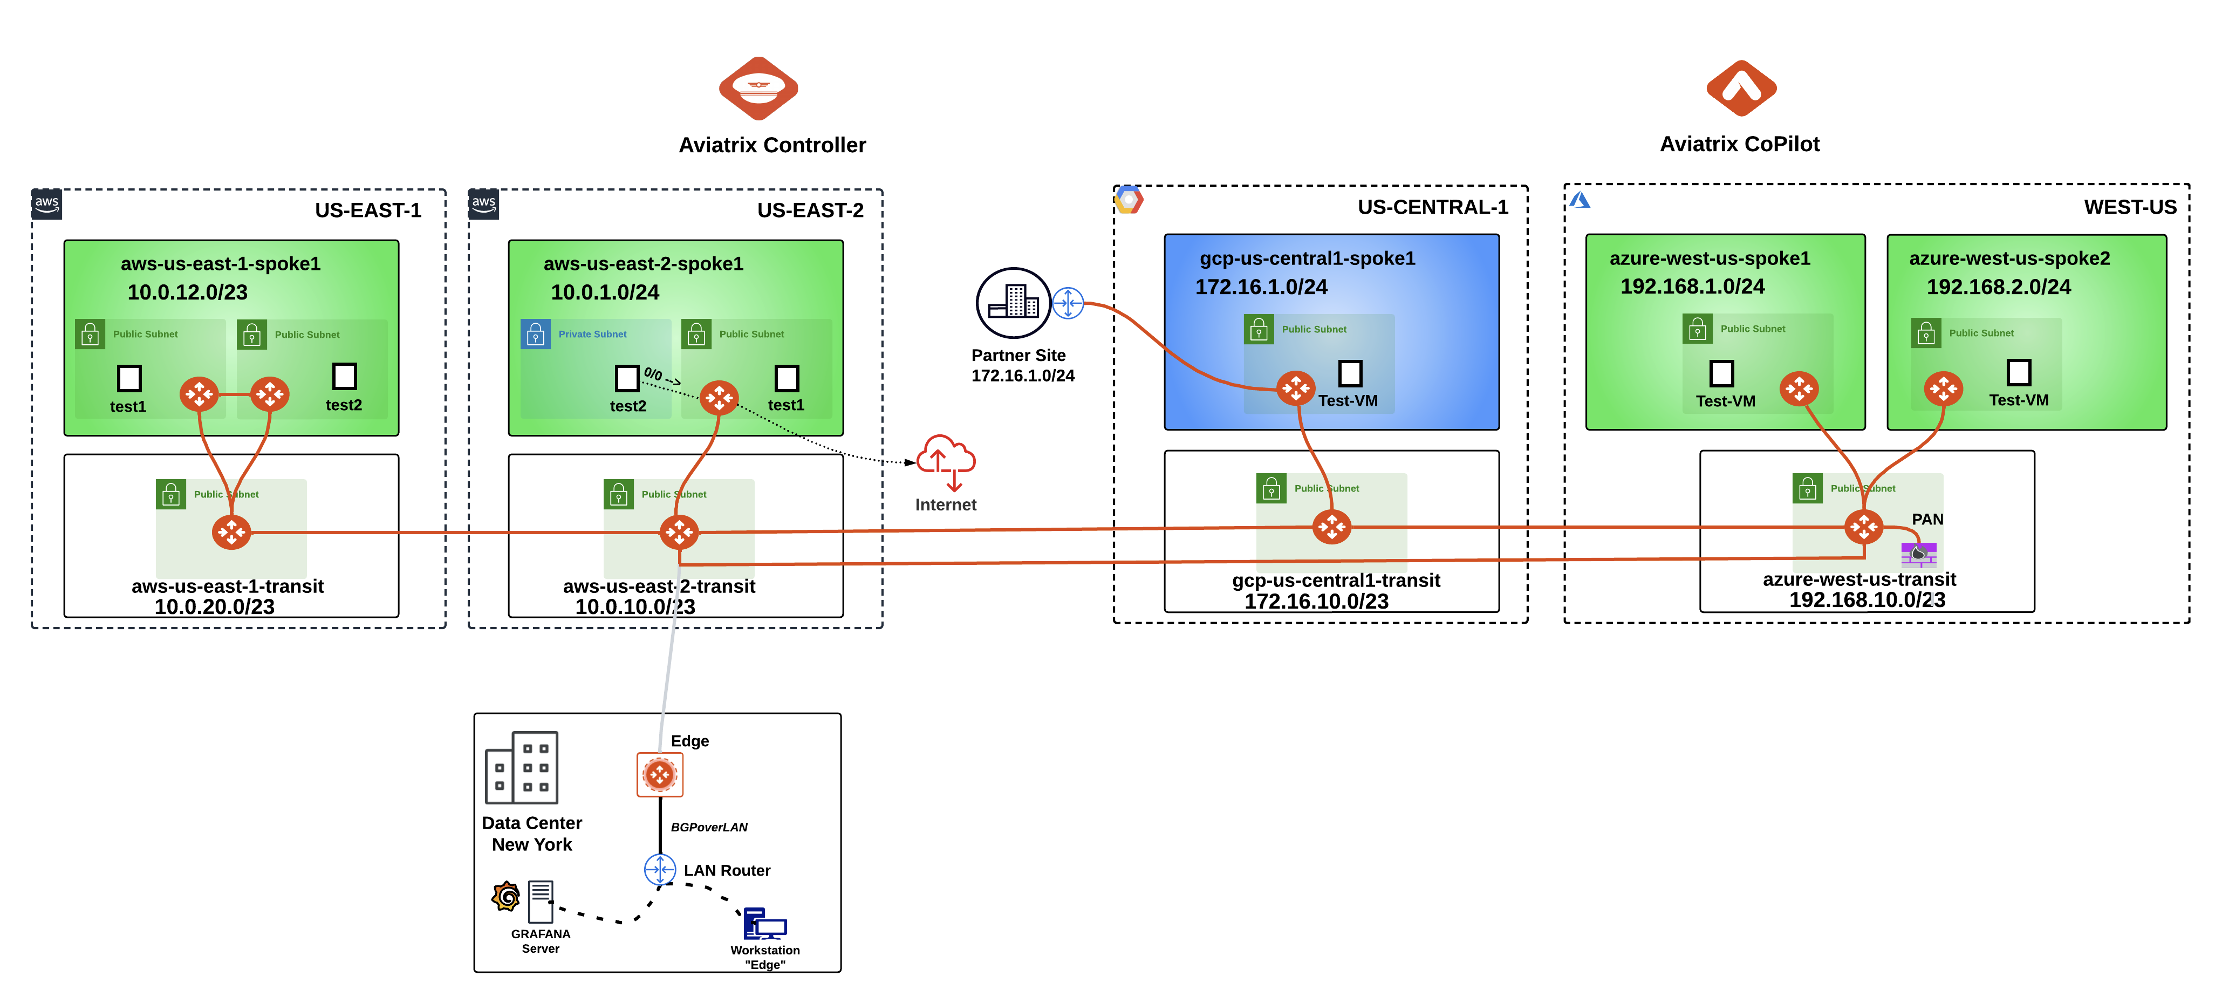
Fig. 246 The Topology with the new S2C connection#
