Lab 7 - Cloud Perimeter Security (Secure Cloud Egress)#
The borderless nature of the cloud creates significant challenges in securing egress traffic, controlling network visibility, and managing spend. Provider-native solutions offer only basic security, high egress data costs, compliance challenges, and exposure to threats like data exfiltration. This leads to operational inefficiencies, increased security risks, and a slower time to market.
1. SCENARIO#
BU2 DB needs to get updates, however the VM is inside a private subnet. The BU2 DB owner has raised a request that solely the apt-get commands should be allowed (other kind of egress traffic should be prohibited).
Furthermore, all egress traffic must be tracked, whereby Logging must be enabled.
You are requested to activate the Egress feature on the ace-azure-east-us-spoke2 VNet, likewise on the ace-azure-east-us-spoke1 VNet but just temporarily as a Test VNet.
In addition to this, you area also requested to create the DCF rules that would fulfil the aforementioned request.
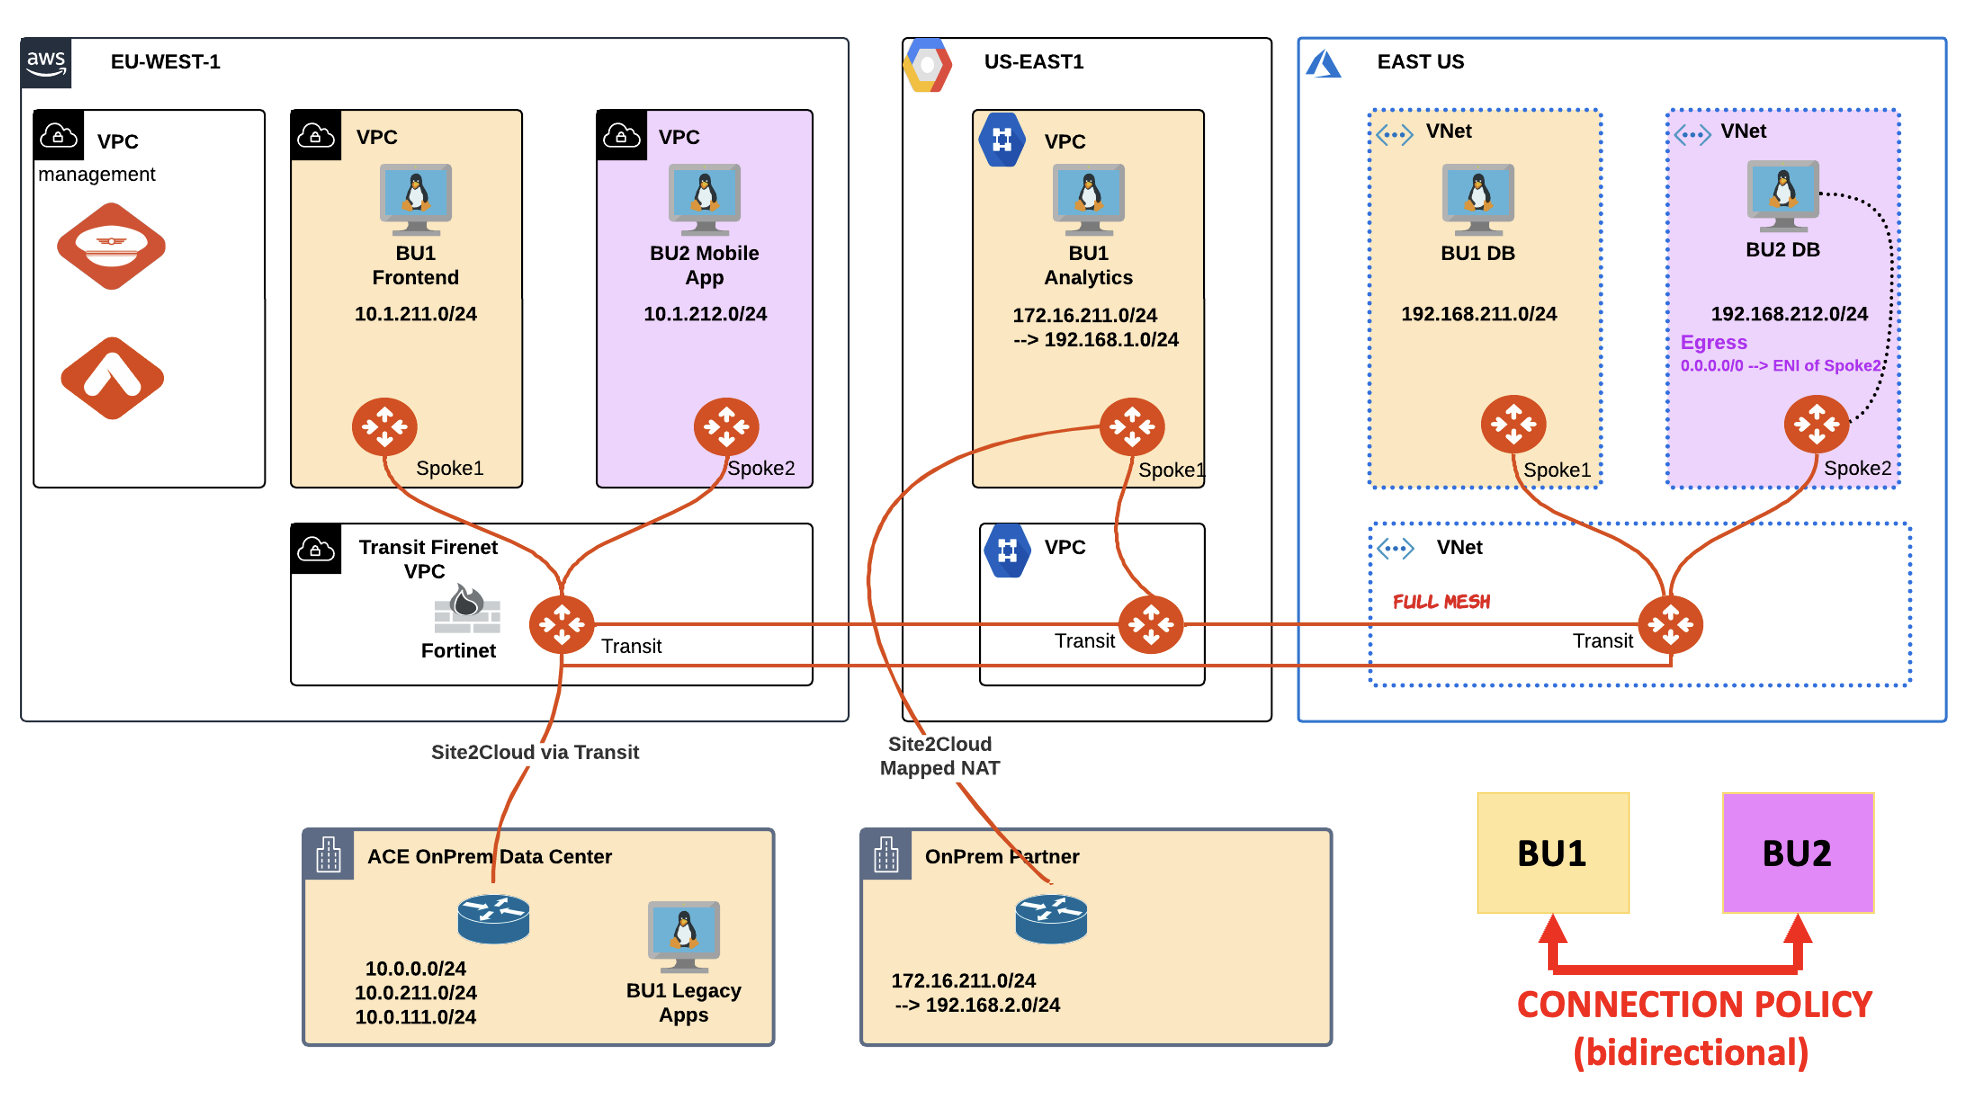
Fig. 122 Lab 7 Scenario Topology#
2. CHANGE REQUEST#
Enable the Egress on the VNet where the BU2 DB resides.
Tip
Go to CoPilot > Security > Egress > Egress VPC/VNets and then click on the "+ Local Egress on VPC/VNets" button.
Select the ace-azure-east-us-spoke2 VPC.
Do not forget to click on Add.
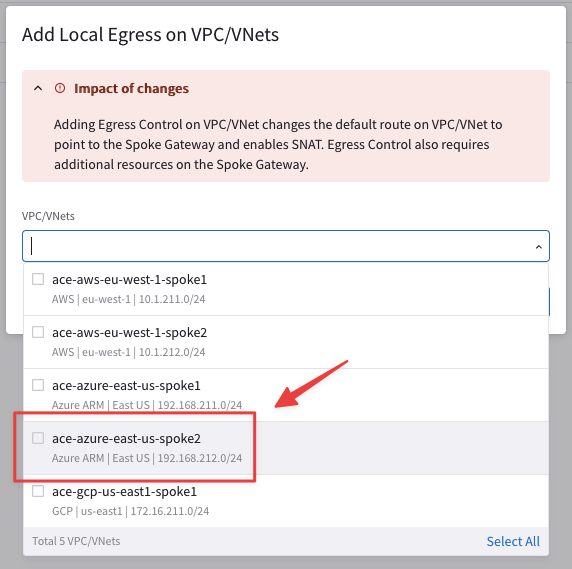
Fig. 123 ace-azure-east-us-spoke2#
Important
This action will install a Default Route in all the Private Routing Tables inside the Azure Spoke2 VNet. The Defautl Routes will point to the ace-azure-east-us-spoke2 GW.
Go to CoPilot > Cloud Fabric > Gateways > Spoke Gateways and select the ace-azure-east-us-spoke2 Gateway, then click on the VPC/VNet Route Tables tab and select any Private Routing Tables from the Route Table field!
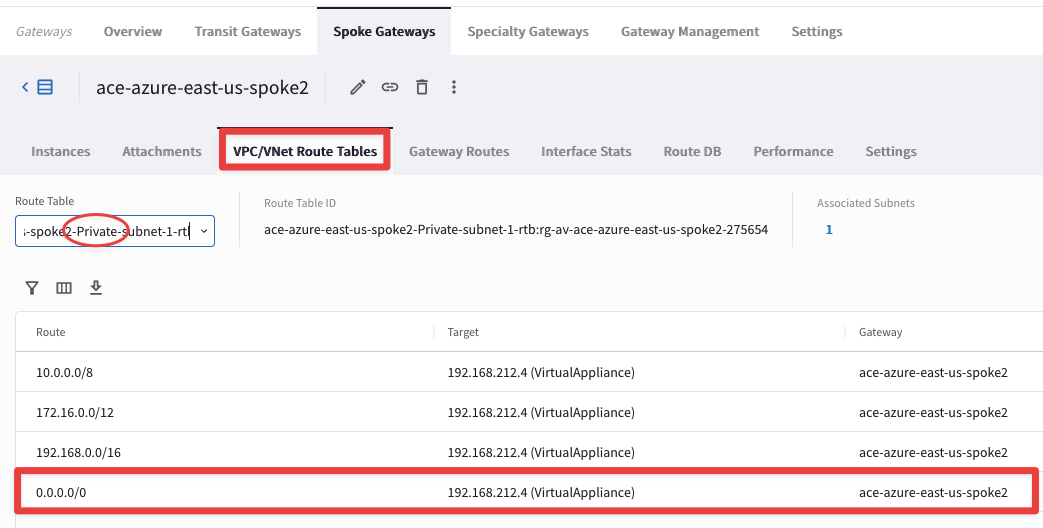
Fig. 124 ace-azure-east-us-spoke2#
Enable the Distributed Cloud Firewall feature.
Tip
Go to CoPilot > Security > Distributed Cloud Firewall and then click on the "Enable Distributed Cloud Firewall" button, and then to the subsequent "Begin Using Distributed Cloud Firewall" button.
You will immediately notice a pop-up message, informing you that the Greenfield Rule will be created for allowing all kind of traffic.
Click on Begin.
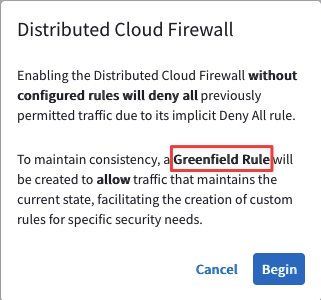
Fig. 125 Greenfield Rule#
Enable the
"Logging"on the Greenfield-Rule.
Tip
Click on the pencil icon on the right-hand side of the entry Greenfield-Rule.

Fig. 126 Edit the Greenfield-Rule#
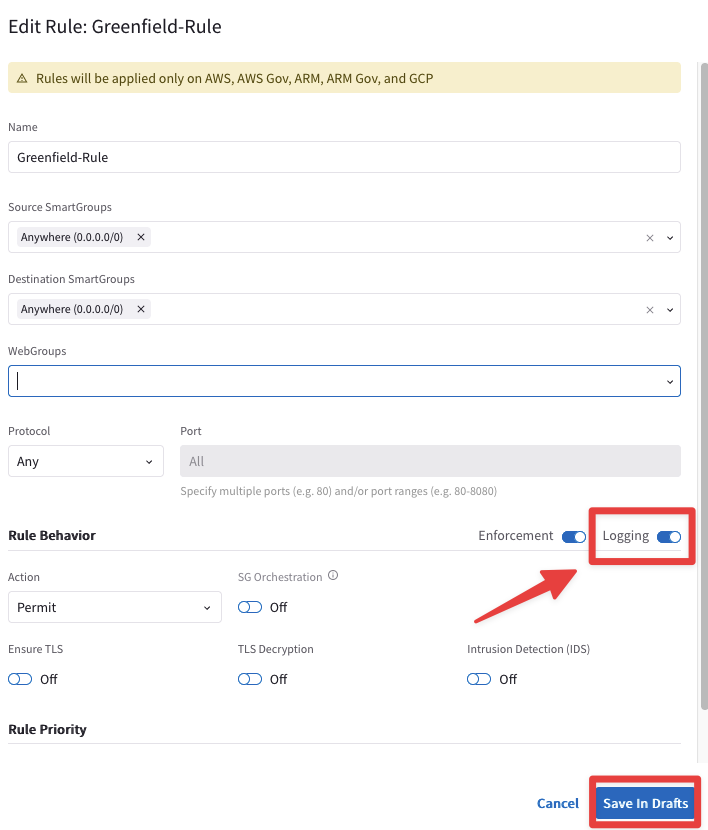
Fig. 127 Enable Logging#
Do not forget to click on Save In Drafts and then click on Commit, to push the change into the Data Plane.

Fig. 128 Commit#
Use the Spoke1 VNet as a Test VNet to find out the domains that should be allowed, in order to selectively execute the apt-get commands only towards the defined domains.
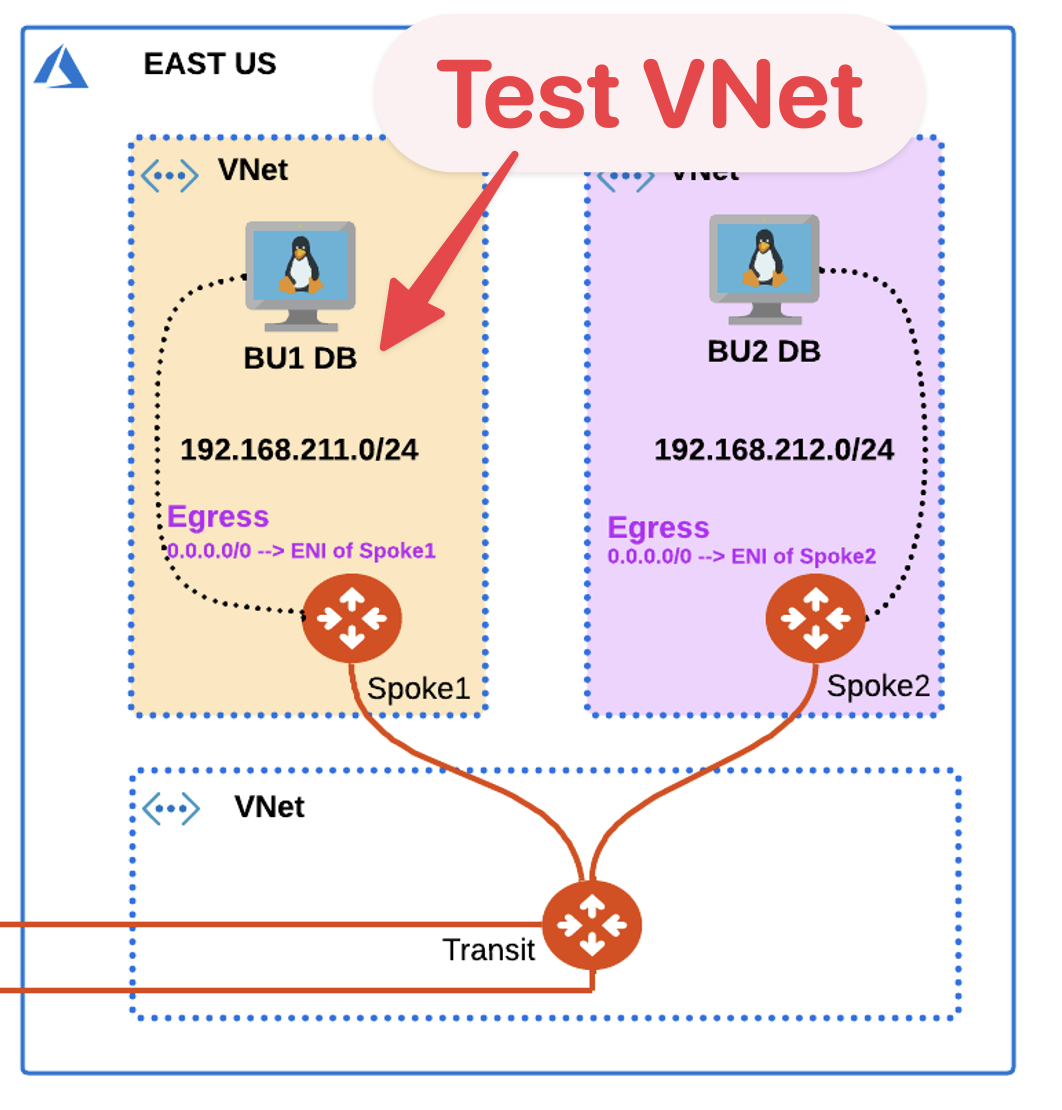
Fig. 129 Spoke1 VNet1 as test VNet#
Enable the Egress on the Spoke1 VNet too.
Tip
Go to CoPilot > Security > Egress > Egress VPC/VNets and then click on the "+ Local Egress on VPC/VNets" button.
Select the ace-azure-east-us-spoke1 VPC.
Do not forget to click on Add.
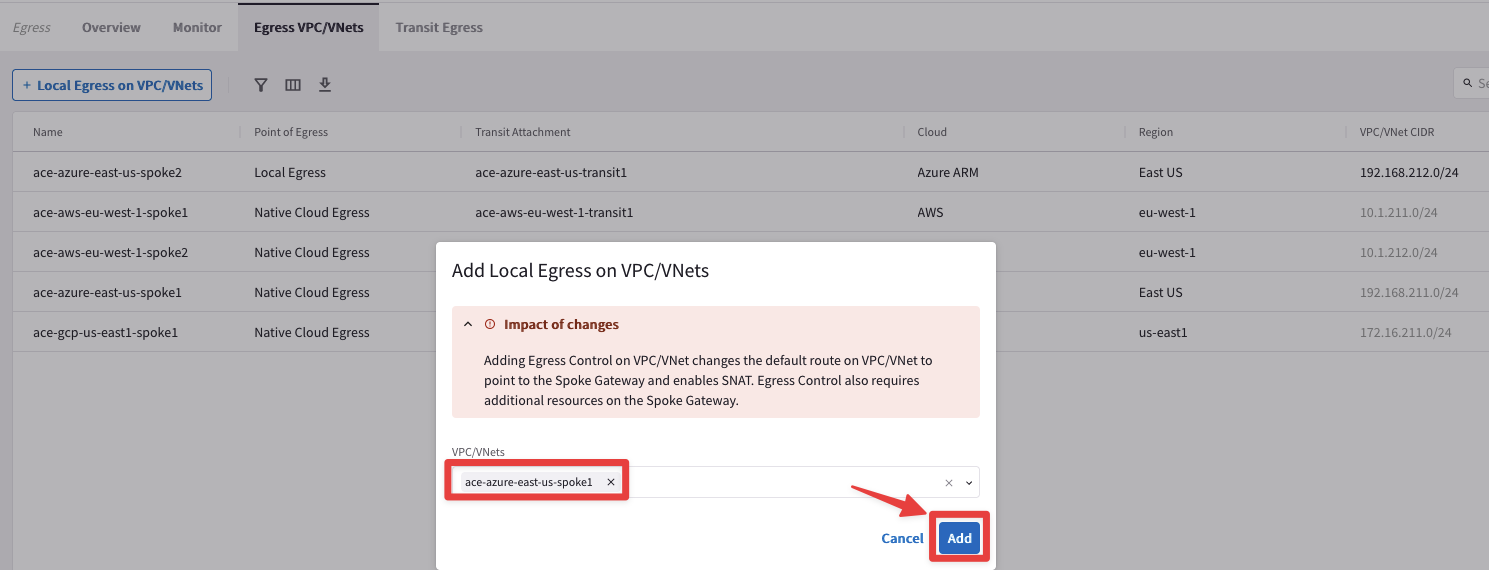
Fig. 130 Enable Egress on Spoke1 VNet#
SSH to the BU1 DB (this VM does not have a Public IP, whereby you need to SSH to BU1 Frontend first, and then from that VM, issue the SSH command towards the Private IP of BU1 DB).
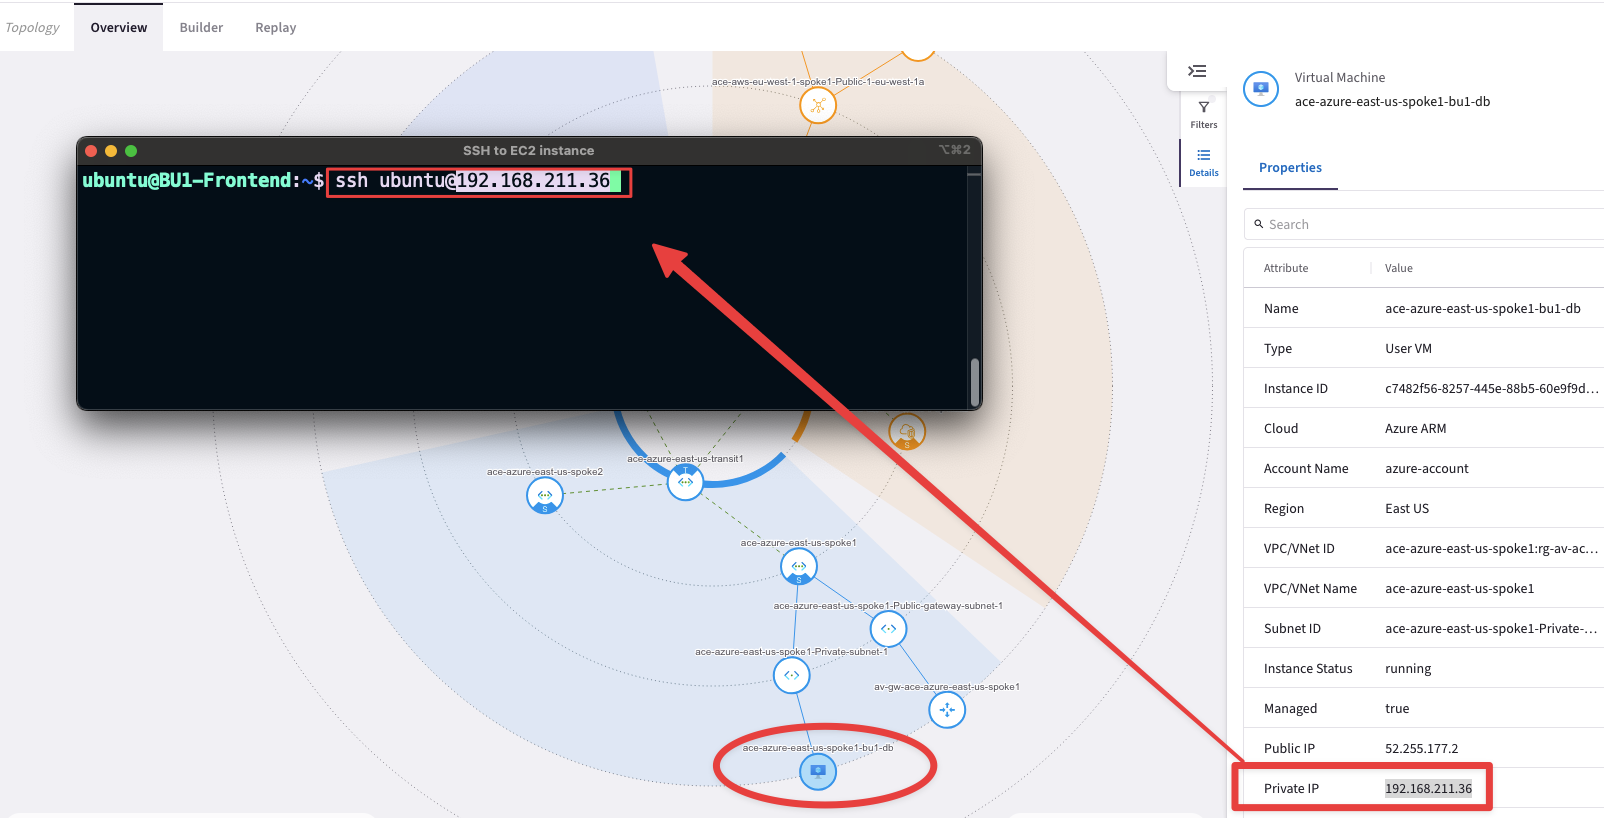
Fig. 131 SSH to BU1 DB#
Enable the
Discovery Modeon the Greenfield-Rule
Tip
Go to CoPilot > Security > Distributed Cloud Firewall > Rules and edit the Greenfield-Rule, clicking on the pencil icon on the right-hand side.
This time attach the All-Web WebGroup and then click on Save In Drafts.

Fig. 132 Edit the Greenfield-Rule#

Fig. 133 All-Web#
Do not forget to commit your changes into the Data Path.

Fig. 134 Commit#
Now execute the apt-get commands from the BU1 DB !
sudo apt-get update -y
and
sudo apt-get upgrade -y
Check the domains hit by the apt-get commands
Tip
Go to CoPilot > Security > Egress > Monitor and select the ace-azure-east-us-spoke1 on the "VPC/VNets" field.
Warning
Identify all the required domains for launching successfully the apt-get commands, inspecting solely the whole list of logs.
The required domains are five!
Click here for discovering the domains

Fig. 135 Monitor#
Detach the All-Web Webgroup from the Greenfield-Rule.
Tip
Go to CoPilot > Security > Distributed Cloud Firewall > Rules and click on the pencil icon on the righ-hand side.
Clear the WebGroups field and then click on Save In Drafts.
Do not forget then to click on Commit.
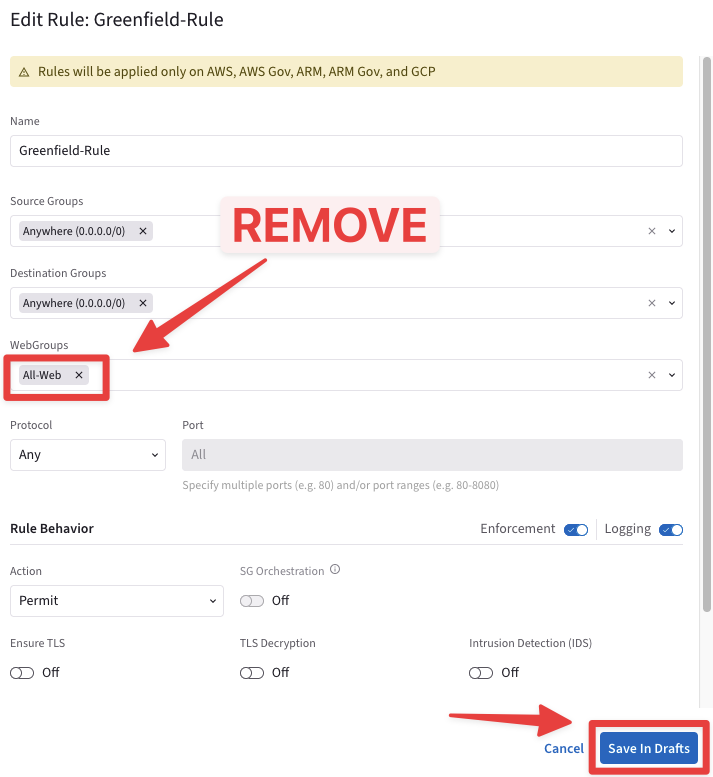
Fig. 136 Detaching the All-Web WebGroup#
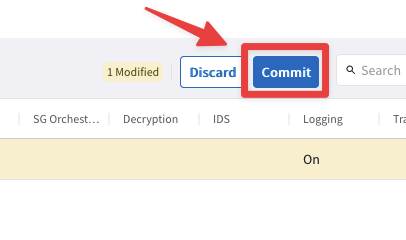
Fig. 137 Commit your change#
Now that you have discovered the domains that are triggered when the apt-get commands are executed, you can proceed in disabling the
Egressfeature from the Spoke1 VNet.
Tip
Go to CoPilot > Security > Egress > Egress VPC/VNets and click on the remove button
beside the ace-azure-east-us-spoke1 VNet entry.

Fig. 138 Disable Egress on Spoke1 VNet#
SSH to the BU2 DB (this VM does not have a Public IP, whereby you need to SSH to BU1 Frontend first, and then from that VM, issue the SSH command towards the Private IP of BU2 DB).
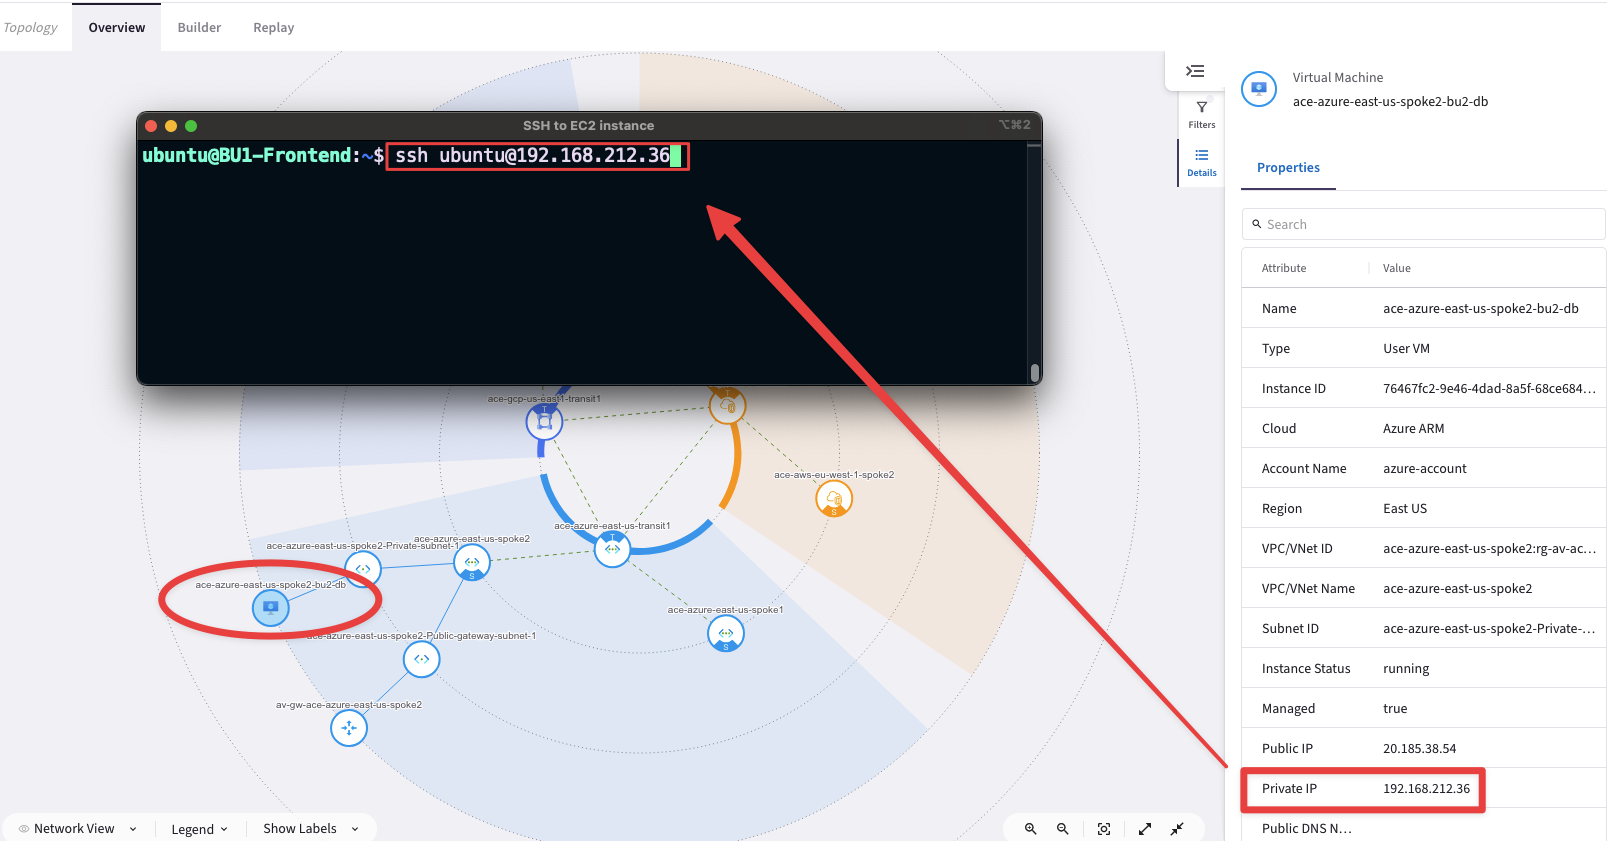
Fig. 139 BU2 DB ip address#
Issue the following curl commands:
curl www.google.com
curl www.wikipedia.com
curl www.espn.com
All commands will be successful, however, this is not what the request asked you to configure…
Enable the
ZTNA Model(i.e. Zero Trust Network Architecture Model), creating an Explicit Deny Rule first.
Tip
Go to CoPilot > Security > Distributed Cloud Firewall > Rules and click on the "+Rule" button.
Create an Explicit Deny Rule:
Name: Explicit-Deny-Rule
Source Smartgroups: Anywhere(0.0.0.0/0)
Destination Smartgroups: Anywhere(0.0.0.0/0)
Logging: On
Action: Deny
Do not forget once again to click on Save In Drafts and then click on Commit.
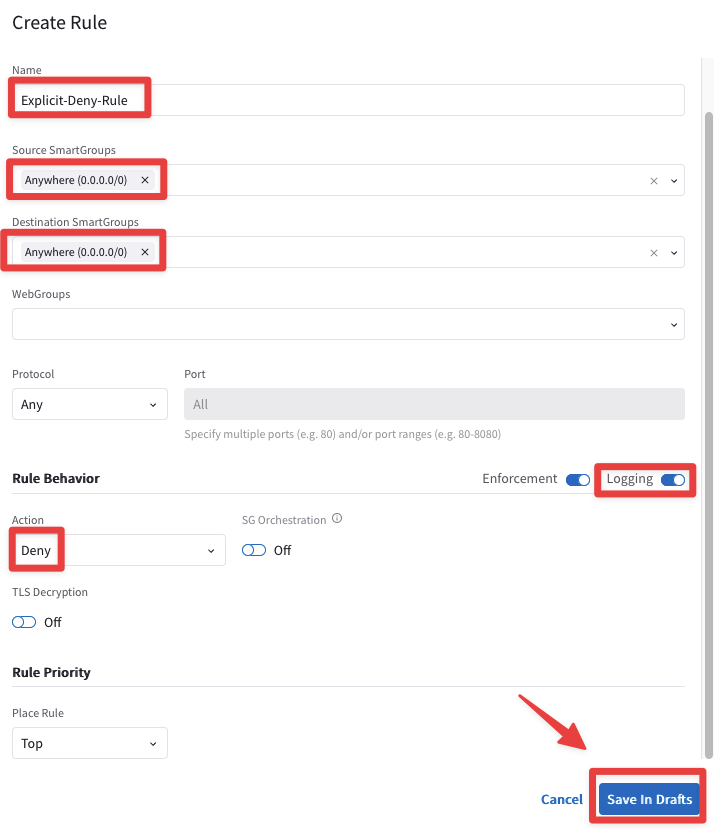
Fig. 140 Explicit-Deny-Rule#
As soon as the Explicit-Deny-Rule is deployed the SSH session with the BU2 DB will be terminated.
You will have to reestablish the SSH session with BU2 DB!
Warning
The East-West traffic is blocked now!
Explore the SmartGroups section on the CoPilot
Tip
Go to CoPilot > Groups
You will notice two SmartGroups, called BU1 and BU2, in addition to the pre-defined SmartGroups (i.e. Anywhere and Public Internet).
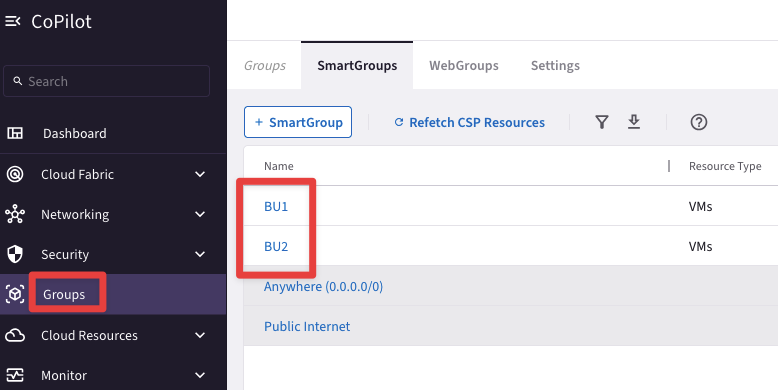
Fig. 141 SmartGroups list#
Expand either SmartGroups to find out what VMs have been associated to each of these logical container.

Fig. 142 BU1’s members#
It is evident that BU1 Frontend turns out belonging to the BU1 SmartGroup, whereas the BU2 DB is a member of the BU2 SmartGroup.
Important
These two SmartGroups had been preprovisioned for you at the launch of the PODs.
Create an inter-rule that allows SSH from BU1 to BU2.
Tip
Go to CoPilot > Security > Distributed Cloud Firewall > Rules and click on the "+ Rule" button.
Ensure these parameters are entered in the pop-up window "Create Rule":
Name: inter-ssh-bu1-bu2
Source Smartgroups: BU1
Destination Smartgroups: BU2
Protocol: TCP
Port: 22
Logging: On
Action: Permit
Do not forget to click on Save In Drafts, and then Commit this new rule!

Fig. 143 Three Rules#
SSH to BU2 DB from the BU1 Frontend, then check the logs!
Tip
Go to CoPilot > Security > Distributed Cloud Firewall > Monitor

Fig. 144 SSH logs#
Now create another SmartGroup that identifies the BU2 DB, solely.
Tip
Go to CoPilot > Groups and click on the "+ SmartGroup" button.
Ensure these parameters are entered in the pop-up window "Create SmartGroup":
Name: BU2-DB
CSP Tag Key: environment –> CSP Tag Value: bu2
CSP Tag Key: Region –> CSP Tag Value: eastus
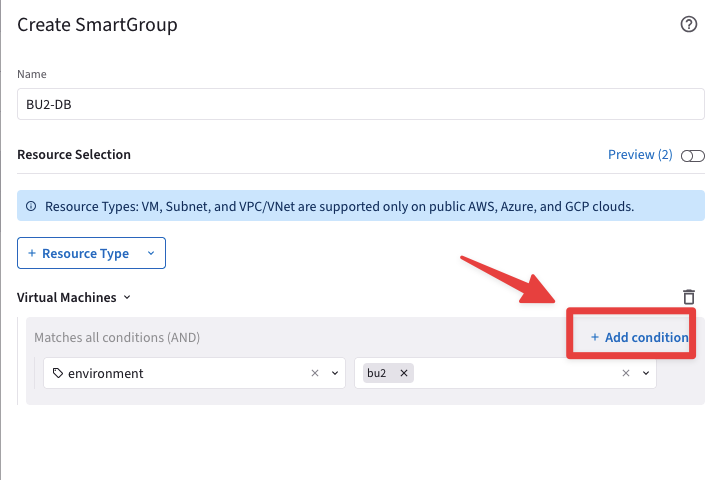
Fig. 145 +Add condition#
Do not forget to click on Save.
Tip
The SmartGroup can match multiple tags simultaneously, harnessing the boolean expressions!
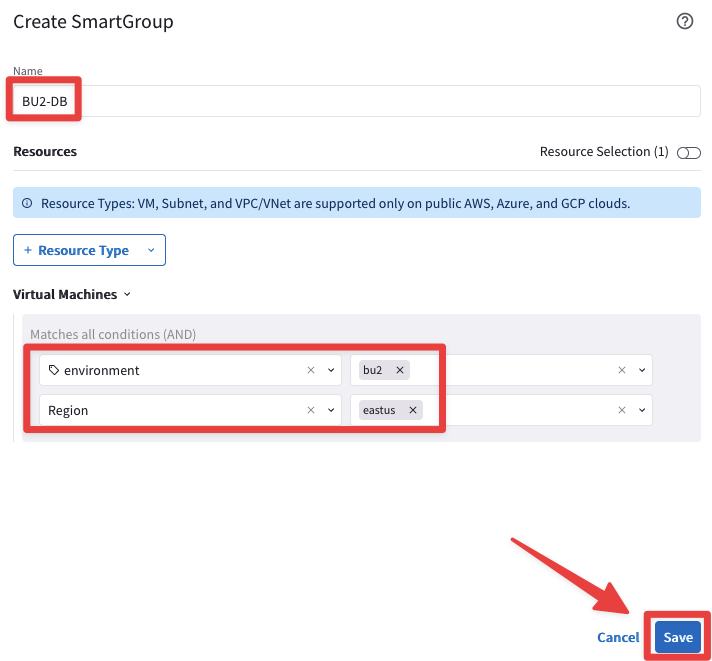
Fig. 146 BU2 DB SmartGroup#
Create a WebGroup that matches the domains and sub-domains that you found earlier.
Tip
Go to CoPilot > Groups > WebGroups and then click on "+ WebGroup".
Ensure these parameters are entered in the pop-up window "Create WebGroup":
Name: ubuntu-update
Type: Domains
Domains/URLs: *.ubuntu.com
Domains/URLs: *.archive.ubuntu.com
Domains/URLs: *.canonical.com
then click on Save.
Caution
These are the domains identified before using the Discovery Mode (= Greenfield-Rule + All-Web).
The FQDNs
*.ubuntu.comand*.canonical.comare both using a first-level wilcard. These wildcards will be placeholders for ntp.ubuntu.com, ftp.ubuntu.com, download.ubuntu.com, contracts.canonical.com…The FQDN
*.archive.ubuntu.comis using a second-level wilcard, that allows to create a subdivision within archive.ubuntu.com.
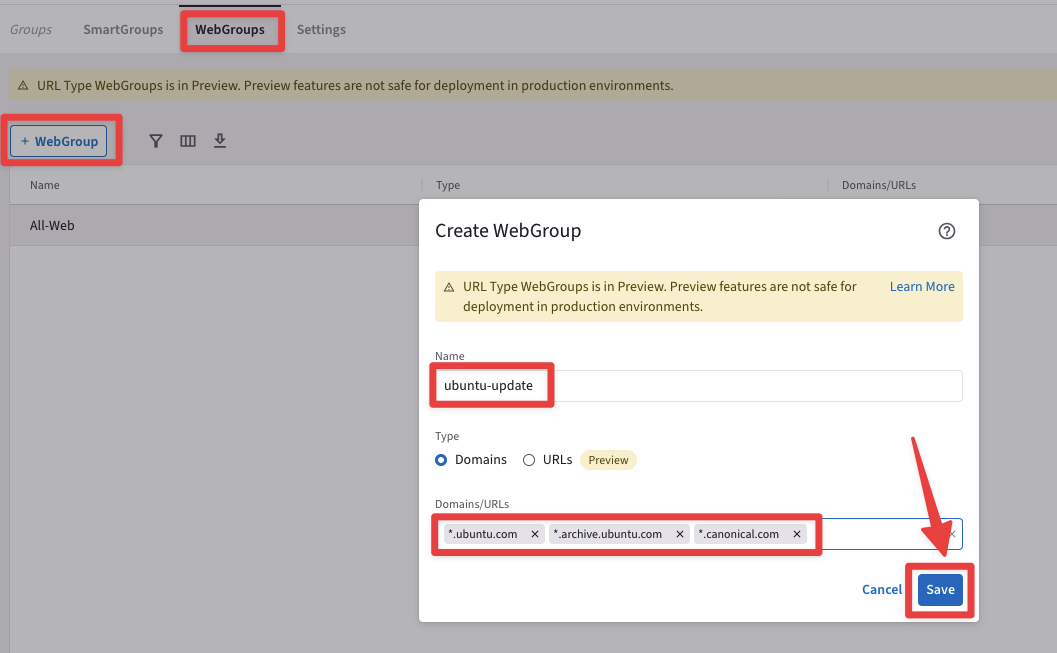
Fig. 147 ubuntu-update#
Now create an inter-rule that allows BU2 DB to generate traffic towards Internet but only for reaching out the ubuntu servers !
Tip
Go to CoPilot > Security > Distributed Cloud Firewall > Rules and click on the "+ Rule" button.
Ensure these parameters are entered in the pop-up window "Create Rule":
Name: inter-ubuntu-bu2db-internet
Source Smartgroups: BU2-DB
Destination Smartgroups: Public internet
WebGroups: ubuntu-update
Protocol: Any
Logging: On
Action: Permit
Do not forget to click on Save In Drafts, and then Commit your rule once again!
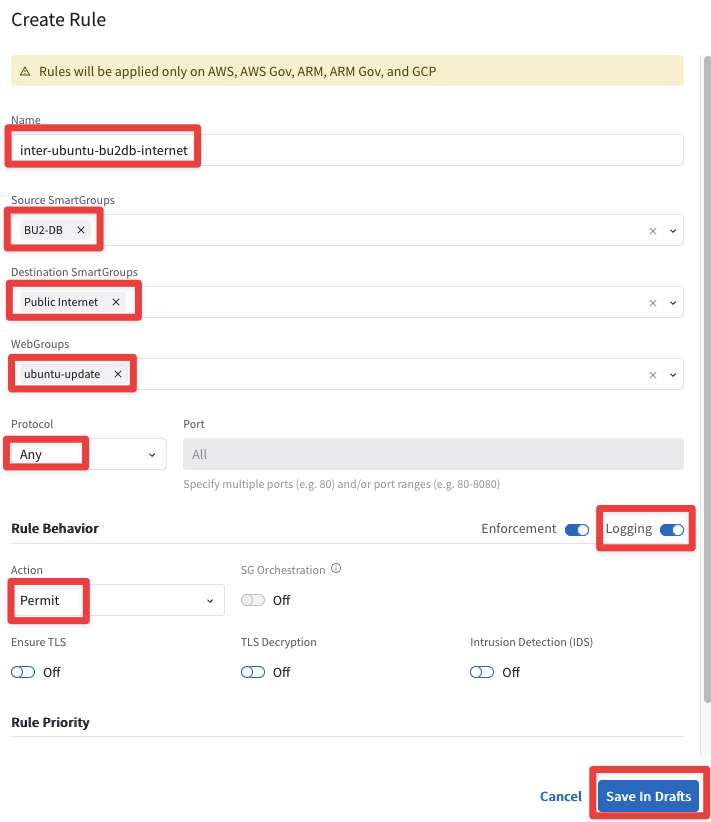
Fig. 148 inter-ubuntu-bu2db-internet#

Fig. 149 DCF rules list#
Now try issuing the following curl commands once again from the BU2 DB virtual machine:
curl www.google.com
curl www.wikipedia.com
curl www.espn.com
You will notice three Drop entries within the Monitor section that have matched the Explicit-Deny-Rule, successfully.

Fig. 150 Explicit Deny Rule matching#
Now try to run the apt-get commands !
sudo apt-get update -y
and
sudo apt-get upgrade -y
Now check the logs within the Egress section!
Tip
Go to CoPilot > Security > Egress > Monitor and select the ace-azure-east-us-spoke2 VNet

Fig. 151 ace-azure-east-us-spoke2#
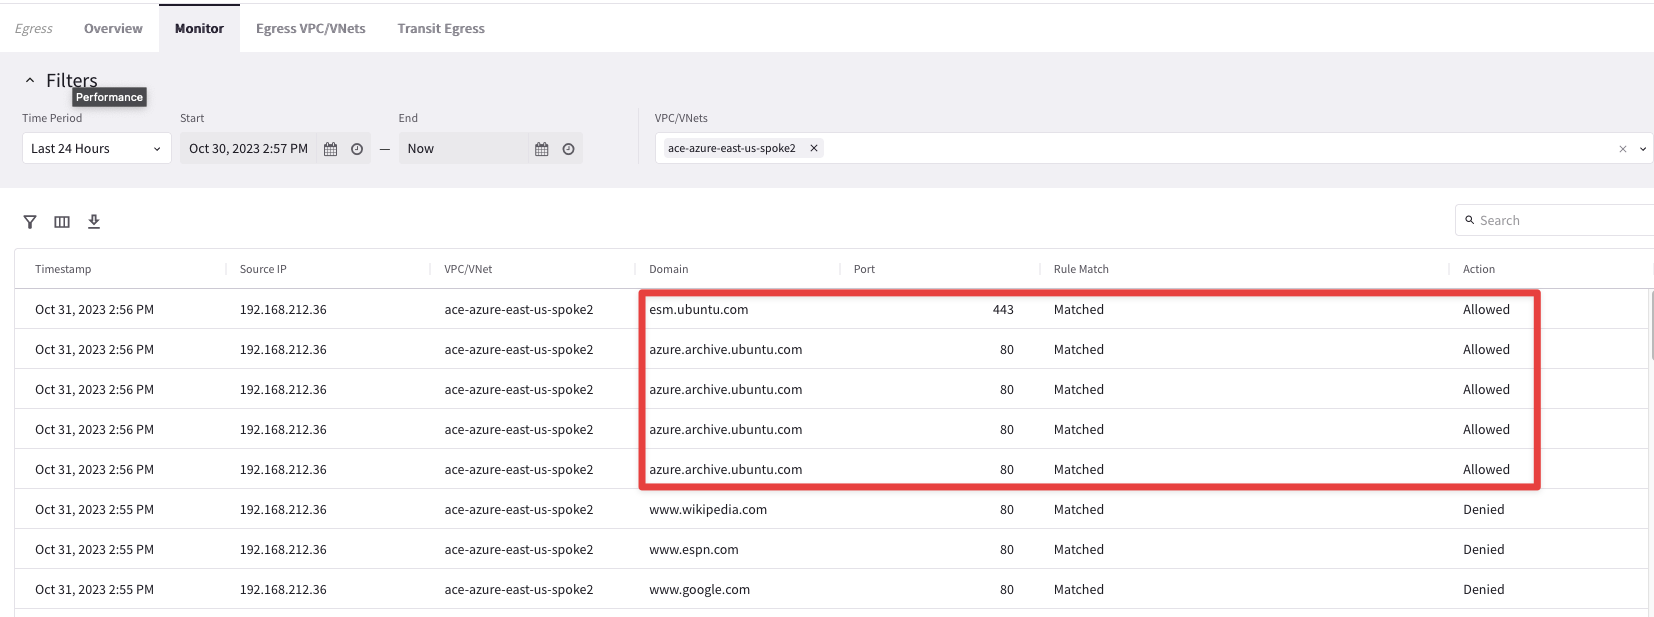
Fig. 152 Allowed domains!#
You have successfully applied the Secure Egress Control, leveraging both the Egress feature and the Distributed Cloud Firewall rules!
