Lab 5 - CLOUD PERIMETER SECURITY (Secure Cloud Egress)#
1. Objective#
In this lab, we will demonstrate how to enable the Cloud Perimeter Security (Secure Cloud Egress), one of the features that belongs to the Distributed Cloud Firewall functionality, on the VPC that we want to target. Of course, the selected VPC should have at least a subnet associated to a Private Routing table (i.e. without a default route pointing to the IGW). The Controller will reroute the traffic through the Aviatrix Spoke Gateway. The Egress Control can guarantee immediately better visibility and better control in order to replace the CSP Native NAT Gateways. Cloud Perimeter Security (Secure Cloud Egress) allows to reduce the cloud costs and at the same time, improve the security without impacting the architecture.
2. Topology#
Let’s pinpoint the right candidate VPC where would be possible to enable the Egress Control.
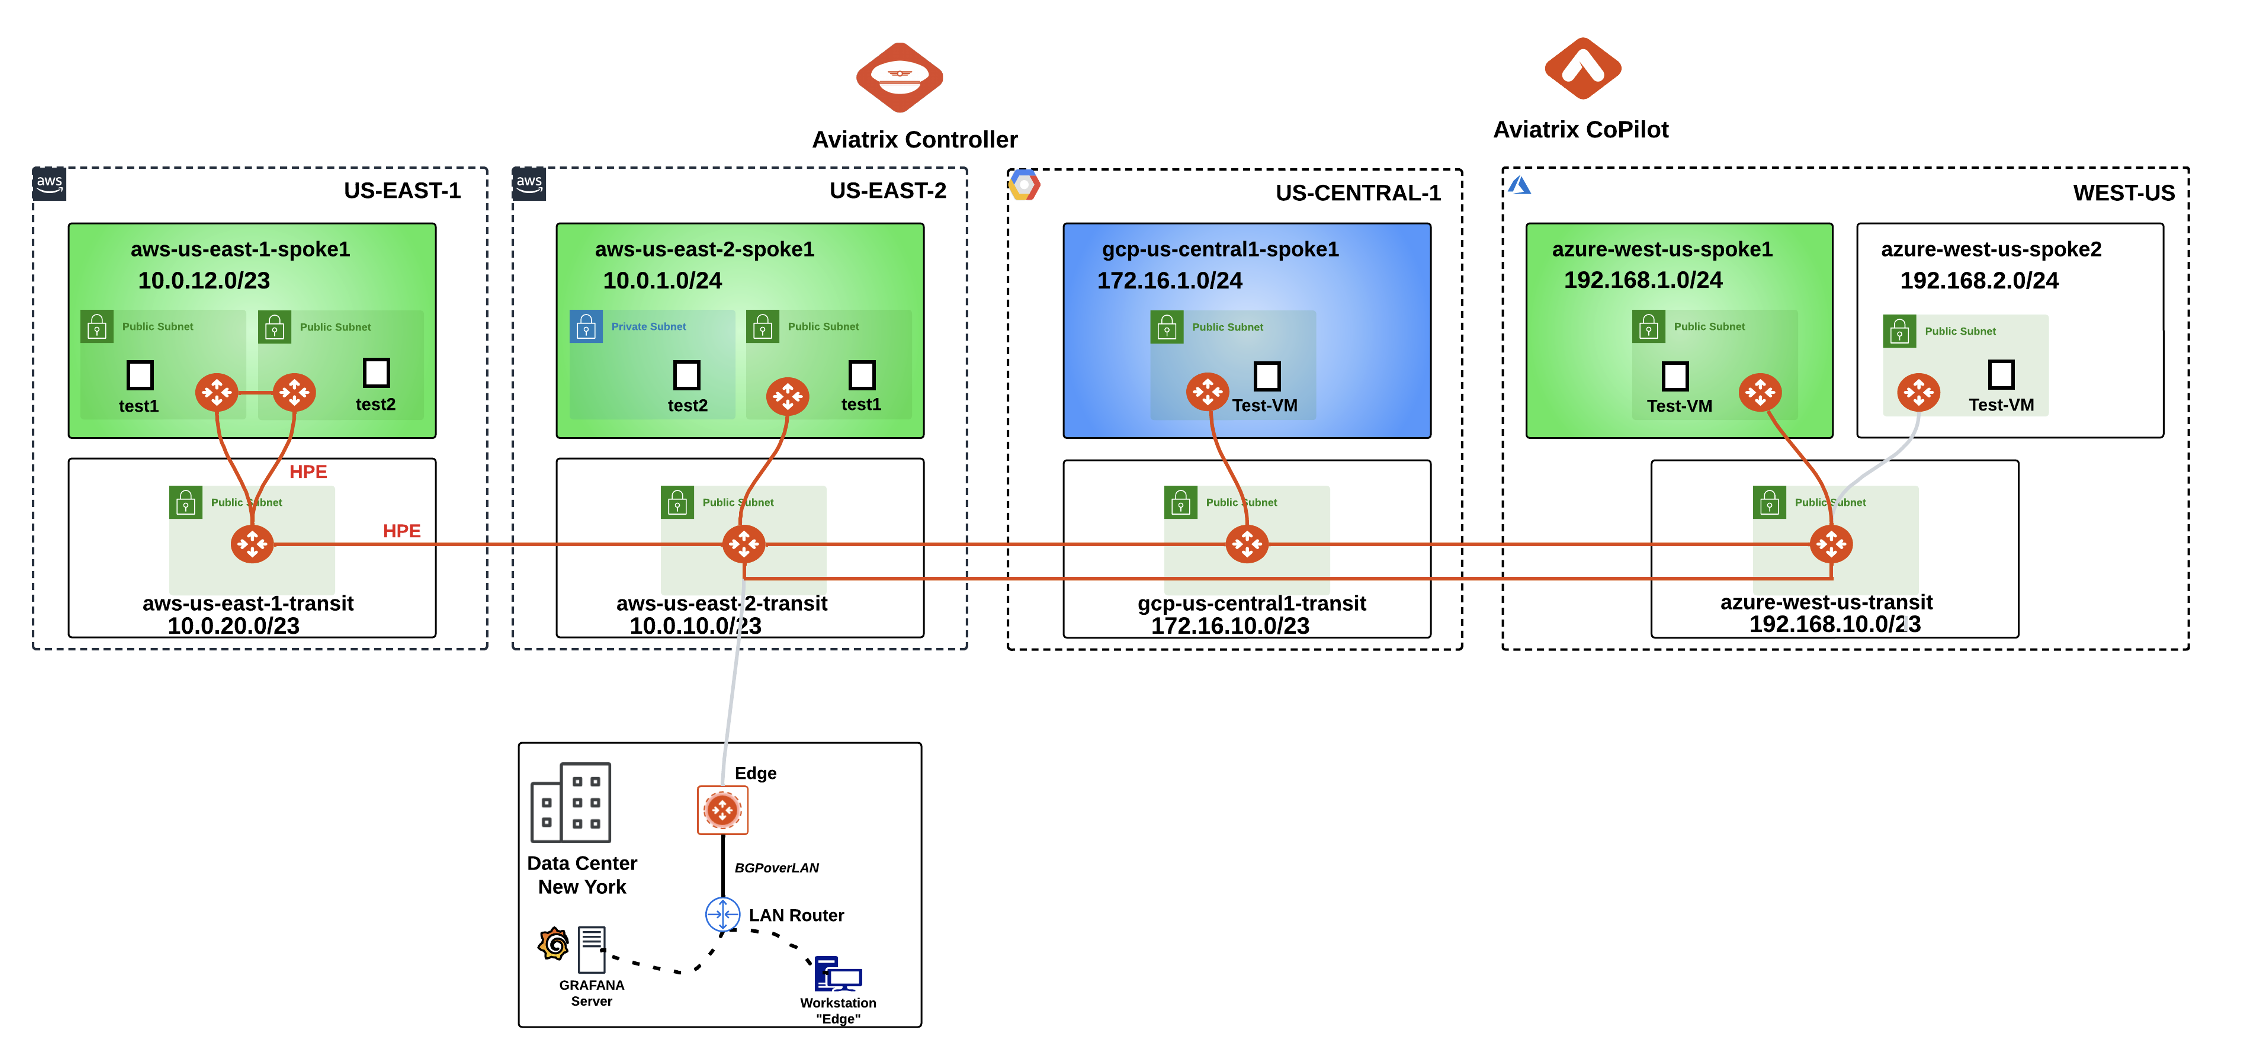
Fig. 146 Lab 6 Initial Topology#
The VPC aws-us-east-2-spoke1 has a private subnet in its environment, whereby the Egress Control can be activated in this specific VPC.
Explore the Private Routing Tables inside the VPC aws-us-east-2-spoke1
Tip
Go to CoPilot > Cloud Fabric > Gateways > Spoke Gateways and select the aws-us-east-2-spoke1 GW, then click on the VPC/VNet Route Tables tab, then select any of the Private RTBs from the Route Table field.
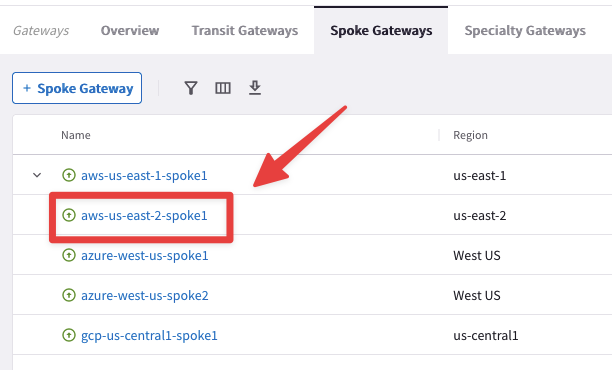
Fig. 147 Select the Spoke GW in US-EAST-2#
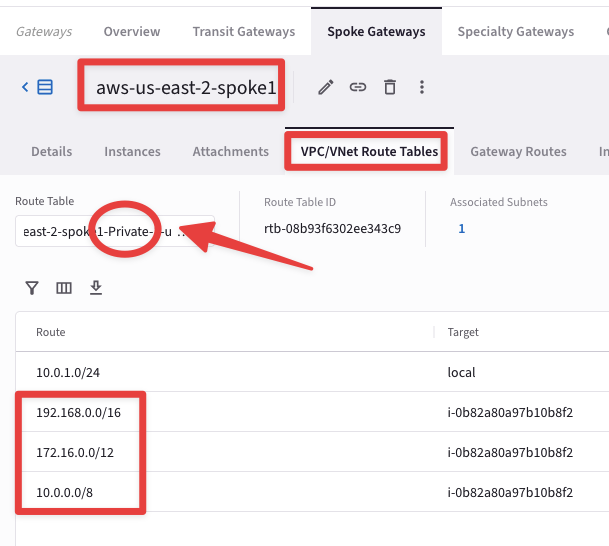
Fig. 148 Check the private RTB#
You will notice that any private RTBs has its own CIDR pointing to local and the three RFC1918 routes pointing to the Aviatrix Spoke Gateway.
With this scenario, the EC2 instance can’t reach the Internet Public Zone, due to the absence of a default route.
3. SSH to the EC2 instance in the Private Subnet#
SSH to the aws-us-east-2-spoke1-test1 instance from your laptop. Refer to your POD portal or alternatively, you can retrieve the Public IP from the CoPilot’s Topology.
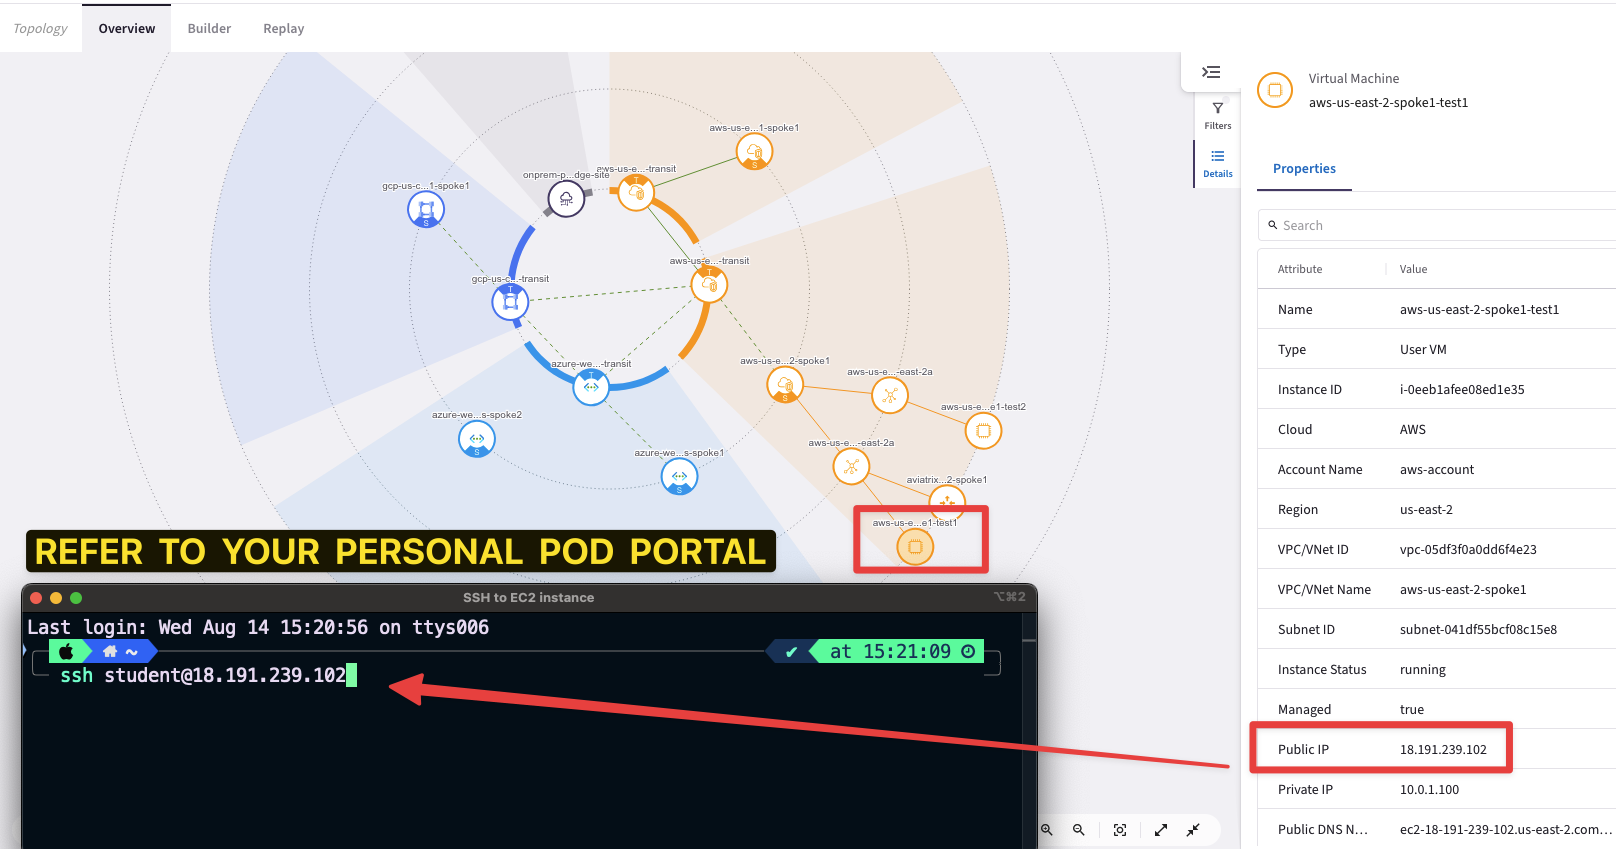
Fig. 149 SSH to aws-us-east-2-spoke1-test1#
Then from the aws-us-east-2-spoke1-test1 instance SSH to the aws-us-east-2-spoke1-test2 instance.
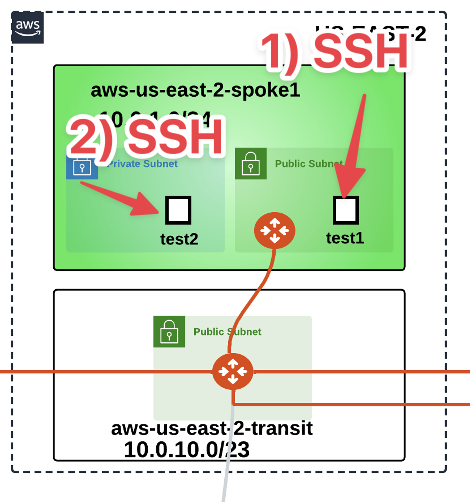
Fig. 150 From test1 to test2#
Note
The aws-us-east-2-spoke1-test2 instance resides within a private subnet!
Tip
Retrieve the Private IP of the aws-us-east-2-spoke1-test2 from the Topology
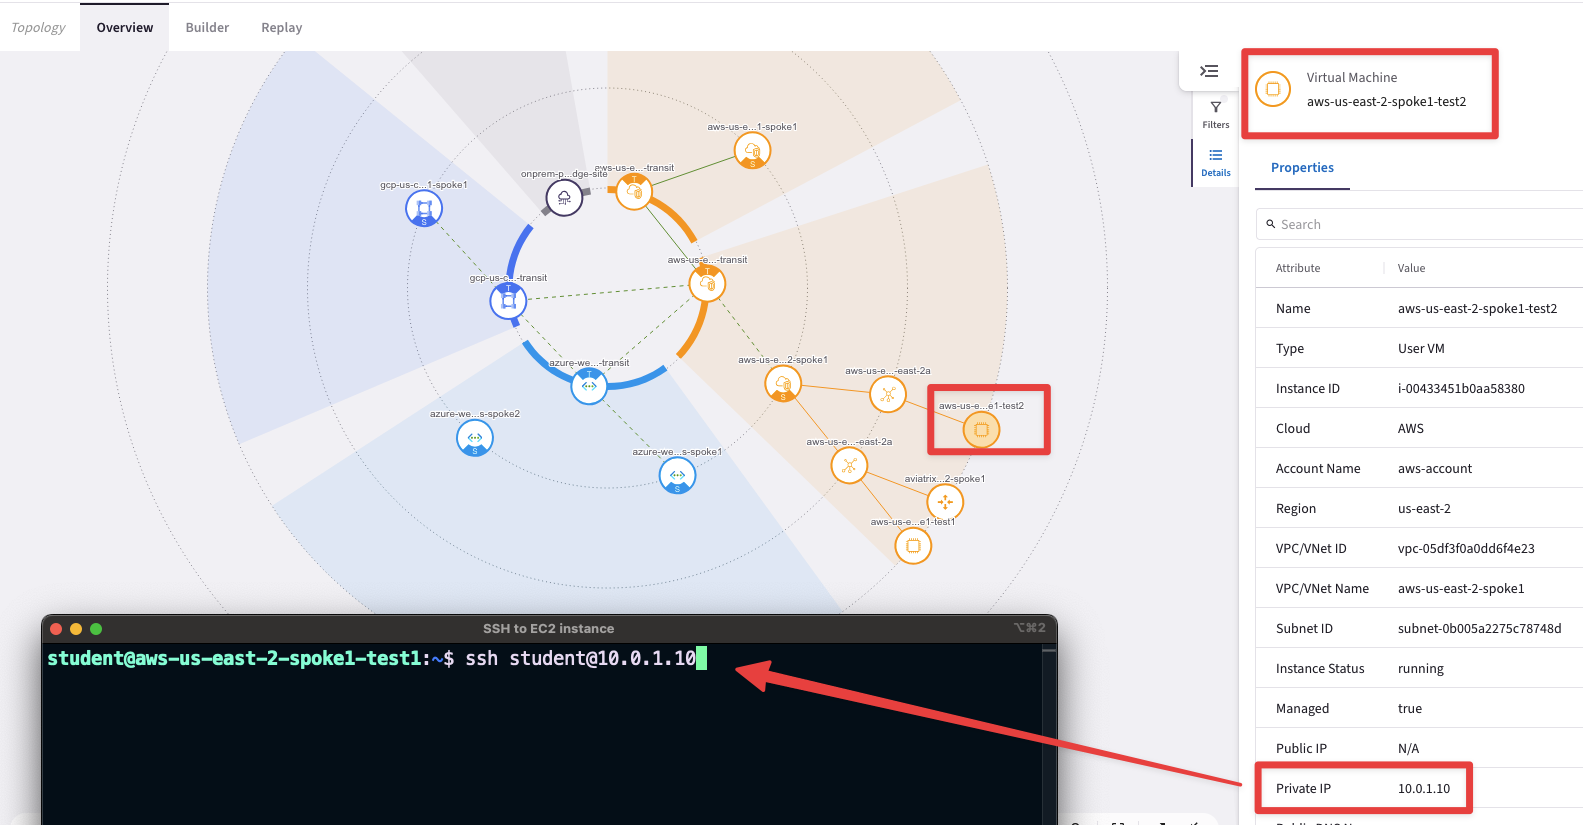
Fig. 151 Retrieve the private IP#
4. Egress Control#
4.1 Enable the Egress Control#
Now let’s enable the egress within the VPC that is hosting the aws-us-east-2-spoke1-test2 instance.
Note
Go to CoPilot > Security > Egress > Egress VPC/VNets and click on "+ Local Egress on VPC/VNets", then select the aws-us-east-2-spoke1 VPC and click on Add.
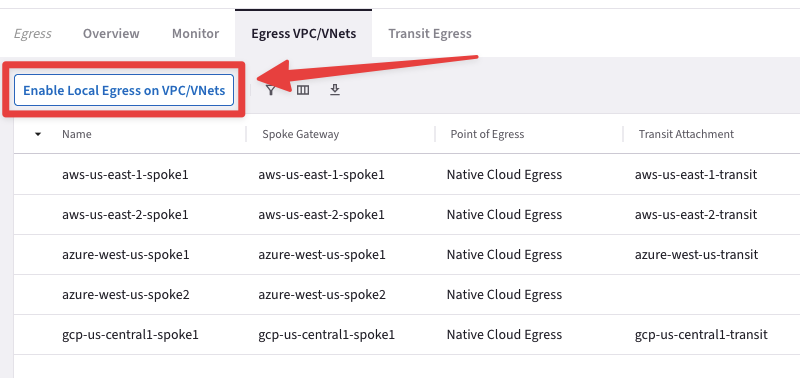
Fig. 152 Enable Local Egress#
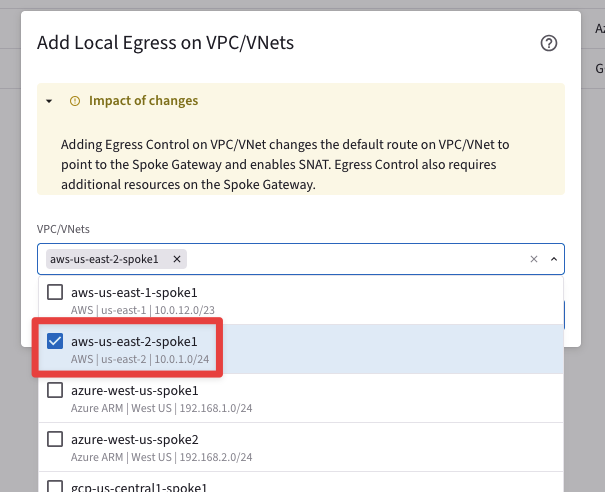
Fig. 153 Choose the correct VPC#
4.2 Inspect the Private RTB#
Upon enabling Local Egress on the specified VPC, the Aviatrix Controller will immediately execute two actions on the specified VPC:
Injecting a Default Route: This route is added exclusively to the Private Route Tables (RTBs). Public Route Tables (RTBs) remain unaffected and will continue to have their default route pointing towards the native Cloud Service Provider (CSP) Internet Gateway (IGW).
Enabling Single IP SNAT on VPC Spoke Gateway: Source Network Address Translation (SNAT) will be enabled on the VPC spoke gateway using a single IP address.
At this point, the Aviatrix performs the same functions as the CSP NAT Gateway.
Verify its presence in any Private RTBs inside the aws-us-east-2-spoke1 VPC.
Tip
Go to CoPilot > Cloud Fabric > Gateways > Spoke Gateways and select the aws-us-east-2-spoke1 GW, then click on the VPC/VNet Route Tables tab, then select any Private RTBs from the Route Table field.
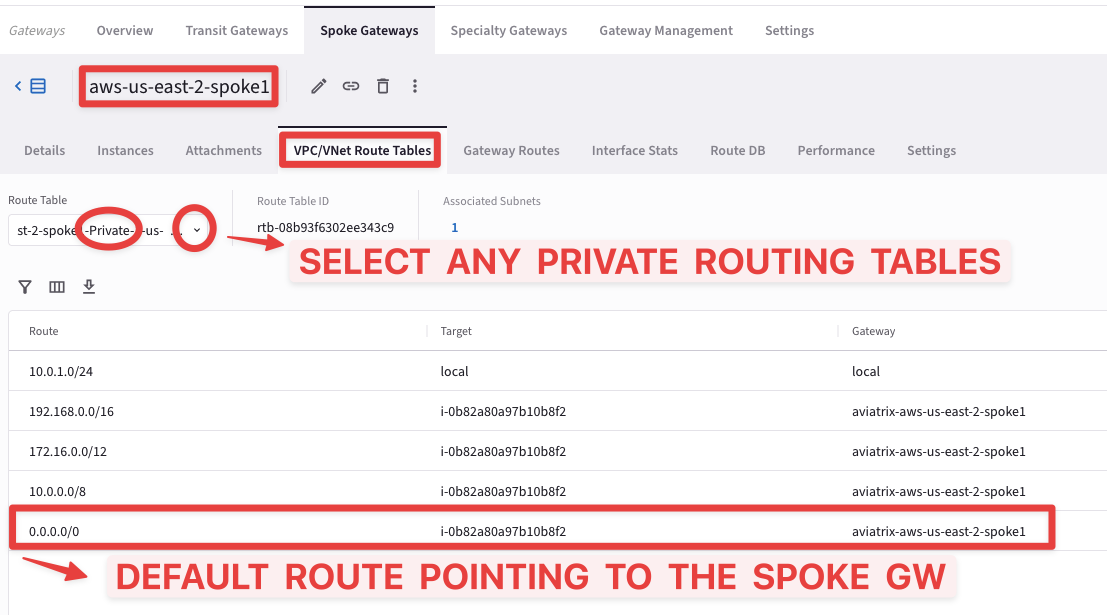
Fig. 154 Default route has been injected#
Important
Now, thanks to the default route, the instance aws-us-east-2-spoke1-test2 will be able to generate traffic towards the internet public zone.
4.3 Generate Traffic#
From the aws-us-east-2-spoke1-test2 instance, try to curl the following websites:
curl www.aviatrix.com
curl www.wikipedia.com
curl www.espn.com
curl www.football.com
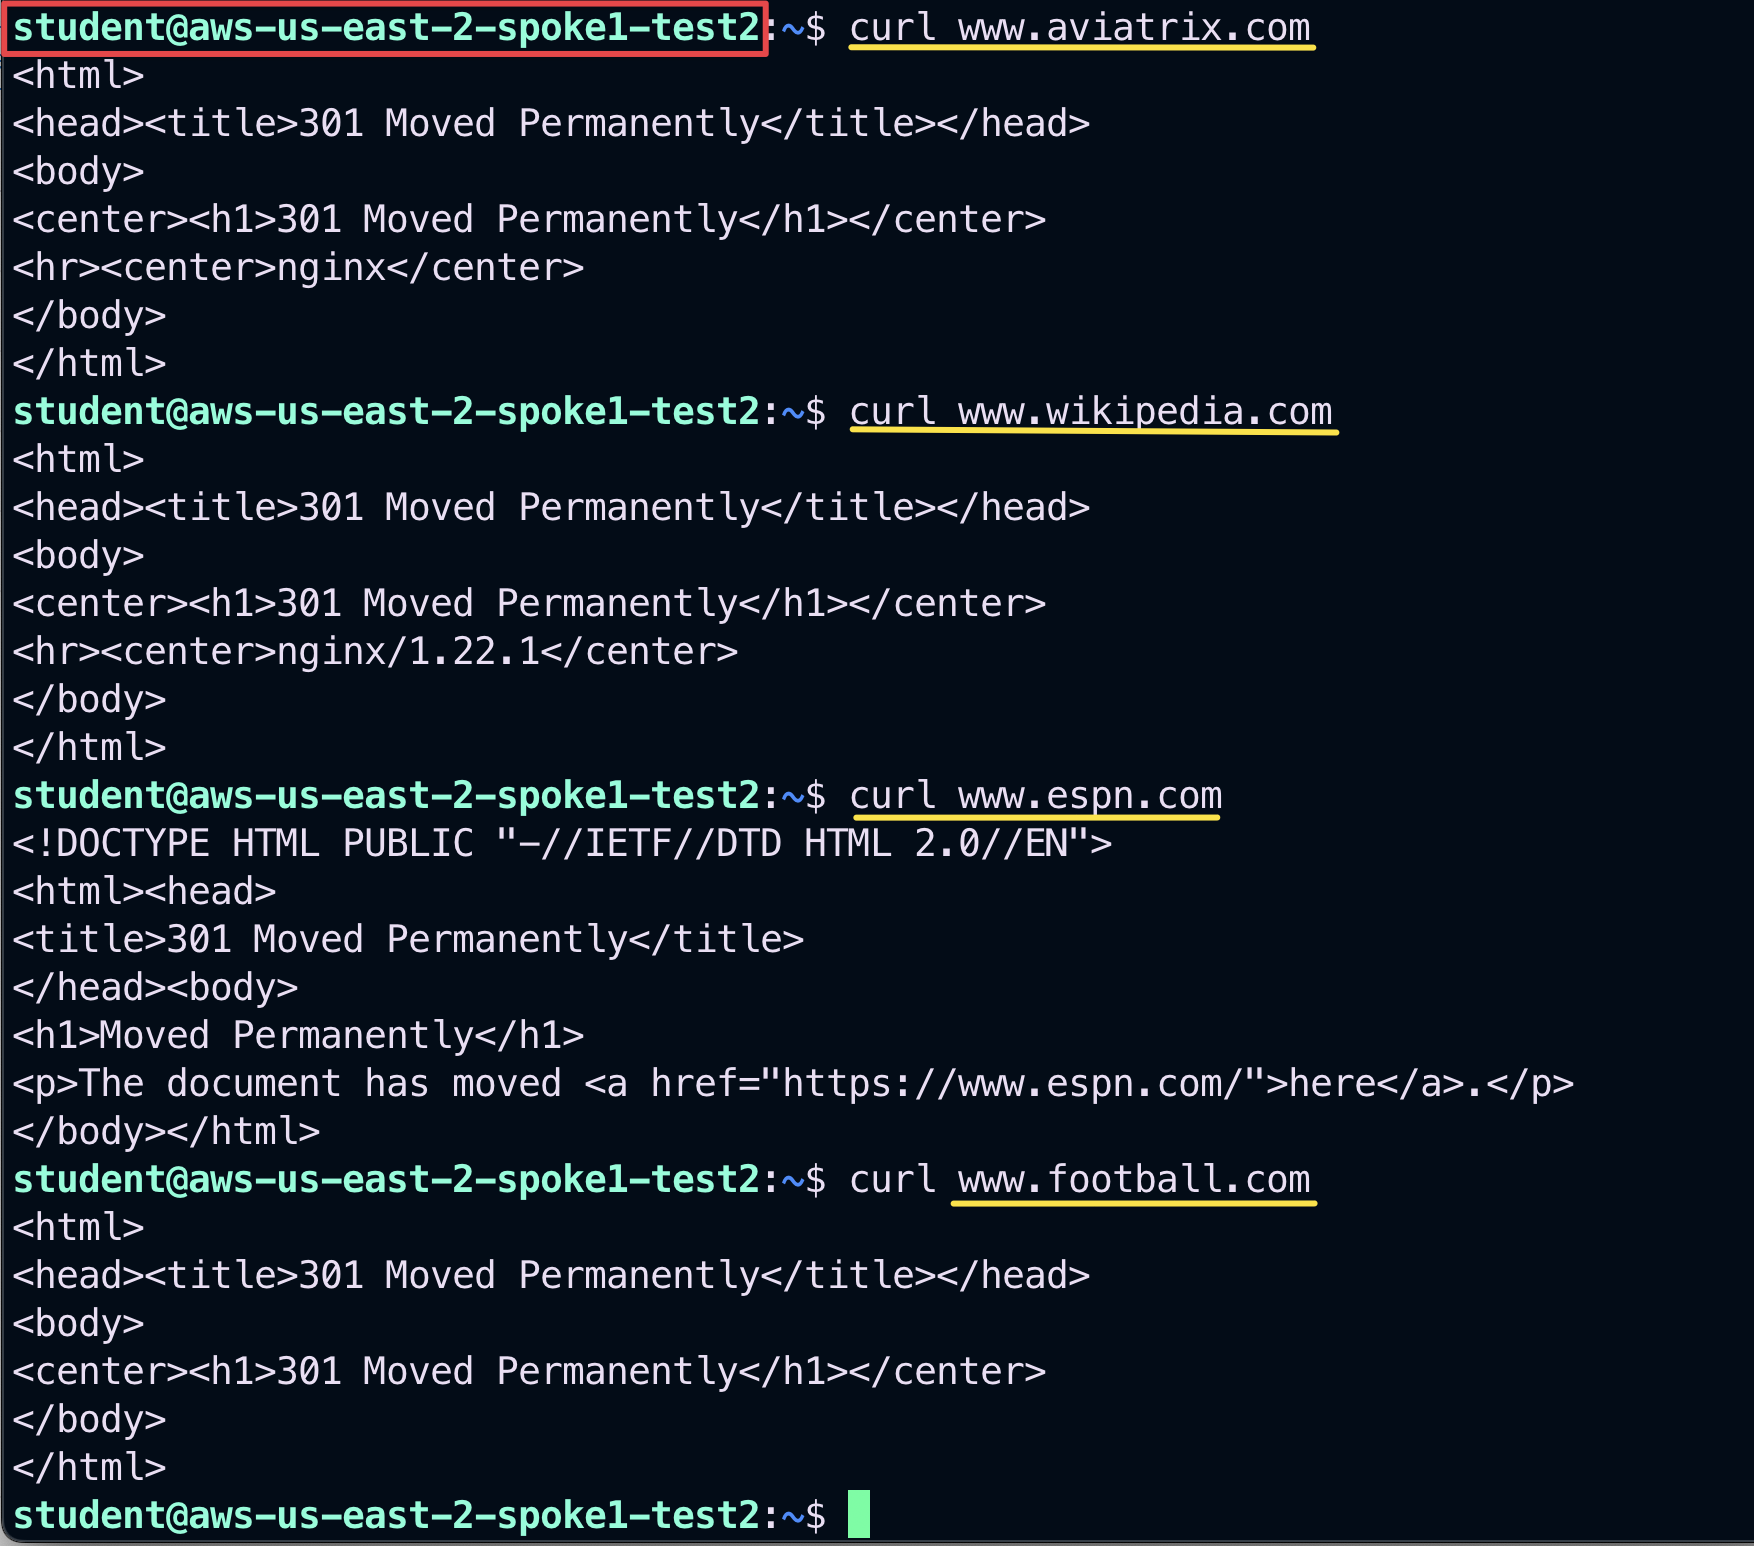
Fig. 155 Generate traffic#
Let’s now check whether the Spoke Gateway could gather NetFlow data after generating the aforementioned curl commands, or not.
Go to CoPilot > Security > Egress > Overview (default)
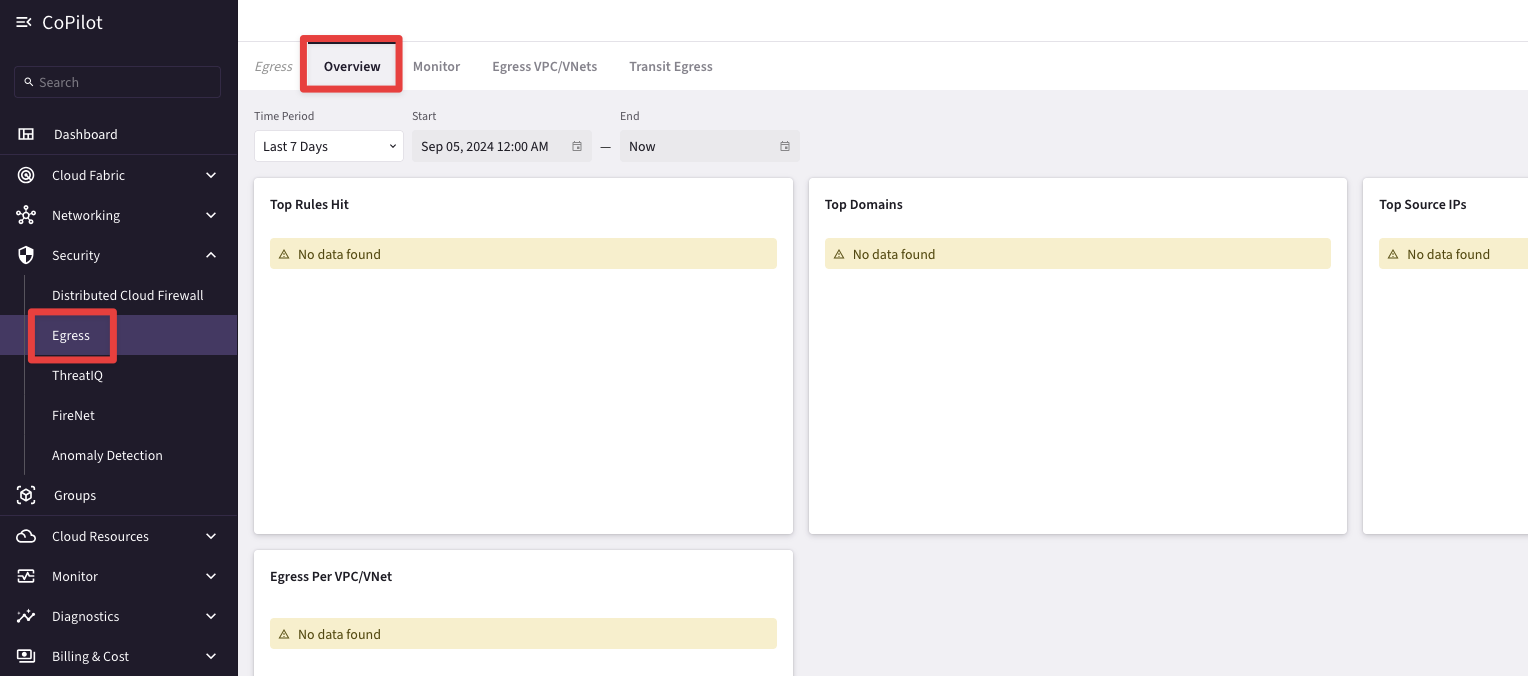
Fig. 156 No Data Found#
You will notice the Message "No Data Found". You have successfully activated your egress control without disrupting anything that is sitting on the private subnet, nevertheless, if you want to get the NetFlow information, you need to apply a Distributed Cloud Firewall RULE, such that you can start evaluate the behaviour of the Private Subnet and get a good understanding of what domains have been reached out from the private subnet.
4.4 Enable DCF#
Enable the Distributed Cloud Firewall.
Tip
Go to CoPilot > Security > Distributed Cloud Firewall > Rules and click on "Enable Distributed Cloud Firewall".
Afterwards click on "Begin using Distributed Cloud Firewall", then click on "Begin".
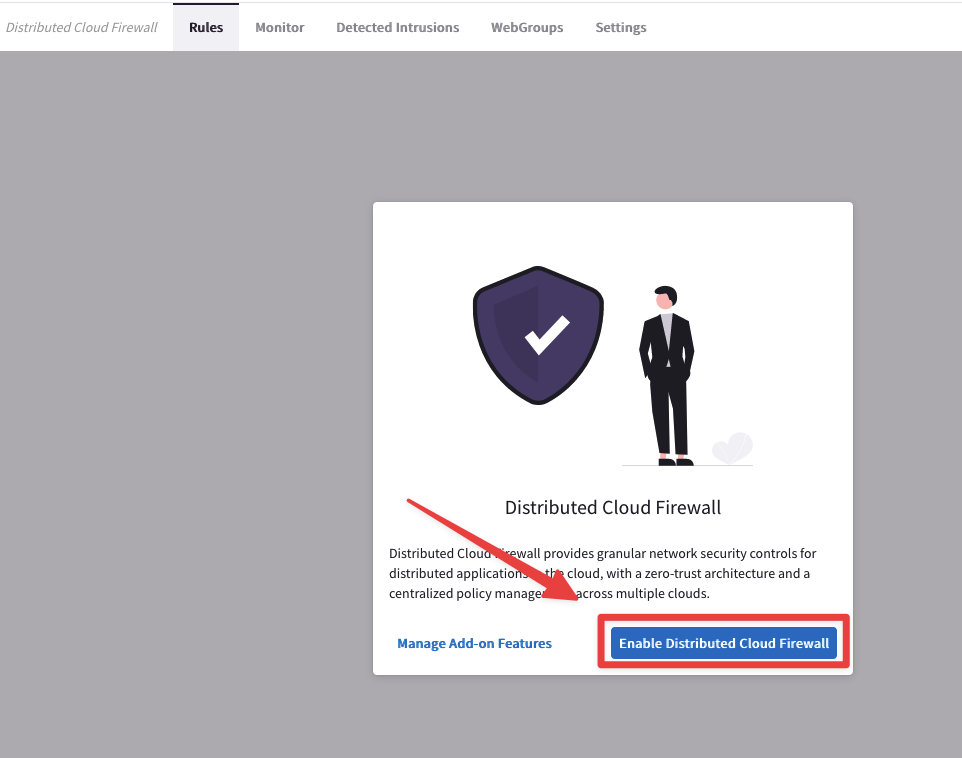
Fig. 157 Enable Distributed Cloud Firewall#
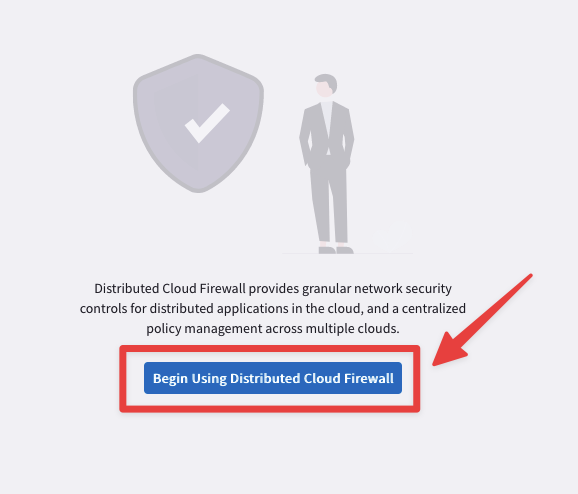
Fig. 158 Begin using Distributed Cloud Firewall#
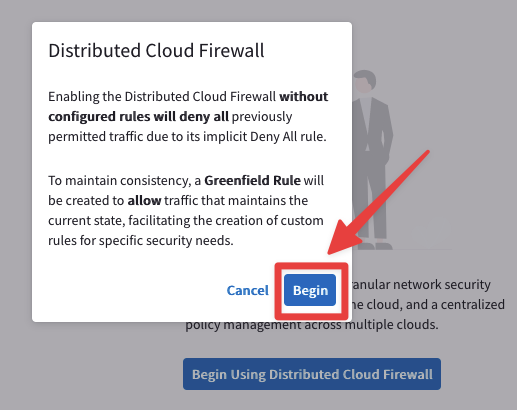
Fig. 159 Begin#
After having enabled the DCF, the Greendfield-Rule gets generated automatically.
This rule essentially allows all kind of traffic.

Fig. 160 Greenfield-Rule#
4.3 Create the Discovery-Rule#
Go to CoPilot > Security > Distributed Cloud Firewall > Rules (default tab) and create a new rule clicking on the "+ Rule" button.

Fig. 161 New Rule#
Insert the following parameters
Name: Discovery-Rule
Source Smartgroups: Anywhere(0.0.0.0/0)
Destination Smartgroups: Public Internet
WebGroups: All-Web
Protocol: Any
Enforcement: Off
Logging: On
Action: Permit
Do not forget to click on Save In Drafts.
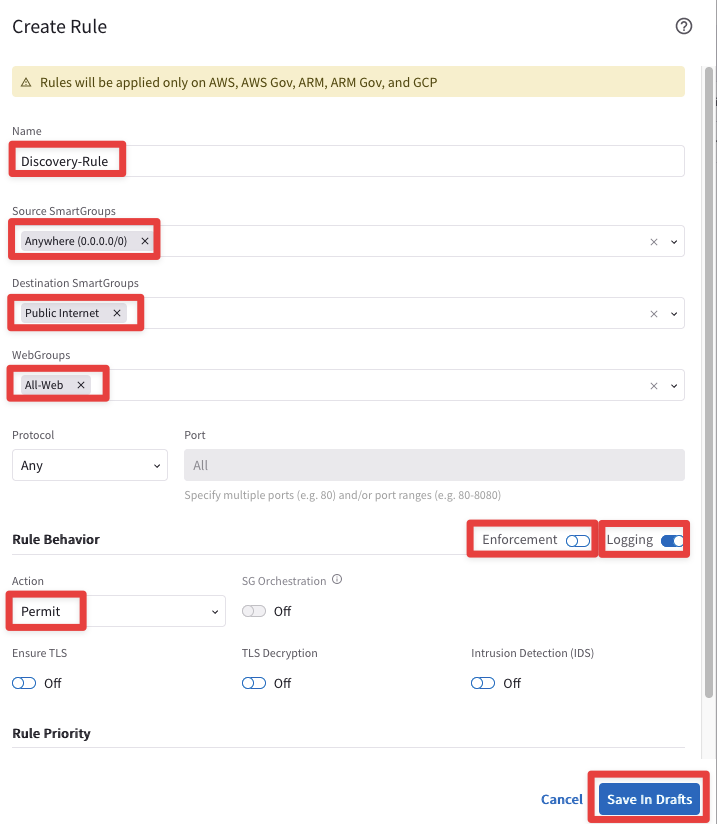
Fig. 162 Committing the Discovery-Rule#
Click on the Commit button and the rule previously created will work in watch/test mode due to the fact that the enforcement was turn off.
Important
If the Enforcement slider is On (the default), the rule is enforced in the data plane. If the Enforcement slider is Off, the packets are only watched. This allows you to observe if the traffic impacted by this rule causes any inadvertent issues (such as traffic being dropped).

Fig. 163 Discovery-Rule#
Launch again the following curl commands from the instance aws-us-east-2-spoke1-test2.
curl www.aviatrix.com
curl www.wikipedia.com
curl www.espn.com
curl www.football.com
Go to CoPilot > Security > Distributed Cloud Firewall > Monitor and you will see the corresponding four logs.

Fig. 164 Monitor: 4 logs#
Go to CoPilot > Security > Egress > Overview (default)
Now you have finally the egress observability with a full list of domains hit by the EC2 instance inside that private subnet.

Fig. 165 Overview#
Furthermore, go to CoPilot > Security > Egress > Monitor and from the "VPC/VNets" drop-down window, select the aws-us-east-2-spoke1 VPC.

Fig. 166 Monitor#
You will get a granular Layer 7 visibility that allows you to get a good understanding of how the egress traffic has been consumed and also allows you to help make decisions on how to potentially optimize that.
5. ZTNA - Zero Trust Network Architecture#
5.1 Create a New WebGroup#
Let’s move towards a posture where only the allowed egress domains are in place.
Go to CoPilot > Groups > WebGroups and click on "+ WebGroup" button.
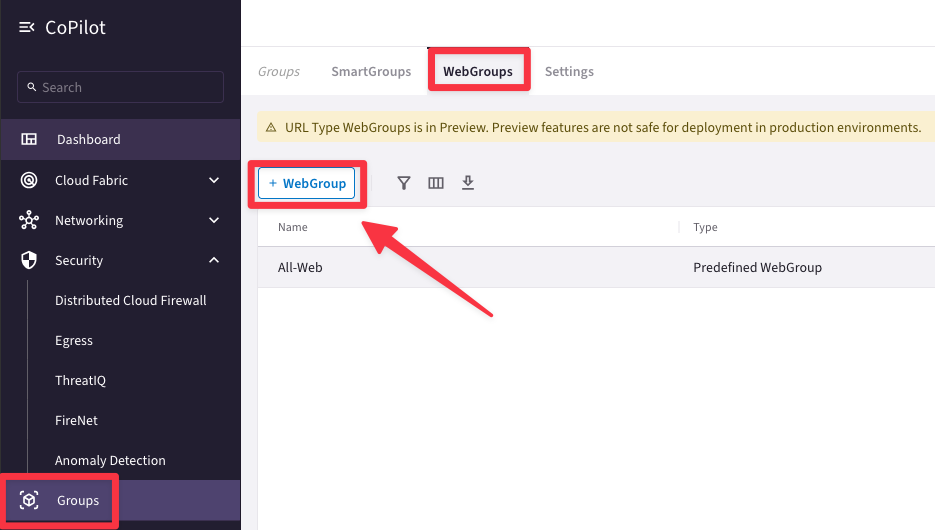
Fig. 167 +WebGroup#
Create a WebGroup with the following parameters:
Name: two-domains
Type: Domains
Domains/URLs: www.aviatrix.com
Domains/URLs: www.wikipedia.com
Do not forget to click on Save.
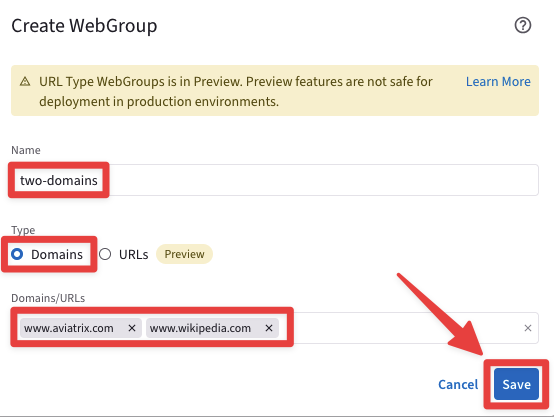
Fig. 168 WebGroup creation#
Important
The purpose of this WebGroup is to authorize traffic only towards both the Domains www.aviatix.com and www.wikipedia.com, therefore the curl commands issued towards other Domains will be blocked.
5.2 New DCF Rule#
5.2.1 Create a new rule#
Go to CoPilot > Security > Distributed Cloud Firewall > Rules and click on the "+ Rule" button.
Create a new DCF rule with the following parameters:
Name: allow-domains
Source Smartgroups: Anywhere(0.0.0.0/0)
Destination Smartgroups: Public Internet
WebGroups: two-domains
Logging: On
Action: Permit
Do not forget to click on Save In Drafts.
Warning
Keep the other parameters with their default values!
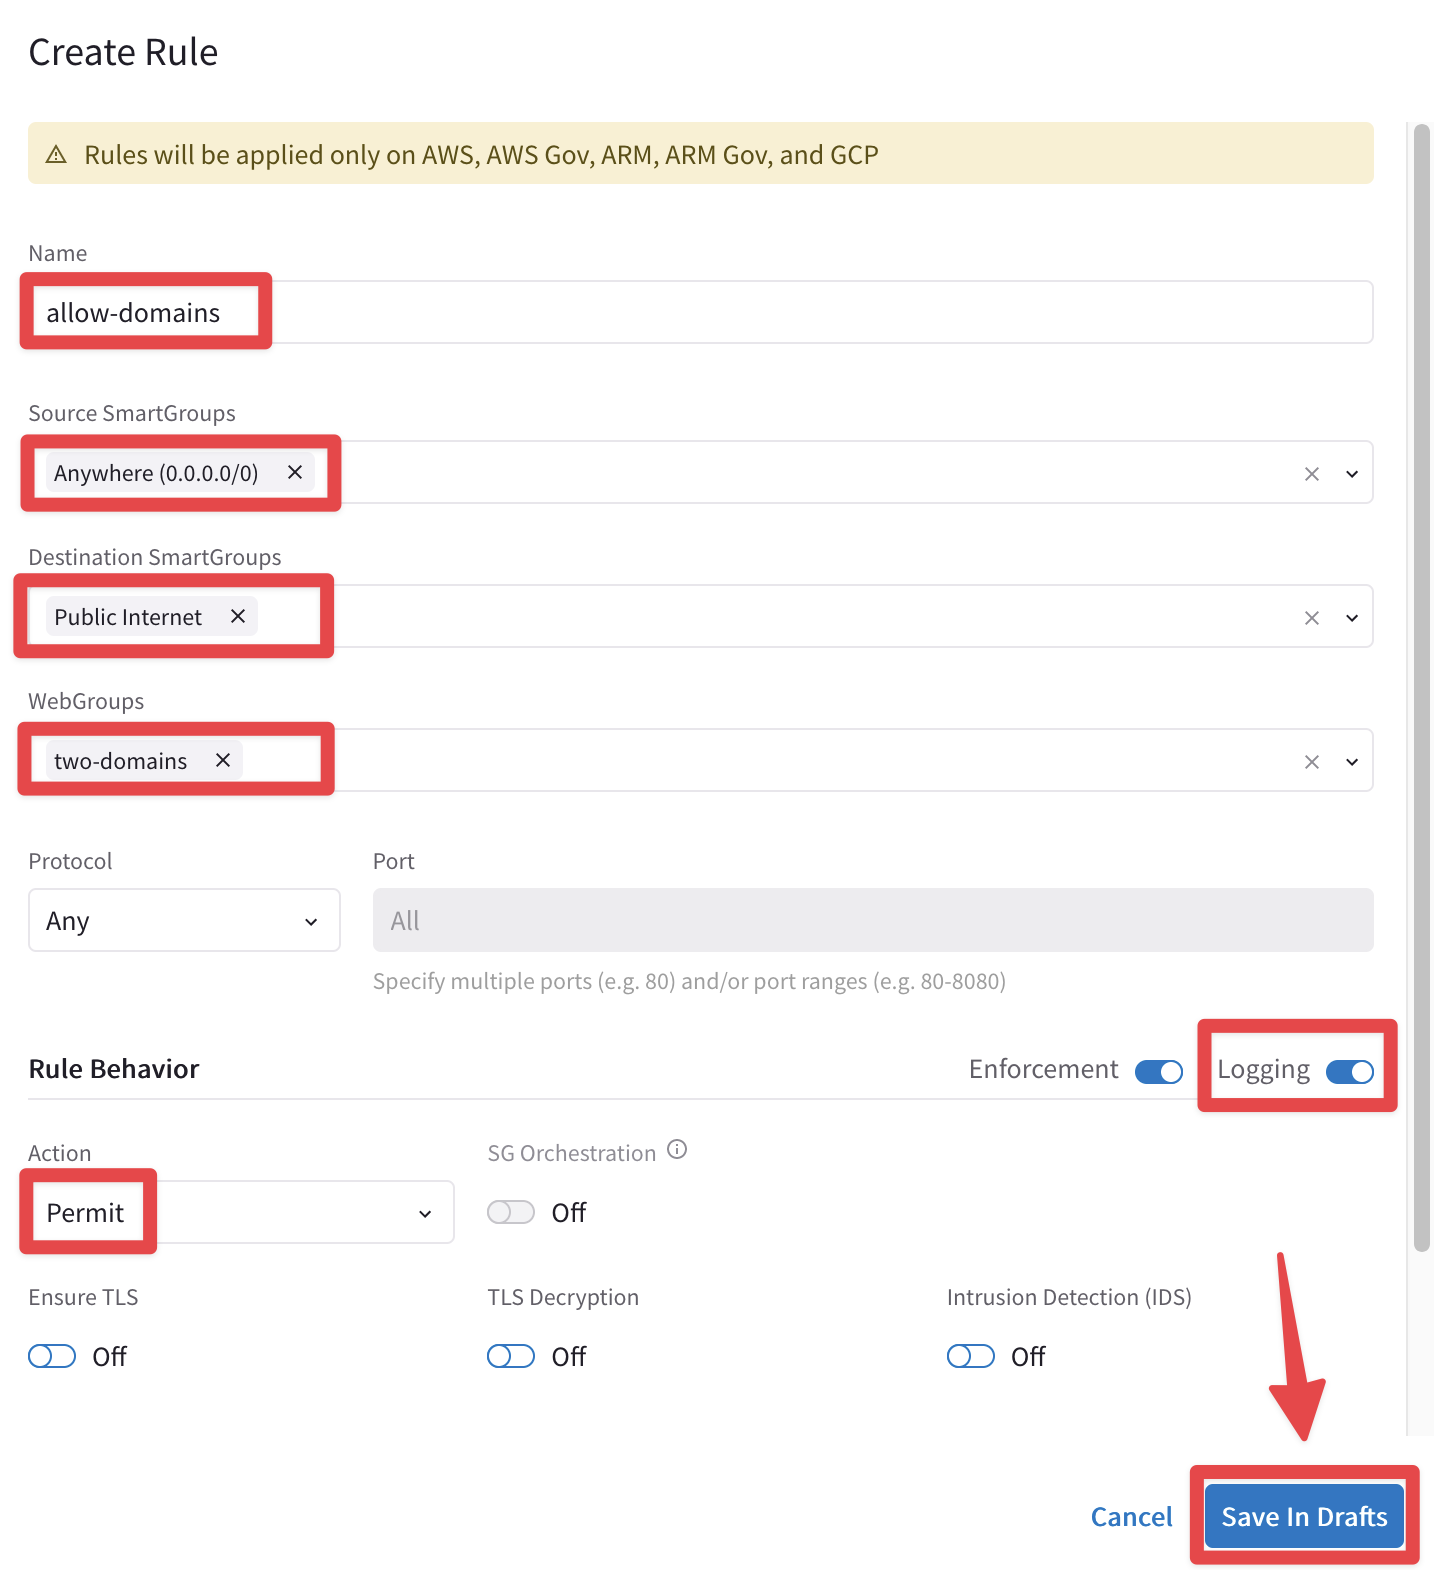
Fig. 169 New Rule#
Important
Anywhere (0.0.0.0/0) = Default Route
Publlic Internet = NON-RFC1918 routes
Before committing, click once again on the "+ Rule" button.

Fig. 170 Before Commit#
Create an Explicit Deny Rule that will allow to see the logs for the "Denied" actions.
Name: Explicit-Deny-Rule
Source Smartgroups: Anywhere(0.0.0.0/0)
Destination Smartgroups: Anywhere(0.0.0.0/0)
Logging: On
Action: Deny
Place Rule: Below
Existing Rule: allow-domains
Do not forget to click on Save In Drafts.
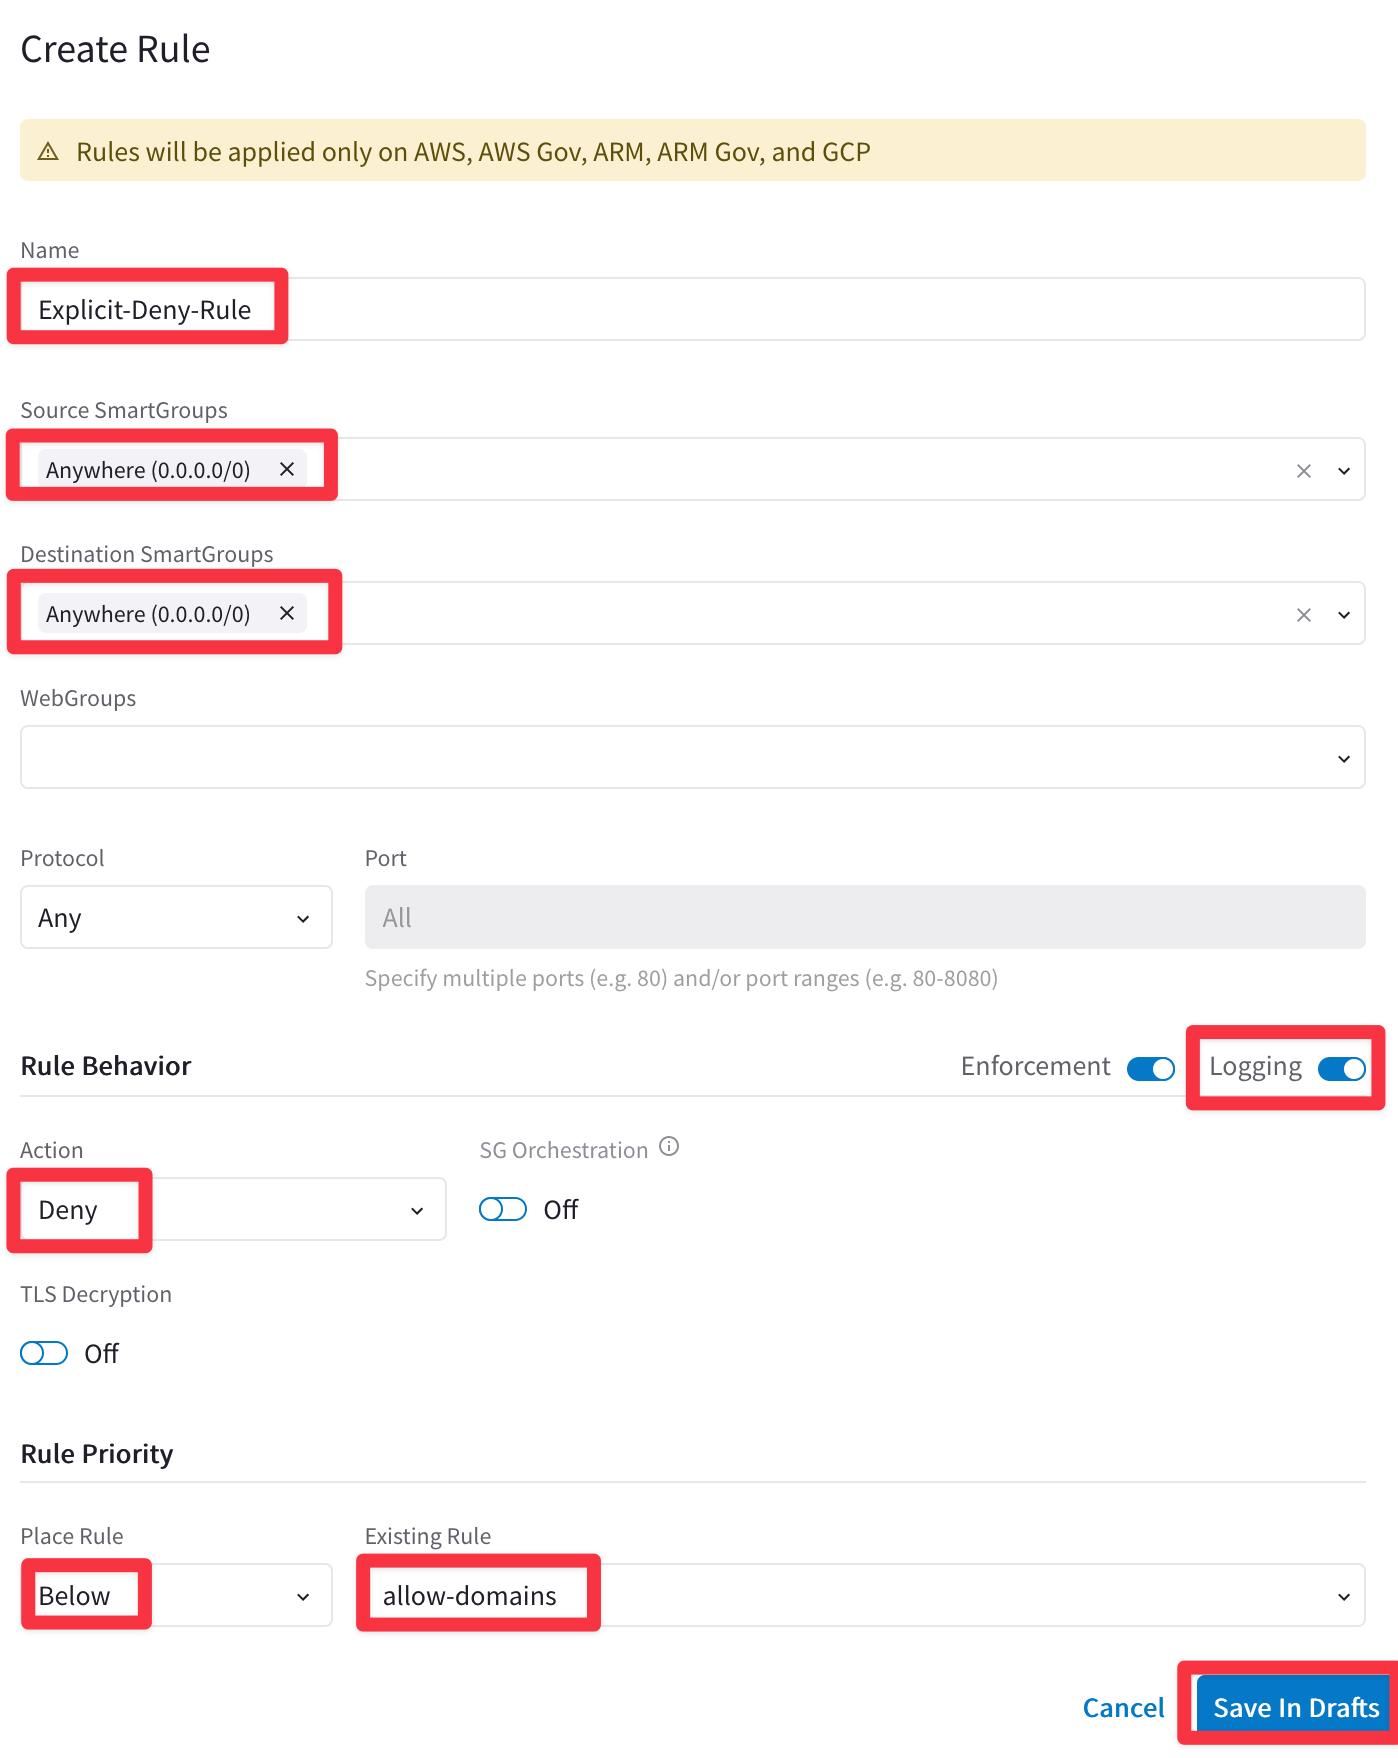
Fig. 171 Explicit-Deny-Rule#
Now you can proceed and click on the
"Commit"button.

Fig. 172 Commit#
Go to CoPilot > Security > Egress > Monitor and select the Live View from the "Time Period" field, then select the aws-us-east-2-spoke1 VPC from the "VPC/VNets" drop-down window.

Fig. 173 Select the VPC#
5.2.2 Test the new rule#
Now launch again the following curl commands from the instance aws-us-east2-spoke1-test2.
curl www.aviatrix.com
curl www.wikipedia.com
curl www.espn.com
curl www.football.com
Only the first two curl commands will be successful.
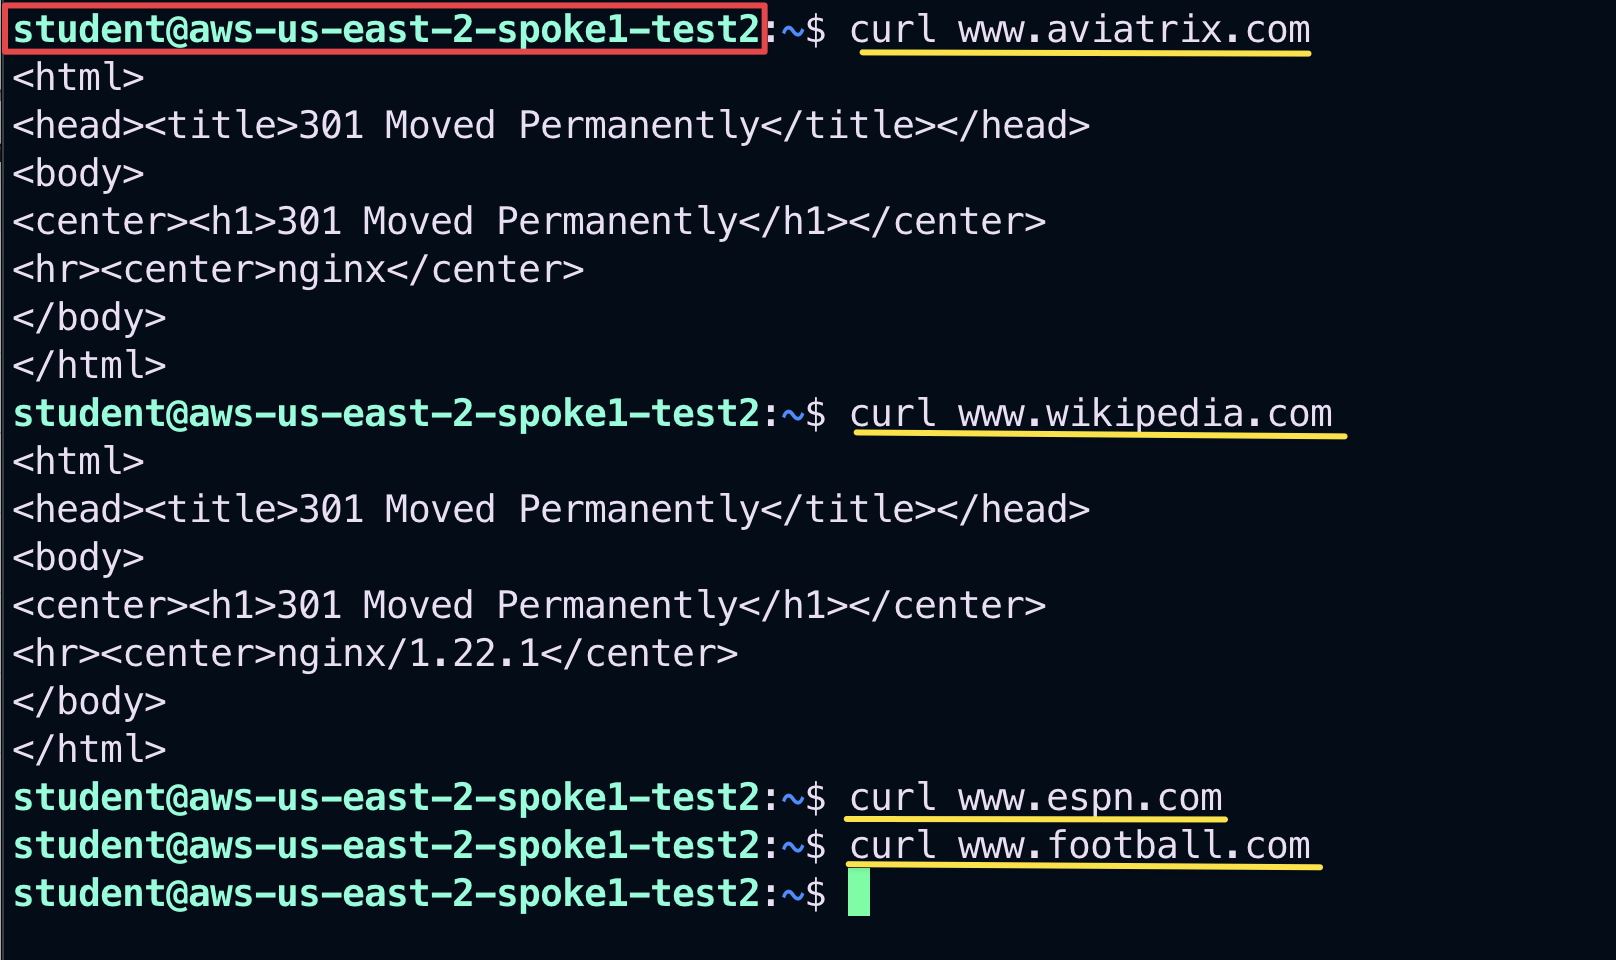
Fig. 174 Curl commands#
go to You will notice almost instanteously that only www.aviatrix.com and www.wikipedia.com are allowed. Traffic towards www.espn.com and www.football.com will match the new "Explicit Deny Rule", therefore it will be denied and immediately dropped.
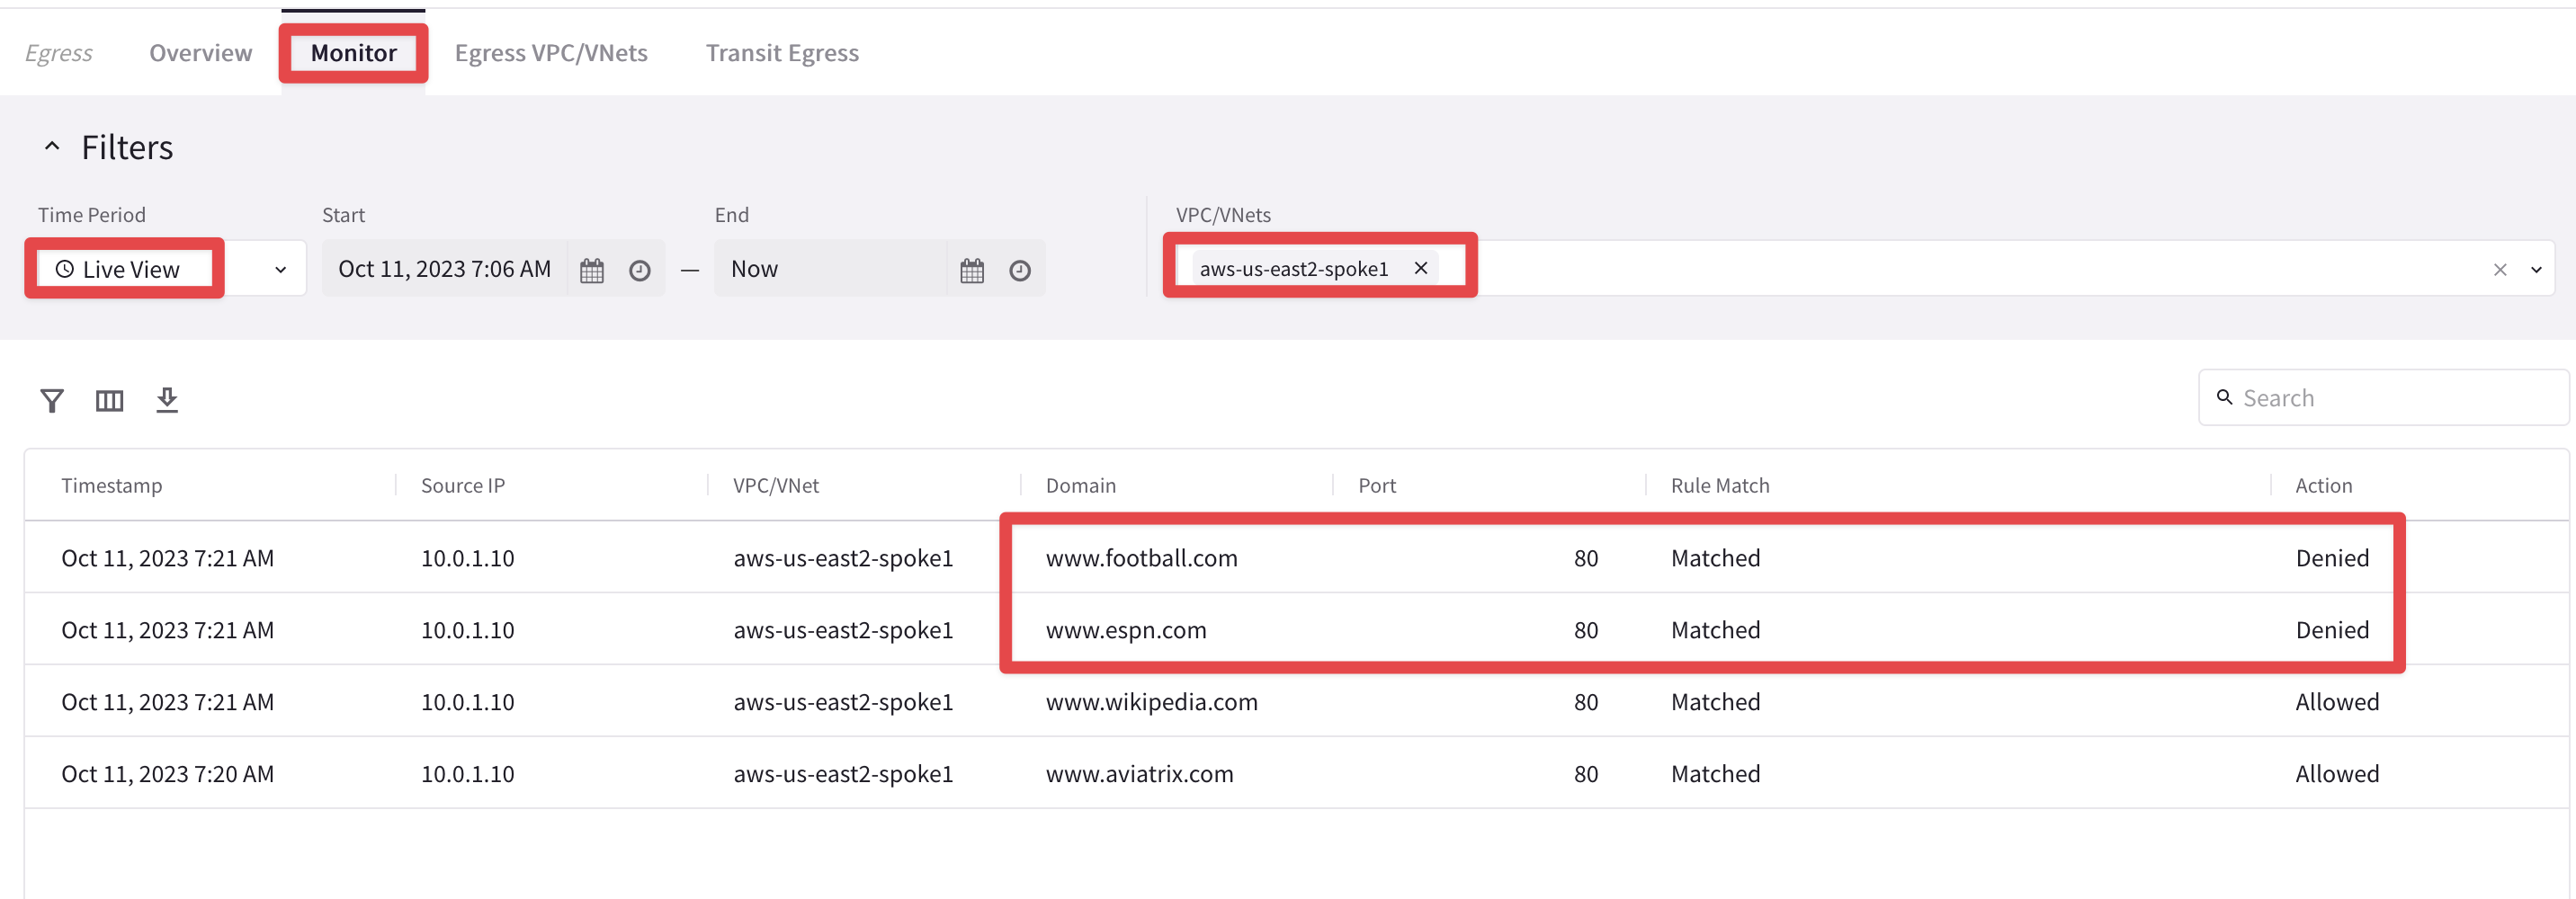
Fig. 175 Denied#
5.3 IDS#
5.3.1 Create a New Rule#
Let’s now test the IDS feature (i.e. Intrusion Detection System).
Go to CoPilot > Security > Distributed Cloud Firewall > Rules and click on the "+ Rule" button.
Create a new DCF Rule with the following parameters:
Name: Inspect-DNS
Source Smartgroups: Anywhere(0.0.0.0/0)
Destination Smartgroups: Public Internet
Protocol: Any
Logging: On
Action: Permit
Intrusion Detection (IDS): On
Do not forget to click on Save In Drafts.
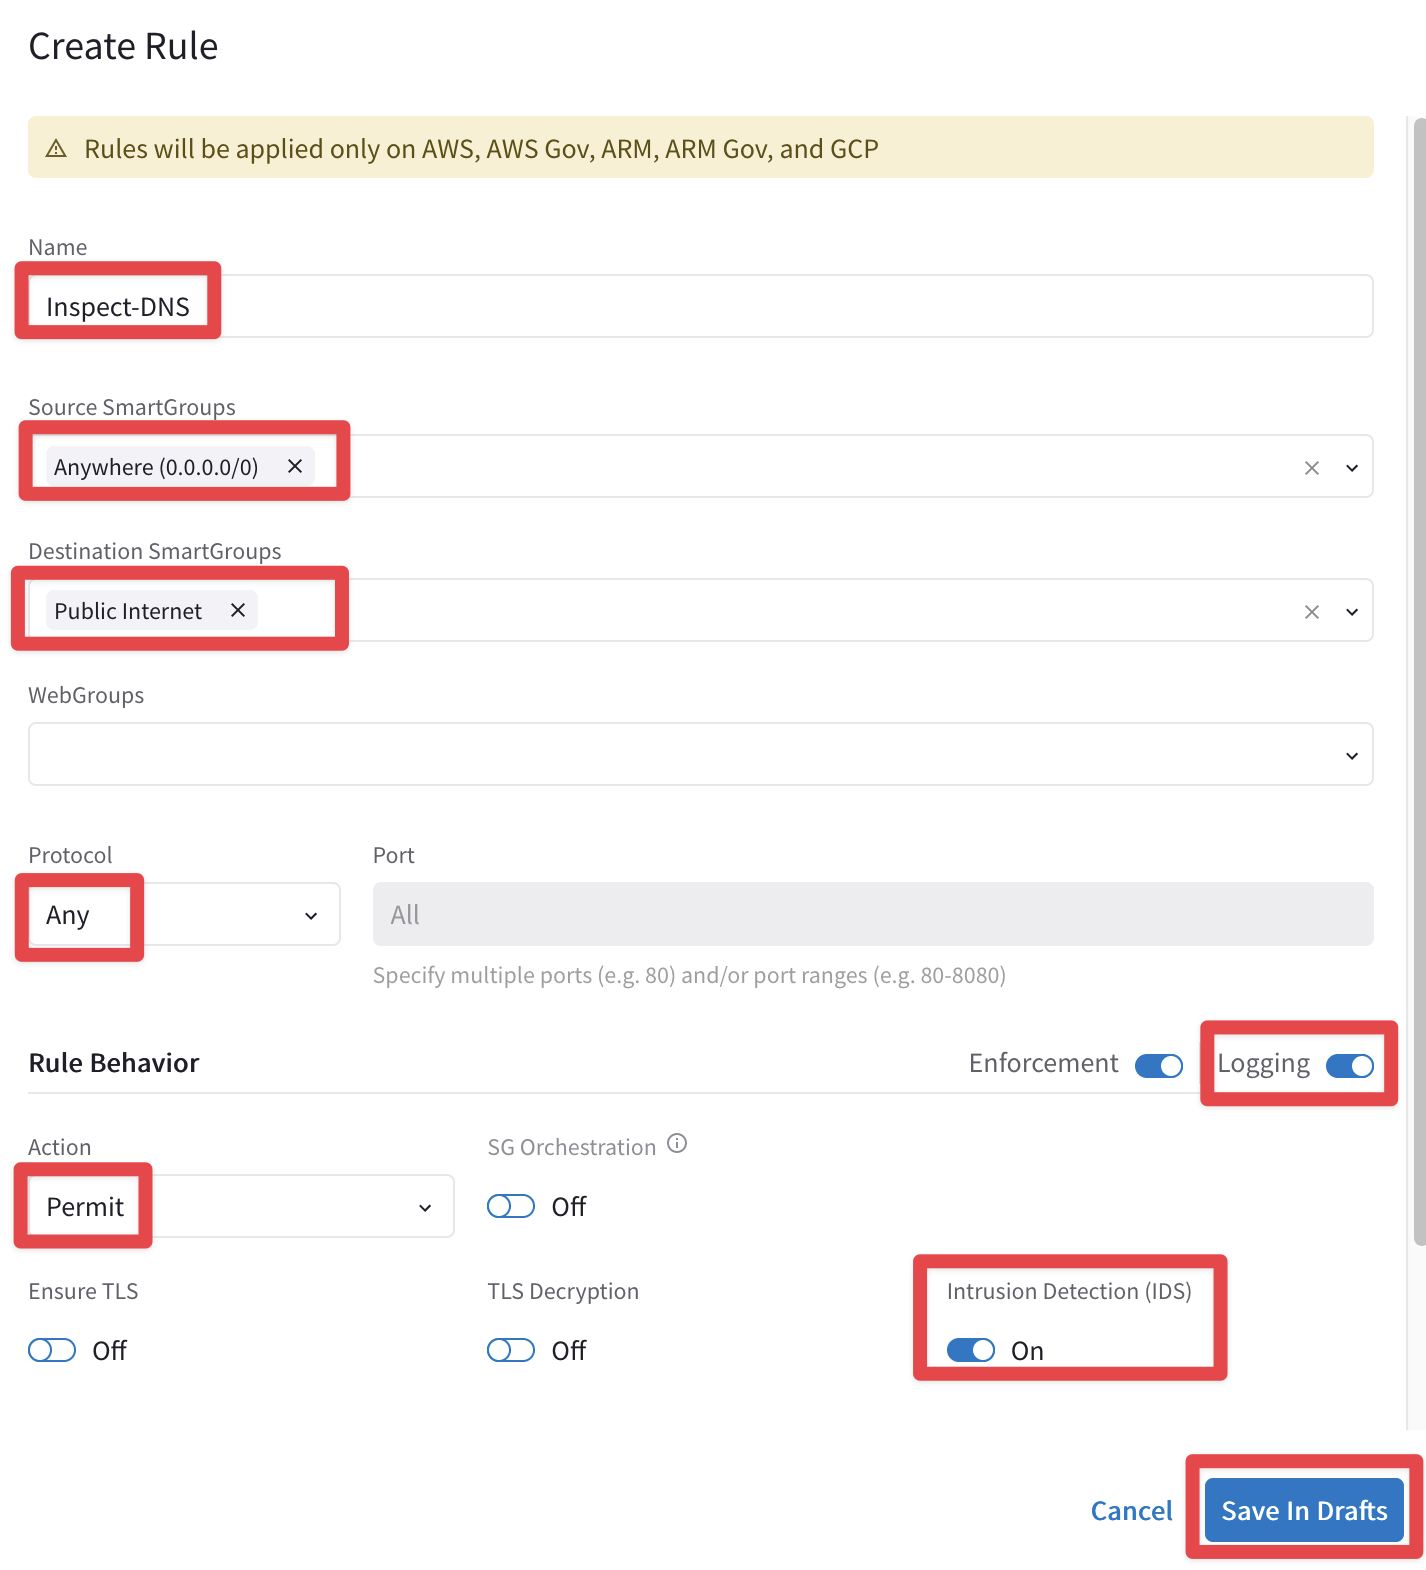
Fig. 176 Inspect-DNS#
Proceed clicking on the Commit button.

Fig. 177 Commit#
5.3.2 Prepare the simulator#
From the aws-us-east-2-spoke1-test2 instance, launch the following two commands.
sudo su -
curl -sSL https://raw.githubusercontent.com/0xtf/testmynids.org/master/tmNIDS -o /tmp/tmNIDS && chmod +x /tmp/tmNIDS && /tmp/tmNIDS

Fig. 179 Commands issued#
The last command will show up a simulator from whom you will be able to launch an attack for testing the "Suricata IDS".
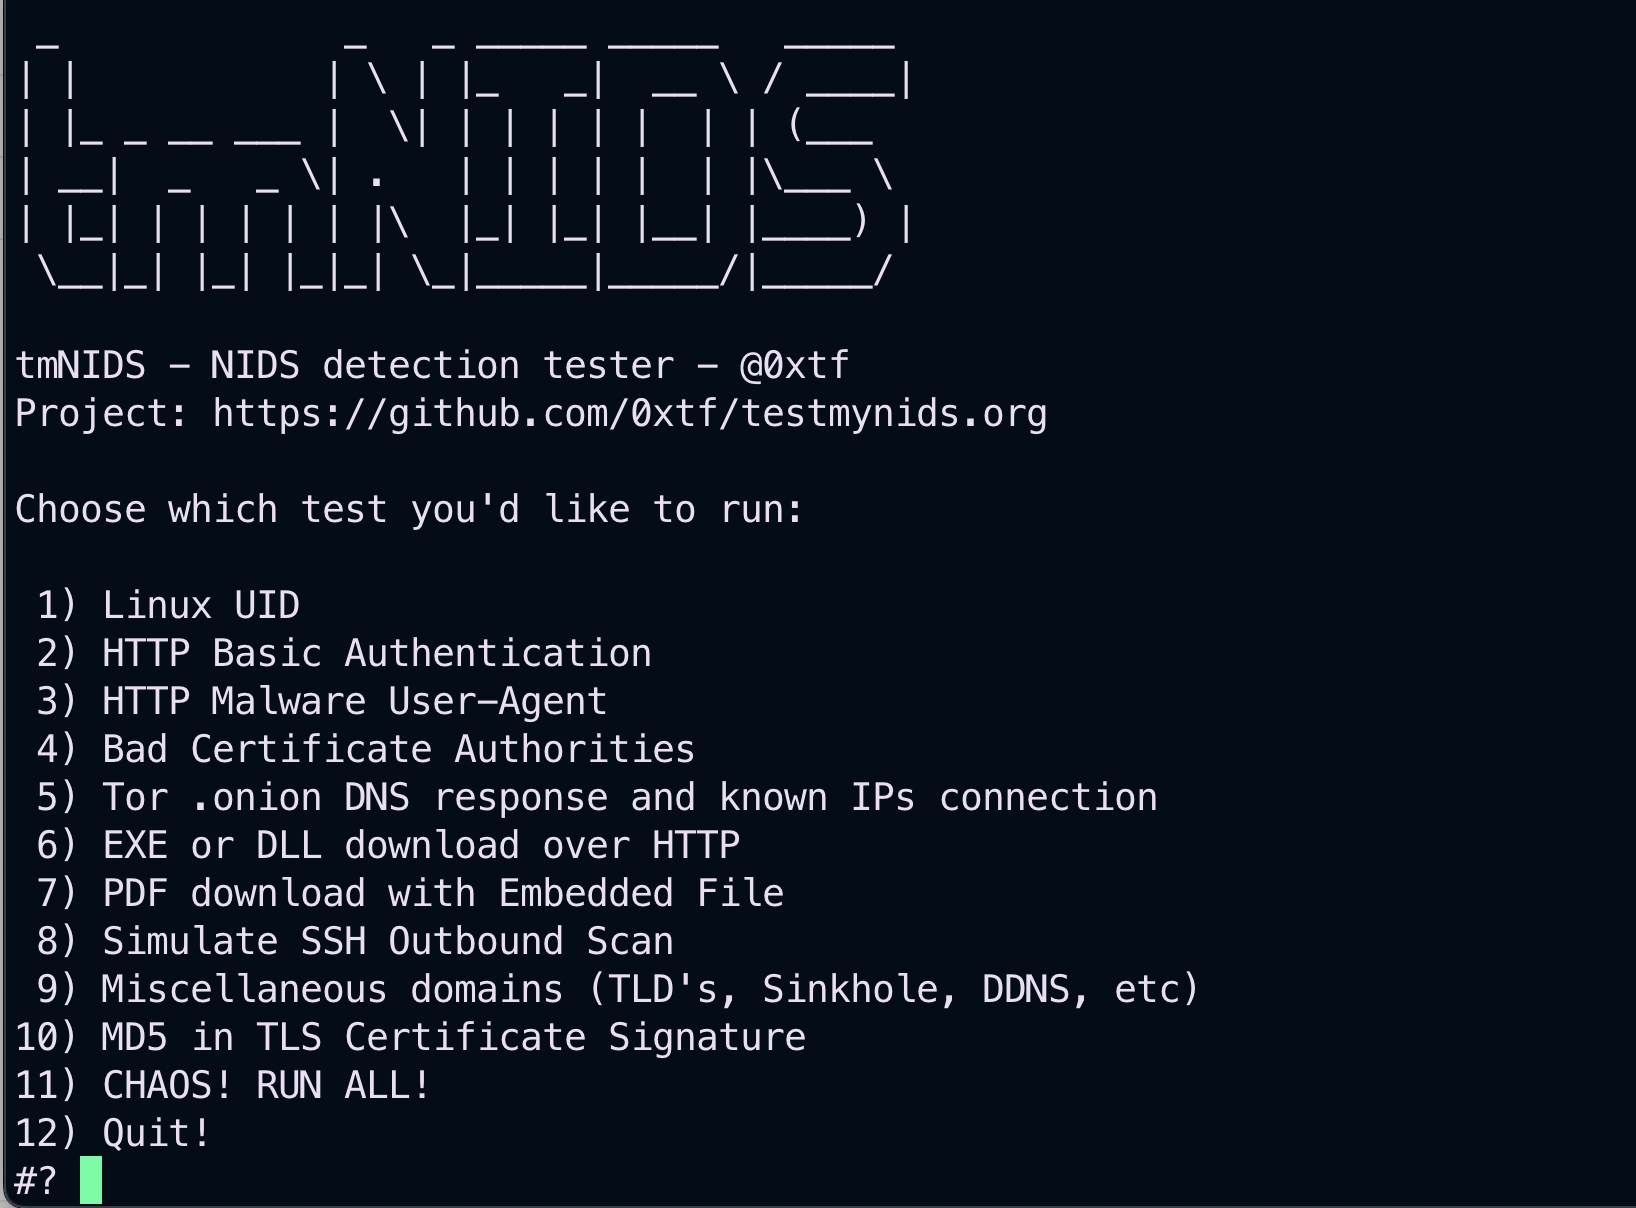
Fig. 180 Simulator#
5.3.2 Test the New Rule and the IDS feature#
Before launching the attack, edit the new DCF rule, clicking on the pencil icon beside the Inspect-DNS rule.

Fig. 181 Edit existing rule#
Insert the following parameters and do not forget to click on Save In Drafts:
Protocol: UDP
Port: 53
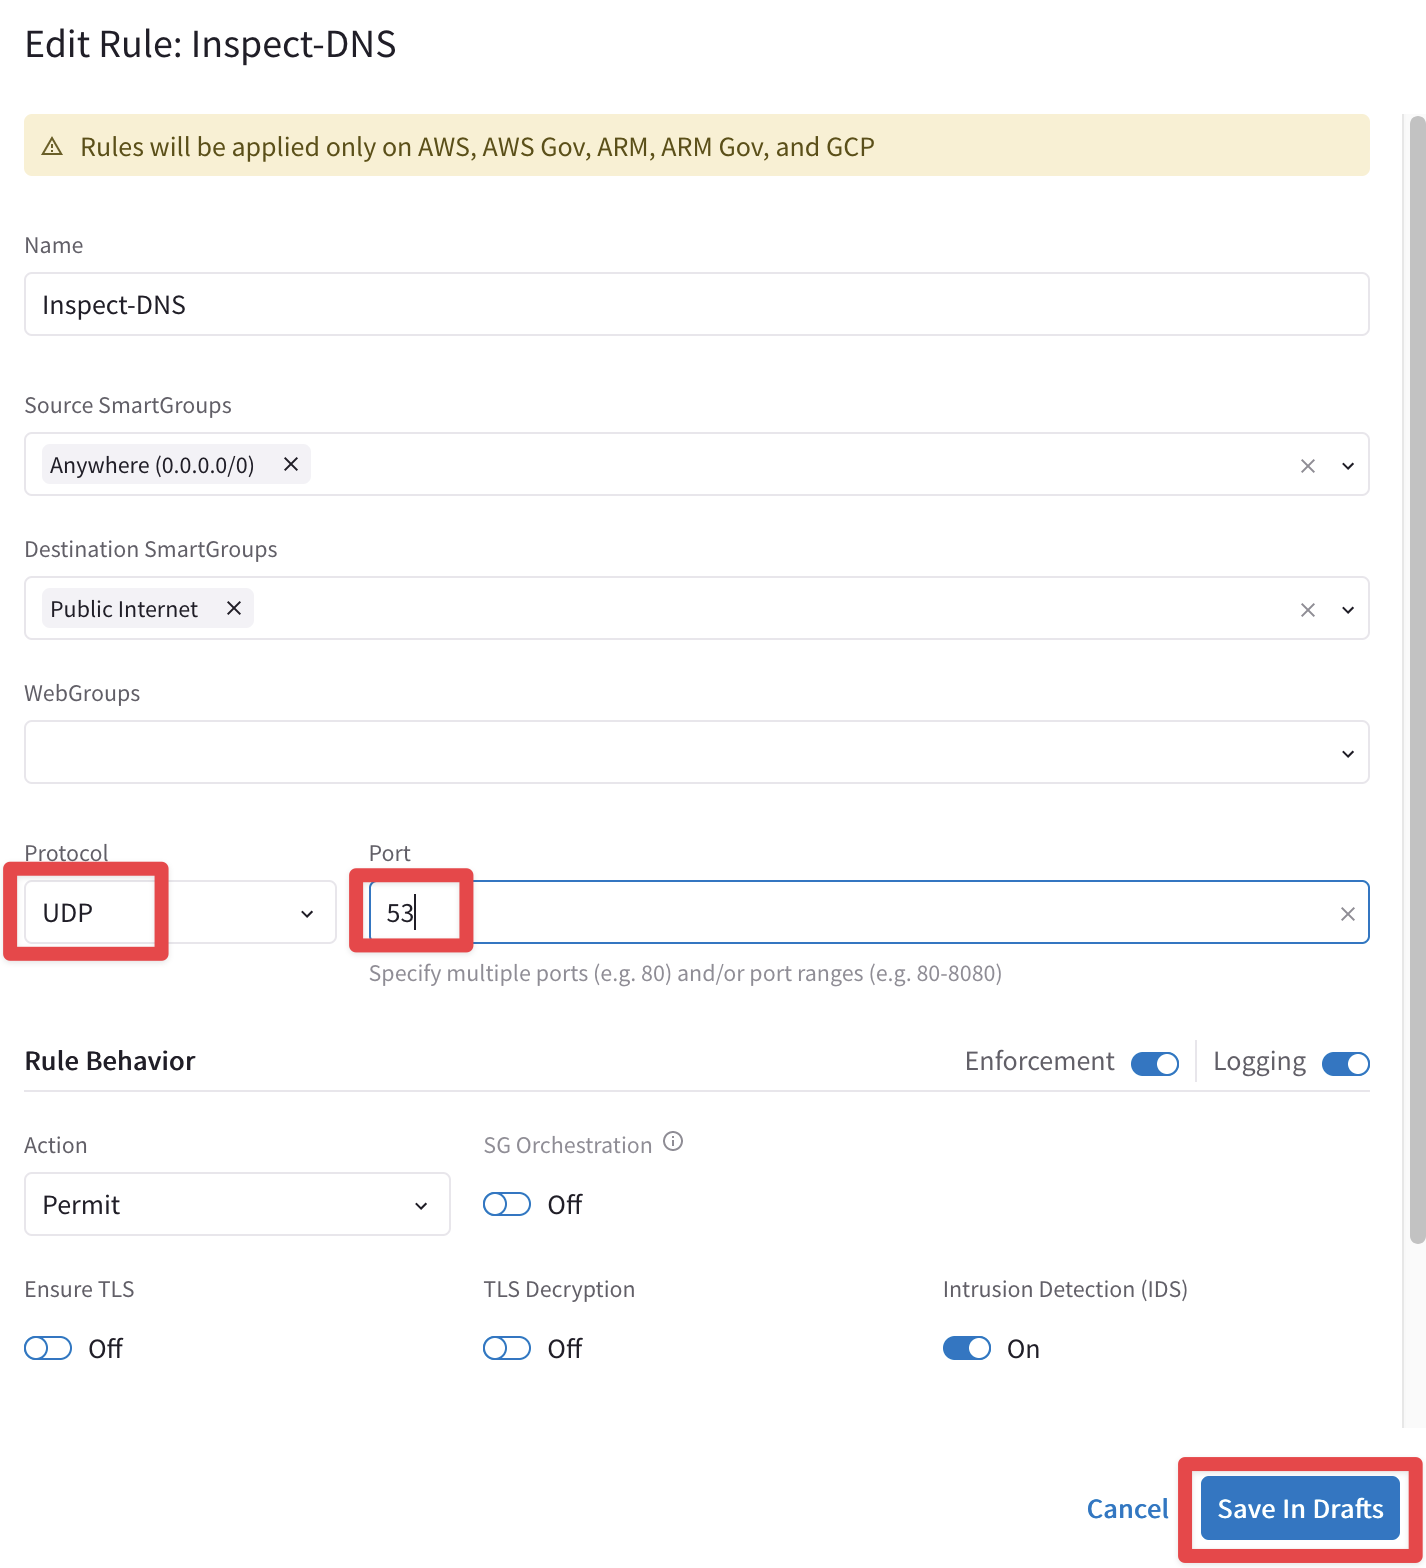
Fig. 182 Modify the rule#
Now click on the Commit button.
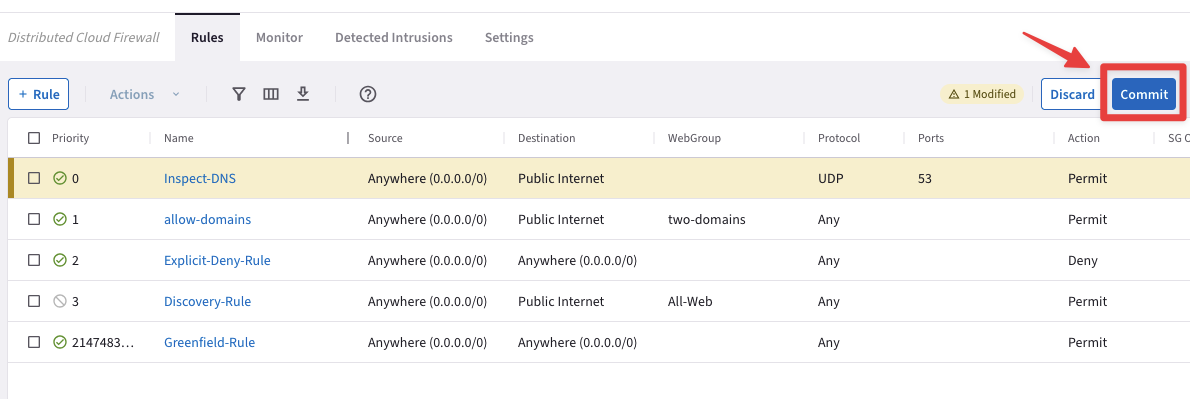
Fig. 183 Commit#
From the EC2 instance aws-us-east-2-spoke1-test2, type 5 and click enter for launching a malicious attack, specifically the attack will try to establish a connection towards a TOR server.
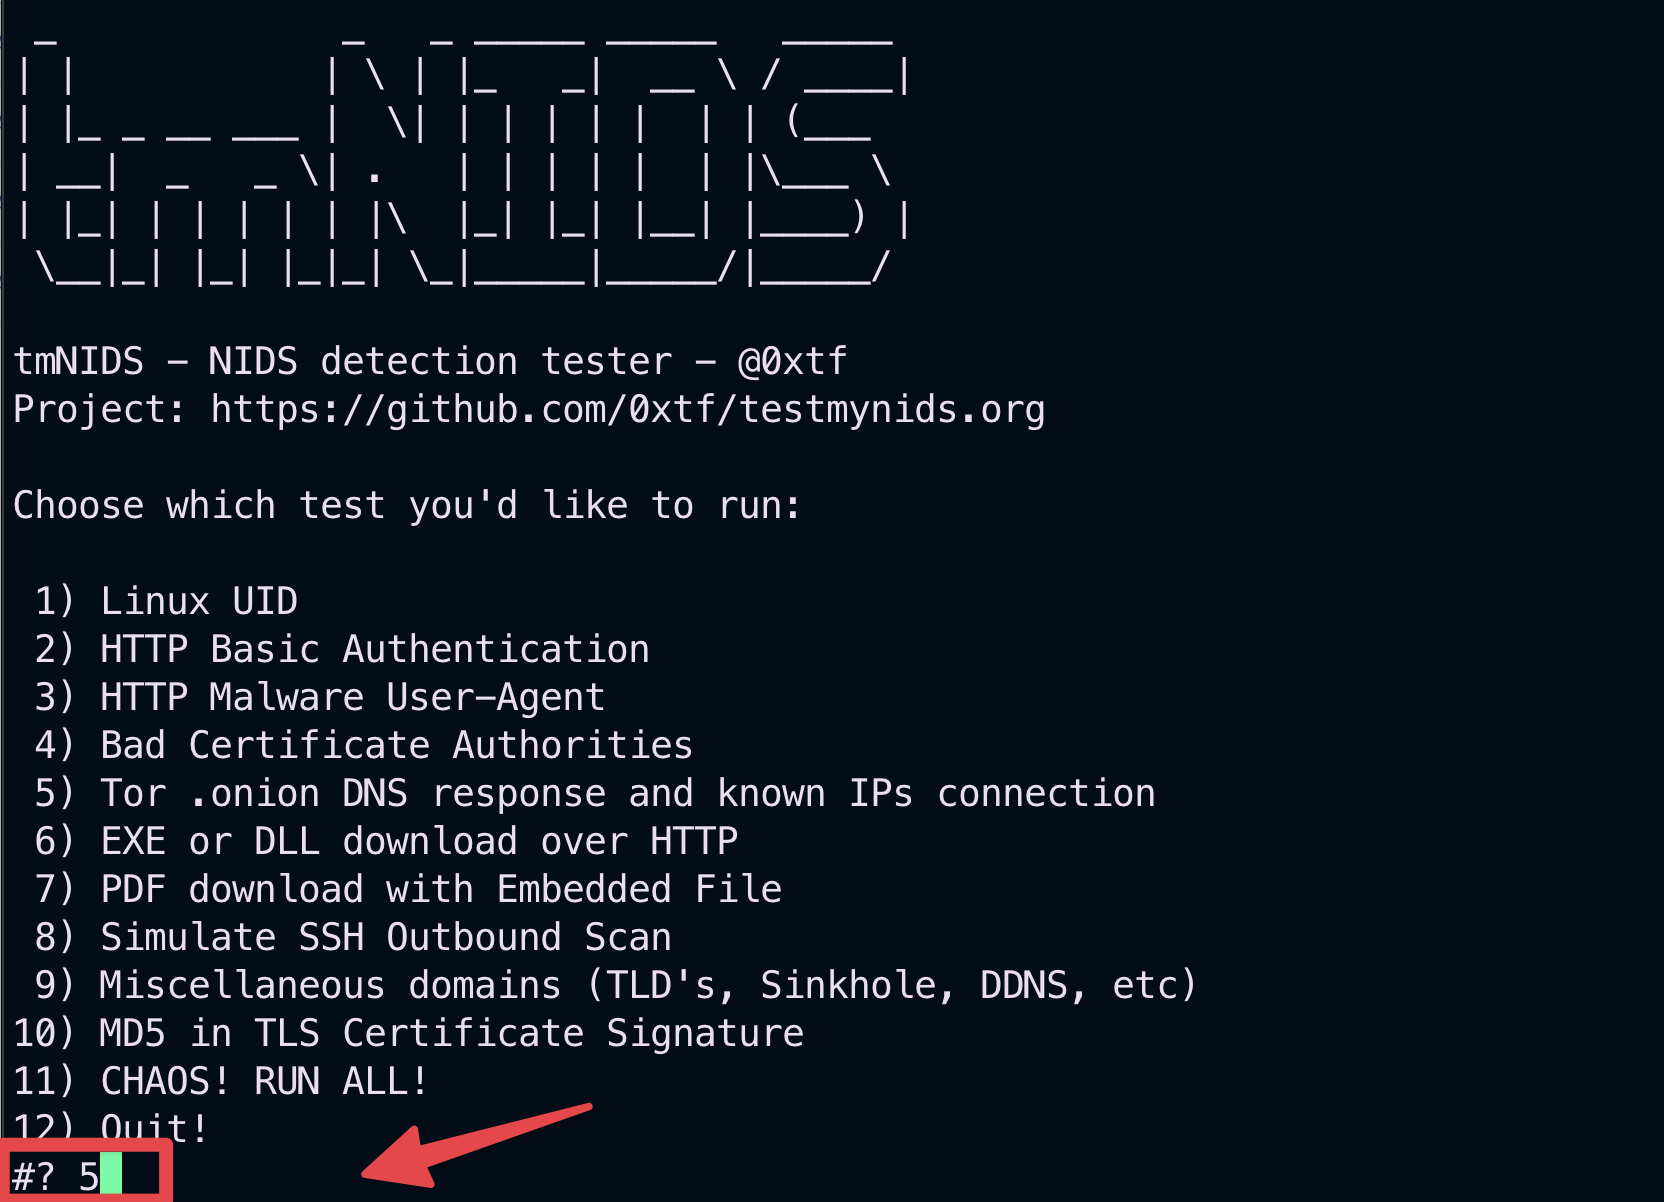
Fig. 184 Malicious known attack#
Now go to CoPilot > Security > Distributed Cloud Firewall > Detected Intrusions, and you will be able to find indicators that detected that attempt to contact a TOR server, through a DNS request.
Tip
If you do not see the logs immediately, click on the refresh button

Fig. 185 Detected Intrusions#
Click on any Timestamps to get additional insight on that specific attack.
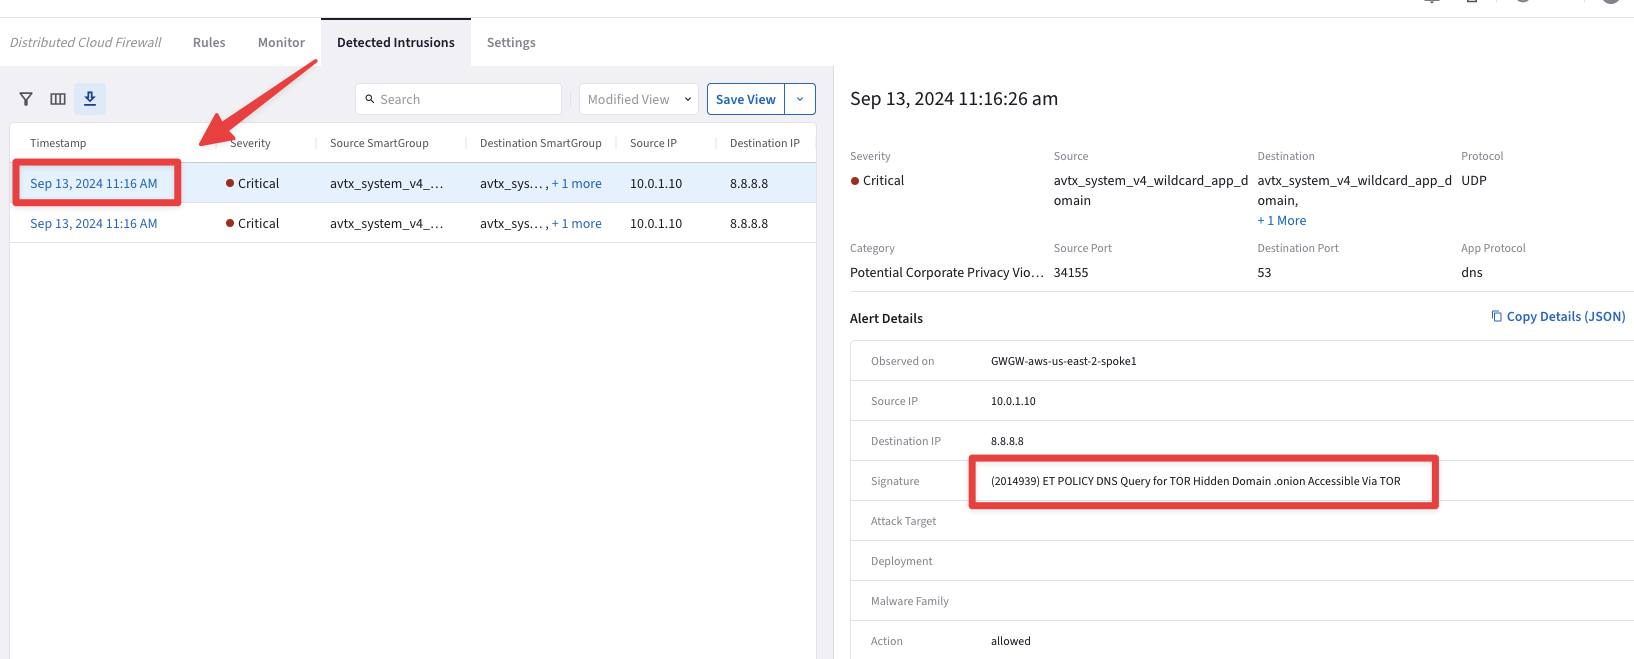
Fig. 186 Additional insights#
Note
The indicator is showing clearly that we tried reaching out to Google DNS and then querying for a TOR domain!
After this lab, this is how the overall topology would look like:
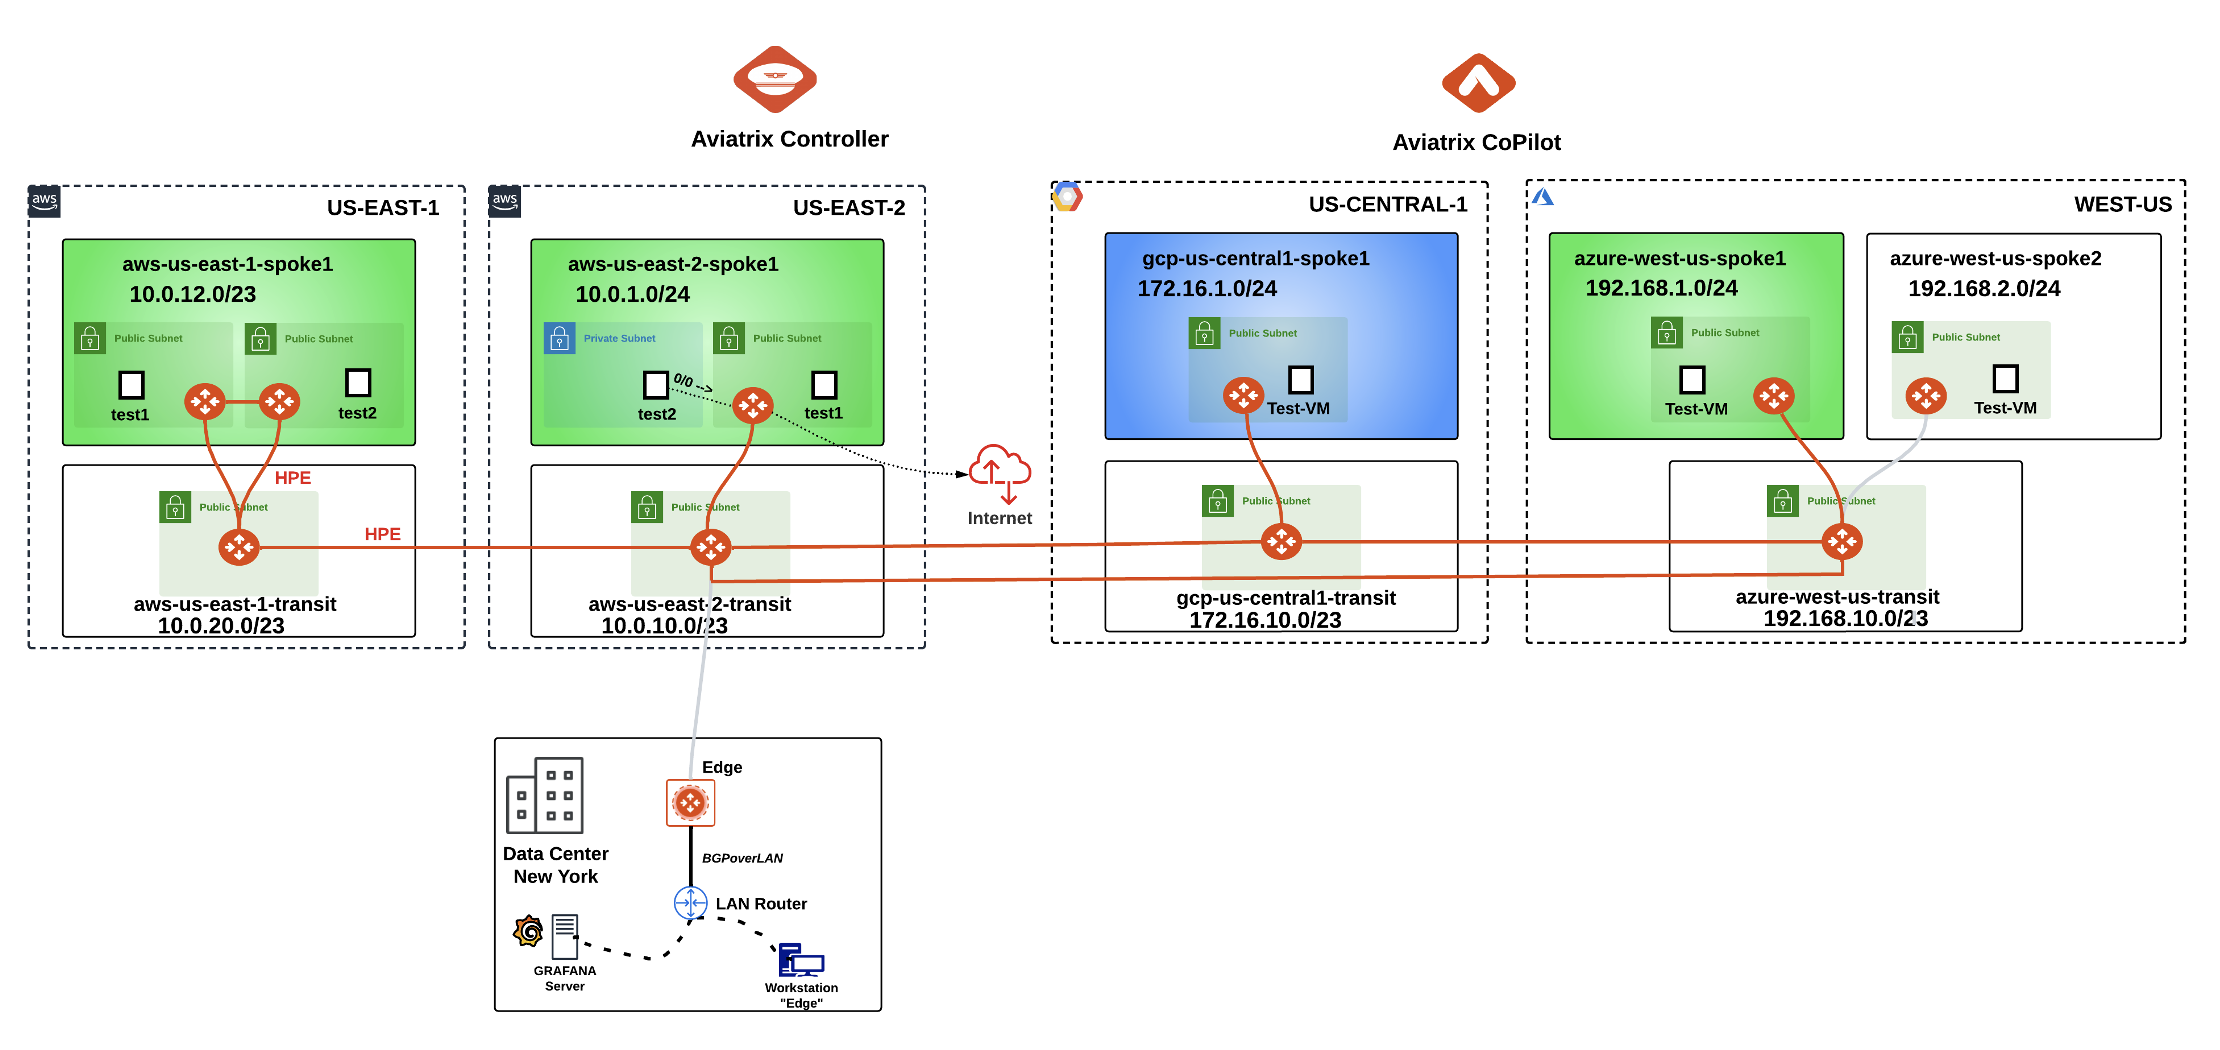
Fig. 187 Final Topology for Lab 5#

